diy solar

diy solar

Ryobi Zero-Turn Mower SLA to LiFePo4 Conversion - (Updated - Build Complete With Pics!)

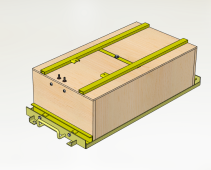
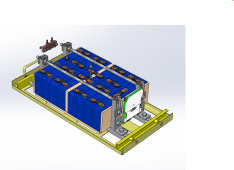
My mower also had been losing mowing time for the past year. I found this thread and it inspired me to go ahead with putting a battery pack together with 16x 100 Ah cells and the overkill bms. I got the batteries from a us stocking warehouse, and the delivery and quality were excellent. The cells matched and top balanced perfectly. The battery cells are joined with foam tape, and the pack is held together with a frame of 13/16" steel strut. I used 1/2" plywood for the box, which, with 2 rows of 160mm cells, fits the width of the tray perfectly. Unfortunately, my mower crapped out before I could wring out the battery, and it's being repaired. Maybe next season.BatteryPackOpaque.pngBatteryPack.png
 
Nice, Jack. That looks great! Those are some serious drawings. I love the power distribution block coming through the box and how you are including the original tie-down clamp.

What happened to your mower?
 
My mower also had been losing mowing time for the past year. I found this thread and it inspired me to go ahead with putting a battery pack together with 16x 100 Ah cells and the overkill bms. I got the batteries from a us stocking warehouse, and the delivery and quality were excellent. The cells matched and top balanced perfectly. The battery cells are joined with foam tape, and the pack is held together with a frame of 13/16" steel strut. I used 1/2" plywood for the box, which, with 2 rows of 160mm cells, fits the width of the tray perfectly. Unfortunately, my mower crapped out before I could wring out the battery, and it's being repaired. Maybe next season.View attachment 73001View attachment 73002
Always amazes me at how talented people are. Are you a design engineer?
 
Nice, Jack. That looks great! Those are some serious drawings. I love the power distribution block coming through the box and how you are including the original tie-down clamp.

What happened to your mower?
The blade controllers, blade motors and the keyswitch all failed. Parts are backordered and are not expected until next year.
 
My mower also had been losing mowing time for the past year. I found this thread and it inspired me to go ahead with putting a battery pack together with 16x 100 Ah cells and the overkill bms. I got the batteries from a us stocking warehouse, and the delivery and quality were excellent. The cells matched and top balanced perfectly. The battery cells are joined with foam tape, and the pack is held together with a frame of 13/16" steel strut. I used 1/2" plywood for the box, which, with 2 rows of 160mm cells, fits the width of the tray perfectly. Unfortunately, my mower crapped out before I could wring out the battery, and it's being repaired. Maybe next season.

Hey @Jack Potredi Great design! Thinking about how I could replicate your build, I have a couple quick questions for you:
  • Is the strut steel secured to the box in any way?
  • Do the strut rods hold the batteries down?
  • Where did you source the strut/rods and hardware?
  • Is the battery box only being held on with the long middle bolt and frame sandwich, or are the struts secured to the bottom frame somehow?

The frame is a stand alone support for the cells, separate from the box. The long rails are secured by the battery tray end clamps. The ends of the plywood box have cutouts to fit around the struts, and the box is just slightly shorter than the struts, so the clamping force from the tray goes only into the struts. The lid has a slot in it to accept the H bracket, which holds everything down.
When I assembled the battery pack, I taped together groups of 4 cells with foam tape. Then I taped groups of 2 together end to end. The cell groups were put on the frame, (after cutting grooves in the center plywood board to accept the thermistors from the bms.) I then clamped the cells firmly together and tightened the frame bolts and threaded rods. The cells are not really being held down by anything other than the foam tape and the compression.
Home depot sells the strut and threaded rod and nuts. A 10 foot section of each is enough for this build.
I got the bms with 24 inch leads, which allows the bms to be at the opposite end from the final battery connections.
 
Hello. New to the forum here and found this thread. 3 summers for my 480e has seen huge losses. I’m going to try the individual agm charging first but definitely have some money to burn on a lithium upgrade. I’m wondering, for those that have working models now, could you all post your BOMs? Several posts seems to indicate you might have tried this or that and it would be helpful to know exactly what parts you ended up putting into your machines. Part number or description or links to exact purchase would be awesome. Thanks for all of your work in this thread
 
So the charger does seem to work and I've added a wifi switch. However, I still disconnect it because the batteries seem to keep the charger powered up. There is also arcing that occurs when connecting the charger... not cool.

I found a better charger from AIMS, but it's pricey at $275-$300 so I haven't purchased it yet. Here's a spec sheet: https://www.aimscorp.net/documents/CON120AC3648VDC.pdf

Out of the box it seems to have the voltages that I would like with proper lower voltage float so this could remain connected 24/7 as long as your BMS has low temp cutoff(which mine does not have).

Current connected sell them here: https://www.currentconnected.com/product/aims-con/
@rio Did anyone go for this charger? Looking at the manual it does have a current adjustment knob 20-100% to avoid overloading the 14 AWG wiring.

I've been trying to figure out the best way to charge this guy for longevity. I just ordered 16 of the CALB 100 Ah cells. Planning to use the Overkill BMS to build this battery and to install a shunt monitor as well. I'd prefer to keep charger costs low, but I'm willing to spend maybe $300 to protect the investment if it is foolproof. Since I'm a novice when it comes to battery charging I'll summarize my thoughts and see if you guys find any flawed logic.
  • I will be using it weekly during the mowing season, then none at all for 4-5 months. I expect to use maybe 40-50% of the battery DOD on a single mow of my 1 acre very hilly lot. It will be kept in a heated shed over the winter.
  • It would be ideal to have a plug-it-in-and-forget-about-it setup, at least during the mowing season, and I don't mind some special winterization method once a year.
  • Leaving this battery at 100% will effect longevity, especially if left on a float charger that keeps it that way for long periods of time.
  • These batteries tend to lose charge unplugged over time, 3-10%/month would be expected. Does the shunt monitor trickle much charge?
  • Compared to AGM batteries, voltage does not correlate well to SOC because of LiFePo4's much flatter voltage profile.
  • It would be ideal to have a charger that has parameters to allow the battery to be charged to no higher than 80%, so my cycle would be 80→40→80→40 rather than 100→60→100→60.
I read that some plan to program their BMS to stop accepting charge at a certain voltage to attain a lower top-end charge but this isn't considered the ideal approach from the BMS manufacturer. Even given the flat voltage curve of these batteries, would a lower charge and float voltage from the charger itself allow this lower top-end SOC? Given that it's not great to keep the battery at a high SOC I'd considered using a simple outlet timer to prevent overcharging, but this introduces too many variables to be reliable (what if I don't mow the entire yard, how will ambient temp effect charge rate etc).

I do understand that most would just buy the lithium charger with the appropriate voltage and just leave it plugged in, but everyone here modding their mowers has already been burned at least once with failing batteries and promises unkept. I'm using up my spouse points to resuscitate this mower, and I want to do it right. Is there a simple solution to maximize battery life?
 
you have a week to recharge, and use it in the summer. How about PV panel(s) and an SCC? Set voltage high enough for BMS balancer to work, low enough to not charge battery too high.
 
you have a week to recharge, and use it in the summer. How about PV panel(s) and an SCC? Set voltage high enough for BMS balancer to work, low enough to not charge battery too high.
My shed is in shade for 90% of the day, so I'm not sure if that's a viable solution.
 
If 2 hours good sun around noon, might still be. Otherwise, if panels could be mounted remotely.

Small SCC can be modestly priced, and if they have adjustable voltage could avoid over charge. Possibly could be fed from AC source.

AC chargers, would need to be able to set suitable voltage. Possibly a couple diode drops in series could reduce voltage to what you want. Diode may allow charge to continue slowly to higher voltage, would have to evaluate whether that is an issue. Spring-wound timer on AC side would stop the charging. Diode would also prevent battery from powering anything in charger (but might prevent smart charger from recognizing and evaluating battery.)

People get CV/CC bench supplies to top-balance cells. One that goes high enough could charge the 48V battery. But need to be able to lock CV setting against accidental adjustment (digitally programmed would avoid issue of bumping analog knob). Also, if desired profile is to charge to a "boost" voltage then float, bench supply alone wouldn't do that. Timer might take care of it.
 
Has anyone thought about not using the bus bars, instead using large gage wires with crimp ring connectors? I know this is almost blasphemy in this forum, but many here are building batteries to sit in their basement, while we have the extra mechanical stress of hitting bumps and holes in an unsuspended vehicle. I plan to lock down by batteries, but having some mobility between cells may prevent future sadness. Thoughts?
 
Ooh, just found this charger. Check out the data sheet, it's programmable via a serial cable to set Vcharge, Vfloat, and current as needed. It says potentiometer (or via PMBus Protocol on serial connection) for voltage. Current adjustable as well, but it might just only be via PMBus Protocol.


It seems like a Cadillac of customizability. $354 here:


Would be sweet to be able to adjust the output manually with the pot, and would be absolutely necessary for the high default current (27A) using the Ryobi-provided cable. The PMBus protocol via the CN500 connector seems somewhat obscure. I did find this inexpensive PMBus USB adapter, but the pinout doesn't match up in number or function:

 
To which set of wires are you referring can’t handle the load and now many amps is the included lead acid charger putting out?
 
Nice find on that charger! And also nice find on the current adjustability of the AIMS. This makes the AIMS very appealing.

I'm tempted to just stick to the Delta charger for now. It seems to me that the main differences between SLA and LiFEPo chargers have to do mostly with what happens at the upper voltage limit (absorption, float, etc), after the charger switches from CC to CV. But if we only want to charge to 90%, then we should still be in CC mode, which will be the same regardless of the type of charger. I think disconnecting the charger either with a timer or via BMS overvoltage protection (or both for extra piece of mind) should be fine, especially given the low cycles in our application (and the fact that we're charging only at ~0.15C). I'm going to look more into this because I could be way wrong.

More on the topic of not relying on the BMS for cutting off: How would this be any different if I bought a fancy "smart" LiFEPO charger? Such a charger would not know if an individual cell goes out of balance and hits 3.65V well before the other ones. If this is the case (which is not unlikely), then the BMS would have to step in every single time. Even if I can adjust the total charge voltage down, nothing would guarantee that a single cell would not hit 3.65V before the whole pack reaches the charge voltage. Obviously that's what the BMS is for. Therefore, I think of "overvoltage protection" as a needed routine feature, rather than as "uh oh, something went wrong". Again, I'm just thinking out loud here; there is obviously a lot that I don't know about this topic.
These are all good points. Have you been able to find out what the charge and float voltage is for the Delta charger? If you let your battery charge up for ~12 hours, at what voltage do the cells top out?
 
These are all good points. Have you been able to find out what the charge and float voltage is for the Delta charger? If you let your battery charge up for ~12 hours, at what voltage do the cells top out?
I have not. It might be a good idea to reach out to them about this. @AMDPower, do you have a contact point for them? I recall you had some communication with them in the past.
 
My wife has given me grief re: the pricing here, but she'd rather not pay $800 every 2 years for environmentally unfriendly lead boxes either.

Realize these batteries can also be used to run an inverter when the power is out. All you would need to buy is a 48V inverter. Imagine your neighbors faces when the power is out and you go get the lawn mower! :)
 
In that case buy yourself an inverter/charger, one with a decent Lithium profile.

Me? I would use Sunny Island and REC BMS, but that might cost more than your lawnmower :)
There is probably a reasonably budget-friendly one. MPP?

To make it easy and safe, drive the mower over to your breaker panel and plug inverter output into an interlocked generator input.
There isn't a great way to do it from your remote shed. One guy thought he could switch inverter input & output onto the AC feed back to house and main panel, but that's like a suicide cord and no disconnect from grid.
 
Realize these batteries can also be used to run an inverter when the power is out. All you would need to buy is a 48V inverter. Imagine your neighbors faces when the power is out and you go get the lawn mower! :)
This is exactly what I do with mine. I just have a small 1500 watt Aims one but it is enough to power the fridge and some lights. We don't have many outages where I live so I didn't want to spend a ton of money.
 
Hello all, I have a Ryobi Zero Turn 100 Ah and I know the lead-acid batteries won't last much and looking on what I'll use next. I really want Lithium but I'd rather have a smaller one that I can bring inside for the winter.

I'm getting a Sur-ron with a 60V battery 32 Ah so I could possibly use it. I'm curious if the controller will accept 60V as it's already OK with 52V with the current lead-acid batteries or I really need a DC-DC converter with at least 3000 Watts.
 
I'm curious if the controller will accept 60V as it's already OK with 52V with the current lead-acid batteries or I really need a DC-DC converter with at least 3000 Watts.
60 volts or so seems to be an inflection point for some electronic components before the next level. There is really no way to know without knowing the specs of the components. Perhaps Ryobi might know. My inverter manufacturer is real clear that 64 volts is the absolute battery maximum. Is the battery you are buying 60 volts nominal? At a full charge could it be even more?
 

diy solar

diy solar
Back
Top