Nice install! Could you share more about the IronRidge configuration? Are they mounted to the RV roof with adhesive or bolted down?
Of course, I'll eventually do a full write up when it's all complete but I did both screwed down and adhesive, although the adhesive was more of a added bonus and but not necessarily a requirement. Better safe than sorry haha.
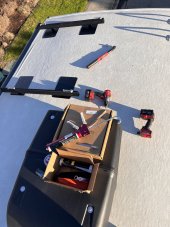
I used SS 5/16" wood screws, 1 1/4" in length. MOST people, from my research, use a #10 or #12 screw. The main reason I used a 5/16" screw was due to the fact that is what comes with the L feet kits and fits the hole well. The included screws are a few inches long which is way too long for my application (meant for residential roofs) so I just purchased shorter lengths.
for the adhesive I used AFCAT 945. This is basically a stronger more permanent version to the popular Dicor most use for RV roof sealants. I use Dicor on most roof applications but for this I figured I'd take something a tad stronger for the extra safety factor.
On a residential install, the flat black plates are used to fit under shingles to help shed water, they aren't meant as a structural interface. I simply used it as extra support by applying the AFCAT adhesive on the bottom of the plate.
")
The L feet is where it is bolted down though. The L feet will sit flat on the roof at whatever curvature it is at, then the cross bar mounts to those and creates the flat surface for the panels. It's a pretty slick setup and fairly priced as well. I ordered 4, 11' sticks of the crossbars (XR 100 rails) then cut to length to fit my panels. They have a flush mounting solution too or a clean look...not that anyone will ever be looking at it but me haha.


Any idea how to configure the 2S2P? Looks like the right side facing south would get the best output.
I have something similar on the roof with 1300 watts of panels, and in the shortest days of the year with the low angle of sun, output peaked at 600 watts. I have two air conditioners that can shade the panels. In the summer, he output will be much higher, but I since I just installed, I don’t have the data yet.
Any thoughts on a 4P configuration? Might be better for shading like I’m experiencing. 4P might not be doable if this is a 24 volt battery.
I went back and forth on Series vs Parallel, and honestly the main reason I went with this wiring layout was simply because it was somewhat the best of both worlds AND it worked with with my single controller, and I didn't want two MPPT's
Right now I have no tilt functionality, but it is something I want to implement in the future. I really wanted the tilt function now but haven't settled on how I want to do it yet, I kinda want to build my own auto tilt function with a remote.
Here is a snippet from my wiring diagram that shows how my panels will be wired. Also, not added/shown in my diagram yet but I have two solar 20a fuses that will be on each of the red/positive leads before it gets to the 2->1 branch connector.
I'm running a 12v system, someday I'd like to convert to a 24v setup but I'm using the new Victron Multiplus II which isn't available as a 24v option, so 12v it is. But does make it easier since most of the RV is 12v.