I have an epever 6420 AN mpppt charge controller. I recently purchased new EVE 3.6v 280ah cells ( or at least the chinese guy said they were new). I was wondering how to top balance the 16 cells. I get that I need to put them in parallel and charge to full charge. My issue is that the only charger I have is the mppt charger and solar panels. Can I use this charger to top balance or is it going to fry my batteries?


You are using an out of date browser. It may not display this or other websites correctly.
You should upgrade or use an alternative browser.
You should upgrade or use an alternative browser.
Top balance 3.6v cells with mppt
- Thread starter Dunkirk
- Start date
This will not work, your cells in parallel are 3.2V, your solar charge controller will output something other than that (12/24/48v). If you are going to top balance, you need a charge source that can charge the cells in parallel (up to about 3.65V)
I bought a 20A buck converter, tied that to a 24V battery, and fed the battery with my solar panels.
The battery supplied steady voltage to the buck converter, and the buck converter supplied a steady 3.6V to the pack.
I set the amps around 10 to keep from overheating the converter. Even with a fan, anything over 10A and it got very hot.
The battery supplied steady voltage to the buck converter, and the buck converter supplied a steady 3.6V to the pack.
I set the amps around 10 to keep from overheating the converter. Even with a fan, anything over 10A and it got very hot.
Thanks. You confirmed my fears.This will not work, your cells in parallel are 3.2V, your solar charge controller will output something other than that (12/24/48v). If you are going to top balance, you need a charge source that can charge the cells in parallel (up to about 3.65V)
I recently build my first pack and I spend over a week on top balancing. I suggest you use the BMS and solar charge controller to charge the batteries in series with the BMS in place, till one of them reaches 3.5V, then have the BMS stop the charge, leave it to settle for an hour or so and reconnect them in parallel. (if any cells are too low, you will first have to charge them individually to bring them close to the others)
I bought a 10Amp bench top power supply from Amazon for the purpose of top balancing and before connecting it to the now parallel pack I checked the voltage output with my multi meter to make sure it was set it to 3.64V. After connecting the power supply to the batteries I waited until I saw the current drop to 1Amp (Even that took hours) After that reconnect the pack back in series, with the BMS and you should be able to start using it.
The hardest part for me was learning to trust the equipment, the BMS has to stop the charge when one cell goes to high and the bench top power supply has to stay below 3.65V. Today I am a little more comfortable although I still find it stressful.
When you measure the voltage of the cells, put the test probe in the center of the screw hole (away from the thread) or it you use studs, on the top of the studs. It reduces the scratching on the top of the terminal. For connecting the battery in parallel I used bare 2.5mm2 copper wire (14 gauge) the power supply can't produce a current over 10 Amp and if I screwed up somehow, (it can and does happen way to often) the wire would act as a crude fuse. I connected the two on the ends first (so I didn't have a loose bare copper wire flopping around) and then the ones in between, alternating the side of the screw the wire ran on. Wear safety goggles and leather gloves (have some one hold the wire away from the terminals if you feel you need to)
I just measured the voltage and all 16 cells are 3.29v with resistance of 0.17-0.18mOhms. Only one cell had 0.19mOhm resistance. Do I still need to top balance.I recently build my first pack and I spend over a week on top balancing. I suggest you use the BMS and solar charge controller to charge the batteries in series with the BMS in place, till one of them reaches 3.5V, then have the BMS stop the charge, leave it to settle for an hour or so and reconnect them in parallel. (if any cells are too low, you will first have to charge them individually to bring them close to the others)
I bought a 10Amp bench top power supply from Amazon for the purpose of top balancing and before connecting it to the now parallel pack I checked the voltage output with my multi meter to make sure it was set it to 3.64V. After connecting the power supply to the batteries I waited until I saw the current drop to 1Amp (Even that took hours) After that reconnect the pack back in series, with the BMS and you should be able to start using it.
The hardest part for me was learning to trust the equipment, the BMS has to stop the charge when one cell goes to high and the bench top power supply has to stay below 3.65V. Today I am a little more comfortable although I still find it stressful.
When you measure the voltage of the cells, put the test probe in the center of the screw hole (away from the thread) or it you use studs, on the top of the studs. It reduces the scratching on the top of the terminal. For connecting the battery in parallel I used bare 2.5mm2 copper wire (14 gauge) the power supply can't produce a current over 10 Amp and if I screwed up somehow, (it can and does happen way to often) the wire would act as a crude fuse. I connected the two on the ends first (so I didn't have a loose bare copper wire flopping around) and then the ones in between, alternating the side of the screw the wire ran on. Wear safety goggles and leather gloves (have some one hold the wire away from the terminals if you feel you need to)
Top balance is not always needed, but you don’t know until you assemble the bank, and charge.I just measured the voltage and all 16 cells are 3.29v with resistance of 0.17-0.18mOhms. Only one cell had 0.19mOhm resistance. Do I still need to top balance.
If it is needed, the BMS will shut down charging early, or shut down discharging early when a fast or low cell hits a limit.
John Frum
Tell me your problems
- Joined
- Nov 30, 2019
- Messages
- 15,233
Probably.I just measured the voltage and all 16 cells are 3.29v with resistance of 0.17-0.18mOhms. Only one cell had 0.19mOhm resistance. Do I still need to top balance.
Let me say that another way.Top balance is not always needed, but you don’t know until you assemble the bank, and charge.
If it is needed, the BMS will shut down charging early, or shut down discharging early when a fast or low cell hits a limit.
If you assemble your cells in series with a bms and charge them at system voltage and they all get to 3.65 volts per cell within milli-volts of each other then you either have perfectly matched cells or they have been previously top balanced.
If you bought them from the manufacturer this is between possible and probable.
If you bought them from a 3rd party its much less likely.
There is a way to do an improvised top balance using a smart bms I can share if you are interested.
I am interested. I do not have a dc bench charger and I may only need to top balance once, so buying a bench charger feels like a big waste right now.Probably.
Let me say that another way.
If you assemble your cells in series with a bms and charge them at system voltage and they all get to 3.65 volts per cell within milli-volts of each other then you either have perfectly matched cells or they have been previously top balanced.
If you bought them from the manufacturer this is between possible and probable.
If you bought them from a 3rd party its much less likely.
There is a way to do an improvised top balance using a smart bms I can share if you are interested.
John Frum
Tell me your problems
- Joined
- Nov 30, 2019
- Messages
- 15,233
Do you have a smart bms?I am interested. I do not have a dc bench charger and I may only need to top balance once, so buying a bench charger feels like a big waste right now.
If yes, which one?
Which solar charge controller do you have?
What is the nominal voltage of your bank and what is the capacity in amp hours.
Please include product links.
The general idea is to set the charge voltage to 3.4 volts per cell for the first charge.
Then see if the bms trips on a cell over voltage trigger.
Either way check the deltas between the cells and report back.
Then each day increment the charge voltage by .1 volts until you get to your planned charge voltage.
What is your planned charge voltage?
This could take most of a month but you can probably start using the pack after the first few days.
Last edited:
If you build the pack, and you have the bms set to trigger low, AND you find you do need to top balance...I am interested. I do not have a dc bench charger and I may only need to top balance once, so buying a bench charger feels like a big waste right now.
Ebay has some adjustable buck converters for around $20 that work fine to top balance.
I got one and set the volts to 3.5 and amps to 10 and let it go for a week, worked like a champ, and it can be used as an ac charger in a pinch. Just set the voltage to the input range of the charge controller, and it will send steady dc current in.
I have epever 6240 AN charge controller. Batteries are 3.2v cells, 280ah from EVE, 16pcs to make a 48v battery. Daly smart bms with Bluetooth connection.Do you have a smart bms?
If yes, which one?
Which solar charge controller do you have?
What is the nominal voltage of your bank and what is the capacity in amp hours.
Please include product links.
The general idea is to set the charge voltage to 3.4 volts per cell for the first charge.
Then see if the bms trips on a cell over voltage trigger.
Either way check the deltas between the cells and report back.
Then each day increment the charge voltage by .1 volts until you get to your planned charge voltage.
What is your planned charge voltage?
This could take most of a month but you can probably start using the pack after the first few days.
John Frum
Tell me your problems
- Joined
- Nov 30, 2019
- Messages
- 15,233
Hopefully your charge controller allows you to tweak the charge voltage.I have epever 6240 AN charge controller. Batteries are 3.2v cells, 280ah from EVE, 16pcs to make a 48v battery. Daly smart bms with Bluetooth connection.
Start at 3.4 and see what the cell delta is when the charge terminates.
I connected my cells in series and charged them until the highest one was 3.6v. I then reduced the input to amps lower than the balancing amps of the BMS. You could reduce your input current by covering your panels (mostly).
As others have mentioned, a power supply that can be used for charging one cell is very helpful. I use an RC charger (X8 Icharger) which allows me to charge a single cell or group of cells. It works for 8 series ,but I don't think will go beyond 8 at one time. But you can bring up each low cell one at a time after you charge them most of the way in series. You don't need to disconnect, just clip on the cell posts that you want to charge.
As others have mentioned, a power supply that can be used for charging one cell is very helpful. I use an RC charger (X8 Icharger) which allows me to charge a single cell or group of cells. It works for 8 series ,but I don't think will go beyond 8 at one time. But you can bring up each low cell one at a time after you charge them most of the way in series. You don't need to disconnect, just clip on the cell posts that you want to charge.
I have an idea, and I am very green at these things but its an idea. My situation is that the station where the cells will be used is completely off grid and located 35 miles away. I have the cells in my house but the panels are 35 miles away. I do not have a bench charger and getting one will cost North of 100usd and wait for 3 weeks minimum.
I do have an old laptop charger giving 19.5v 6.9amps. I also have a low voltage/ high voltage battery disconnect from china that I can set at 3.65v high voltage disconnect.
One idea is to parallel the 16 3.2v cells and charge with the laptop charger at 19.5v but have the high voltage disconnect set at 3.65v. What is the likelihood that I will overcharge and thus kill some of the cells in the parallel configuration?
Second idea is to charge each cell individually with the 19.5v laptop charger while setting 3.65v high volt disconnect, wash rinse and repeat 16 times. Not sure how long this will take. Comments are invited.
I'm not sure what this ^^^^^ is. Is that a BMS, or a buck converter, perhaps?low voltage/ high voltage battery disconnect
A laptop charger is not going to be happy about going from 19.5 volts to 3.65 volts. It may let the smoke out if it doesn't trip out first.
Its a relay switch that protects a battery from over or under voltage.I'm not sure what this ^^^^^ is. Is that a BMS, or a buck converter, perhaps?
A laptop charger is not going to be happy about going from 19.5 volts to 3.65 volts. It may let the smoke out if it doesn't trip out first.
Attachments
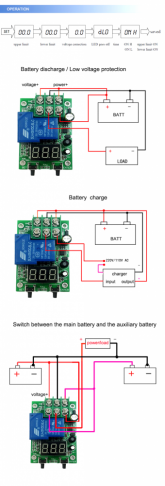
Do you have a link to the actual device?Its a relay switch that protects a battery from over or under voltage.
Do you have a link to the actual device?
DC 6~80V Voltage Detection Charging Discharge Monitor Relay Switch Controller with Case LED Display - - Amazon.com
DC 6~80V Voltage Detection Charging Discharge Monitor Relay Switch Controller with Case LED Display - - Amazon.com
www.amazon.com
Similar threads
- Replies
- 5
- Views
- 323
- Replies
- 9
- Views
- 573
- Replies
- 5
- Views
- 444