diy solar

diy solar

LiFePO4 heating pad for cold temperatures

Just spotted this nice and cheap and might be workable if you add a thermostatic switch to control it?
Hmm 2 amps per hour is not much, (it's too much current draw for me at my present, meager ability to generate and store amperage but fortunately my batteries are in an insulated box in a six foot deep root cellar blocked from any wind movement), but if someone can spare 24 amps per day for battery heating then it's fine.
 
If you are trying to use a lifepo4 battery in freezing cold temperatures, battle born just released a 12v heat pad for keeping the batteries warm without melting the case. This pad should work for any standard lifepo4 battery. Just slap it under your batteries and connect it to 12v and you are done.

I think it is over priced though. It can be found here: Click Here for battle born heater pad


If you cannot afford the battle born pad, you can use a septic tank heater pad. It works in the same way but may possibly melt your battery case if you are not careful. You can avoid this by adding some protection or a way to distribute the heat across your entire battery bank. I would personally put the batteries in a insulated container, then add a thin sheet of conductive material like sheet aluminum over the pad so that the heat it produces can warm up your entire battery bank.

Cheaper heater pad source: Click here for heater pad
This, of course, assumes you have power in the first place!
 
Could a person use heating cable wrapped around the batteries. It normally keeps things at 35-40F and they often have a thermostat in them so it doesn't run all the time, it will run only when needed. It's used to keep pipes from freezing. Why anyone would install water supply pipes in an outside wall in Michigan is beyond me, but they did at my old house. How this passed inspection is also beyond me.

There are also bare Chinesium heater pads that run off 12v but I would not use those for expensive batteries. What about an electric blanket? Reptile heater stone? I'm just swingin' wild here! :)
 
IF you want to build your own heater IE cheaper.

Dang that tape is kind of cool. I just upgraded my heat setup using a 3d printer silicone heat pad + aluminum 1/4" plate as a raised floor (minutes ago)-initial test in progress. Turns out there isn't a lot to be had in the USA &/ ETA < 6wks in the 12v flavor and with acceptable wattage/size. I ended up with a 120w 12v 120x120mm w/ thermistor.

The previous setup was an incubator heater (12v 100w and 60mm fan, measured high 92w @ 13.34v on Victron BMV) and never got used in the wild. Not that it didn't work - it passed all tests (sitting on my patio in 20*F) - but fan crapping out was a concern and I wanted to control both the fan and its heating element separately. Even got PID control working on the heating element but I disliked the thought of fan failure, relay sticking on, more wires in an increasingly cramped enclosure, yadaya.
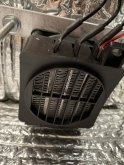
6boxheat.jpeg

Anyway, on to the new...

A microcontroller paired with a 3d printer heat bed module MOSFET operates the heat pad at the perfect temperature (as measured by the incorporated thermistor) so the floor will never really deviate from the setting. Once it's up to temperature it only requires a trickle of wattage to maintain in open air tests (maintain 120*F in 66*F ambient, still air..) , so I'm hoping this will be a tiny amount of draw once I throw it in the truck and the box it'll reside in is all sealed up, just trying to maintain like 47*F

Heat pad $16 (or pick anything with better dimensions for your build, or a full wrap, or something from the slow boat)
Some serious aluminum $27
A 3.3v suitable initial switching MOSFET module $9
One of the two of this 2pk of 3d printer heat bed modules, so $5.50
A $5 arduino nano clone, or a $19 particle photon, or a ESP8266/esp32 dev module for $8, whatever
Some jumper wires from a many-hundred pack
A breadboard
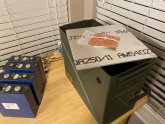
materials_punystrip.jpeg

This is a 12 watt heater without incorporated thermistor. I ended up ordering two of these, advertised as bee colony warmers or something. Could have made them work but weren't adhesive backed and were less durable than the one in the parts list that I ultimately used. These seem like the standard fare silicone heaters that you'd get from China, and they heated well. Shoo, I might have been able to get by with a single 12w pad... but I wanted to be sure, and I liked the durability and 3m backing of *
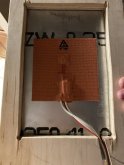
plate_plank.jpeg

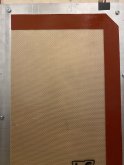
plate_siliconemat.jpeg

^ the aluminum doesn't really have a hot spot even operating the pad at 90w. Maiden test capped at 50w. But still, added a strip of silicone from a cheap 3pk of silicone baking sheets from amazon. It's nice and nonskid, thin, transfers heat well, felt like the right thing to do after drinking a lot of beer and looking in to a stupid box for 3 hours with my hands on my hips like a dingaling.
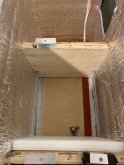
box_ends.jpeg

^the same cell holding strategy as in the initial incubator fan heater. You can see why this wasn't really a great solution when the heat was blasting from the opposite side of the can, hitting a wooden wall, trying to maintain a hunk of cells.
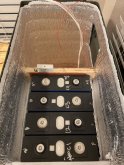
box_ends_loaded.jpeg

loaded... more insulation has been shoved around certain places, cells have been locked in place from movement in any direction, ceiling on top of the whole shebang with BMS and other crap mounted on it...
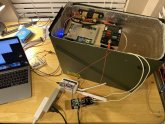
testing.jpeg

I'm going over the top with this project but for simple insanely consistent heating... give DIY control some thought. Plug some wires in to numbered holes, connect some positive and negative wires to screw terminals, copy paste 20 lines of code and press play. Aluminum is biggest expense. My hope is that this heats slowly from the bottom so I don't get the BMS or Victron BMV prematurely enabling charge because... heat rises and stuff.

Edit: it's been like 2 hours running the plate at a maintained 78.5*F and is requiring about 8 watts to do this, installed, cells atop it. Starting temp was 67*F combined avg between BMS' onboard temperature reading and its separate probe. In that 2 hours time I've reached 71.6*F combined. This is not a fast heating solution so if I ever program it to shut off it'll be right after sundown, turning on many hours before sunrise. If I can leave it on permanently I'm just going to do that.. and I have a feeling I probably can. Low and slow works for me.

A mildly interesting observation is that it was taking like 0-4w to maintain 120*F in 66*F ambient, open air, plate just sitting on that wooden donut on my coffee table. That was reached in 2 minutes according to thermistor reading, and plate was warm-warm after a few additional minutes of soaking. Guessing the cells and all the materials are sucking heat off the plate which is requiring more to maintain
 
Last edited:
Nice work! What do you plan to do in the summer heat? Is that an ammo can? If so what size?
 
Does cold come into play at the same temp for lithium as it does for lead acid? We are staring to see mid 30s overnight here and I don't know when I need to start caring about cold for my Ruixu lithium. It's in the 50s all day with bright sun so I don't want to take the battery out of my trailer yet. I know if we get those awful temps below zero that my battery will be inside with me where it doesn't get below 66. I just don't know where the line is. I assume when it is sustained temps at or below freezing may be a good gauge.
 
Nice work! What do you plan to do in the summer heat? Is that an ammo can? If so what size?

It is indeed an ammo can, 30mm. Not 30 cal. It's giant and incredibly heavy. Still, my total project weight for 200 usable amp hours with an abundance of monitoring, microcontrollers, onboard LTE, etcetc is about the same as a naked 90ah marine deep cycle lead acid :p

I have a small vent cut that you can see in one of the pictures, where there's an absence of insulating wall. That's where the Victron MPPT goes, and you're right, overheating is a concern. There currently isn't an intake which would logically be placed down low, and I probably won't install one until spring though I have the parts. 40mm Noctua fan and a classy looking two piece grille that includes a filter between the two. My thought was to obviously not run the fan in the winter and install some insulating silver stuff that I used for the walls as the filter. Then when it's warm out remove that blocker and run via PWM speed control. I discovered last night that the fan can't be dimmed to 0%, it's minimum is always 30%. Means another relay to install and more fuss to deal with... later. Anyway, when done, it should force air out directly behind the charger. I know it all sounds puny but it's not like I have an inverter in there.

I really just wanted to flush mount MPPT to the ammo can. The back of it is metal and they say there should be air flow behind it, which I've achieved by elevating it half an inch off the wall (not pictured, of course).. but I would have used thermal paste and stuck it directly on the bare metal of the can for giant heatsink effect. Sadly there's like a 1/36th of an inch lip between the metal backing of the controller which would have required a pond of thermal paste. Later thought about cutting a rectangle of my 1/4" aluminum plate to fit.. but ultimately I have no idea how effective this would have been and didn't want to do anything irreversible or messy.
 
Just watched Will’s ‘New Tesla’ vidéo and saw at the end the cheap heat pad mentioned. The problem of hot spots was also mentioned.

The easy & simple way to prevent hot spots with any of these mats is to mount them on a sheet of aluminium (or other material with good heat conductivity). This would smooth out any lumps and bumps in the heat produced in the pad.

The thicker the aluminium plate the smoother the heat output will be.

This has me thinking. I wonder how complicated and effective it would be to use an aluminium frame to thermally connect all the batteries to heat and/or cooling sources? Heat pad on one side of the bank, finned heat sink with fan on the other?
 
This has me thinking. I wonder how complicated and effective it would be to use an aluminium frame to thermally connect all the batteries to heat and/or cooling sources? Heat pad on one side of the bank, finned heat sink with fan on the other?

I don't know if it can be done without cooking the one that's in most direct contact... and it'd be a shame if the fan was mandatory to achieve that and for some reason failed.

That's the same thing I'm dealing with and can't for the life me google an answer to, controlling the temperature of the pack (approximately) without roasting them from a bottom heat source. I can keep the alum floor 70*F all day but I'm not terribly interested in the floor temp, more so the BMS and the temp from its probe. But to apply heat based on that is to make the floor potentially a frying pan
Gentle well dispersed heat won’t cause a frying pan effect. Batteries only need to be above freezing so as long as there is a decent thermostat with a backup it will be fine.
An aluminium plate between the heat pad and batteries will provide the required even heat distribution and eliminate hot spots
 
I like the metal ammocan idea because much of the material inside of the can is flammable. For heat disapation during warm, sunny weather I would mount the SCC outside of the can unless I was trying to protect it from damaging physical elements.
 
Amazon USA with prime shipping

It says on low settings it’s about 32C
Since it’s power by usb, I think it would be easier to build and use Home Assistant to control

It clams it’s also waterproof, probably it can used in outdoor but definitely some kinda cover is required
 
Jeepers creepers making heat is one of the, if not the, number one most energy consumptive functions to perform using electricity. It's too bad that we have to use the electricial energy stored in our lifepo's to warm our lifepo's so they will be capable of receiving and storing electricial charge. It's a a bummer. If they can put a huperson on the moon then ...
 
Jeepers creepers making heat is one of the, if not the, number one most energy consumptive functions to perform using electricity. It's too bad that we have to use the electricial energy stored in our lifepo's to warm our lifepo's so they will be capable of receiving and storing electricial charge. It's a a bummer. If they can put a huperson on the moon then ...
Yeah, it's very inefficient but I'm hoping that the energy that goes in will outweigh the energy used to heat the batteries up.
I've ordered a heat pad and a temperature controller with the intention of setting them up to keep the batteries between 5-10 degrees C.
 
Yeah, it's very inefficient but I'm hoping that the energy that goes in will outweigh the energy used to heat the batteries up.
I've ordered a heat pad and a temperature controller with the intention of setting them up to keep the batteries between 5-10 degrees C.
Good luck, let everyone know what the results if you can, thanks.
 
Yeah, it's very inefficient but I'm hoping that the energy that goes in will outweigh the energy used to heat the batteries up.
I've ordered a heat pad and a temperature controller with the intention of setting them up to keep the batteries between 5-10 degrees C.

FWIW I'm not finding it to be that big of a battery drain, though tonight will be a more proper test (low of 24*F and was below freezing at like 530pm)

For days in the 50's with some mediocre winter sun and lows around freezing, I've found my ammo can enclosure with < 1/4" thick foil-foam insulation to not dip below 50 averaged between bms and it's probe, until about 3am.

Then the floor heats til the average of the two sensors is 50*F again or the floor hits 105*F. It'll maintain 105*F in that case until the probes are back up to temp. It runs for just a few minutes at a time and only has run once or twice between 3am - 8am for the last nearly two weeks. And never dropped below set temperature. This is dialed in to only output around 30w, though the heat pad could run at over 120w.

First heat cycle is going to cut on soon tonight, it's 51*F average between two sensors.. the floor is 48*F. So once that 51 hits < 50.5, the process begins. I'm sitting with a full (188.8 of 190ah) battery so it'll be interesting to see what I wake up to with tonight being cold, and cold early.
 
I learned about the Battle Born heating pad last summer, before they released it. I was surprised to see it wind up being so relatively expensive. That and the internal bluetooth interface were the reasons I wound up buying a LifeBlue with the built in heater.
 
There should be a dump mode so when the bms senses temps below 34F, charge power switches to heating elements to maintain pack temp for charging.
I really like this idea. I was thinking I would disconnect the SCC from the batteries with a thermostatic controlled relay, but switching the power from batteries to heat would be less wasteful. Thank you for this post.
 

diy solar

diy solar
Back
Top