diy solar

diy solar

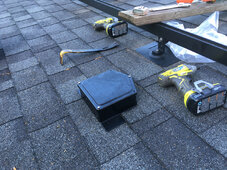
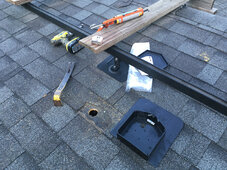
Roof Junction box mounted. Panels going up.

Q-Dog

¯\_(ツ)_/¯
Joined
Dec 22, 2020
Messages
2,185
Location
South Louisiana
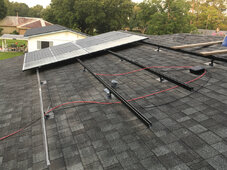
It took me a while to come around to mounting panels on the roof, mainly because I really didn't want to put a bunch of holes in fairly new shingles ... but here we are. We were planning a pergola but a recent tonado changed my mind. Yes, the first hole is the hardest, but it gets easier after 30 or 40 of them to mount the rails.

But I didn't really anticipate how much anxiety I would have installing the junction box. The thought of making a 2" hole in the roof really gave me the frissons! (I'll likely be up in the attic often, checking for leaks.) Conduit and wiring and disconnect are next, then I can get the rest of the panels up. Not bad for a one man show.
IMG_3744.jpg
IMG_3745.jpg
I've got 4 panels mounted so far, with 8 more to go.
IMG_3730.jpg
 
Last edited:
This morning I was up on the roof as soon as there was light in the sky. Still working alone. I pulled up some wire and a couple more panels. We now have 6 panels (1800 watts) mounted and temporarily connected to the new charge controller. I'll likely spend a lot of today checking wire and bus bar temperatures to see if we have any bad connections ... and enjoying some solar powered air conditioning!

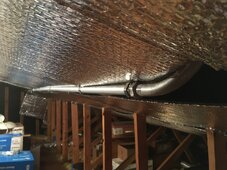
The other 6 panels will get put up and wired after I get some metal conduit run in the attic. Who knows when that might happen ... it was 97º in the shade yesterday, 117º in the attic.
IMG_3749.jpg
 
Use MC in the attic, it is allowed.
I already bought EMT and fittings and I can borrow a bender. I might have to make a run down near the eaves and I can't fit in there, but I can likely push EMT through and make the final connections outside. We shall see.
 
Looks great - but I would have had similar concerns cutting a big hole in the roof like that!

We are in similar position to you, as about to mount extra panels and have similar rail fixing to yours (the L-shaped brackets) that bolt through the felt... We were going to put the feet of the L brackets all on the lower side of the rails (as that was how they were pictured in the rail's brochure), but see you have them going in alternating directions.

Is that for greater stability? My gut feel is that it would be better to have them alternating (like you have), so might do the same :unsure:
I set the L brakets that way because, despite all my measuring and planning, I felt like the rails were too close together and the panels were too close to the peak with too much cantilever at the top. They are probably fine, but I was uncomfortable with it, and I wasn't about to move the mounts and make even more holes in the roof. So I flipped the lower L feet around and moved the panels down a few inches. If I add more panels I will put the next set of rails a little bit further apart.
 
So I flipped the lower L feet around and moved the panels down a few inches
(y) Thanks for the explanation - they look nicely balanced now.

I'll have a think about ours - I feel they would be more rigidity when pointing in opposing ways, though I'm no mechanical engineer.
 
(y) Thanks for the explanation - they look nicely balanced now.

I'll have a think about ours - I feel they would be more rigidity when pointing in opposing ways, though I'm no mechanical engineer.
I think on a steeper pitch roof you may want them all pointing up to center the weight more over the mount. I didn't think it matters as much on our roof that isn't very steep. Also, the rails felt flimsy at first, but they stiffen up a lot once the panels get bolted on.
 
What a lesson in frustration it was getting all the parts together. Who knew Lowes and Home Despot EMT are maybe very slightly different diameter?

Well. One place had plenty of EMT but didn't have the fittings I needed. The other place had the fittings but had zero sticks of conduit. So, had to buy stuff from both places to get everything I needed. But the EMT from one place took a fair bit of work to fit into the fittings from the other place.

Once I got into the attic I changed my original conduit route and needed a couple more bits so I went to a bigger store instead of the small stores close to me, and the conduit and fittings bought from the same store fit together easily.

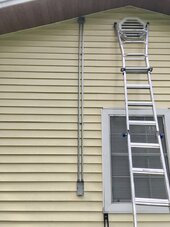
Anyway. Got the outside disconnect box mounted this morning. Just have to finish the drop into the equipment room.
BF8CDF3F-A717-4E2D-A7A0-63BB73BE7D17.jpeg
 
How do you like the EZ solar? They don’t seem to get as much love here as I think they deserve.

What is the reason for the 2x conduit run on the side there? I believe 1/2 and 3/4 can fit a ton of PV circuits. Does it serve a purpose now, or maybe it’s just because you found hardware that can do 2x in parallel and it also ends up looking better, so why not have two?
The EZ Solar was fine ... no issues and no surprises. I guess we will need some time to see how durable and leak-free it is. Mine will be under the last panel in the row.

There will be 2 arrays on the roof, with maybe enough room in the conduit to add more later.
 
Looks good. If I may suggest for the next guy, alternate the rail feet so you spread the load out to more rafters. You'll use a few more mounting feet however.
 
Looks good. If I may suggest for the next guy, alternate the rail feet so you spread the load out to more rafters. You'll use a few more mounting feet however.
How do you mean exactly? Aren't the rail feet attached to the purlins rather than rafters?
 
How do you like the EZ solar? They don’t seem to get as much love here as I think they deserve.
I had a couple of solardeck units so I ended up using them instead of the ezsolar just because they were metal rather than plastic on a roof in Florida. But I will be using the ezsolar on my west facing roof for the next set of panels.
Either look like they will do the same job long-term, I guess it depends whether you are a plastic or a metal guy.
 
How do you mean exactly? Aren't the rail feet attached to the purlins rather than rafters?
I have trusses here in the USA spaced 24" on center I've attached the plans for the mounting feet to show you what I mean by staggered.
 

Attachments

  • roof mounts.pdf
    98.8 KB · Views: 12
Maybe purlins are a thing for timber framing, with rafters far apart.


Many of our homes, including OP's, are "Stick Built", from toothpicks (I mean 2x4's).
Shake roofs might have slats (not sure the correct term) and no sheathing plywood or OSB.
But many have no such cross boards, just sheathing.

So rafters are the solid place we can screw panel mounts into.
I think some installs just screw into sheathing.


Going through SolarAPP+ I came across the staggered attachment.
That might be required with heavy snow load so weight is distributed across more rafters rather than just every 2nd or 3rd.
 
Looks like attic trusses to give you some open space

 
I had a couple of solardeck units so I ended up using them instead of the ezsolar just because they were metal rather than plastic on a roof in Florida. But I will be using the ezsolar on my west facing roof for the next set of panels.
Either look like they will do the same job long-term, I guess it depends whether you are a plastic or a metal guy.
I ordered both for my project and returned solar deck… it felt like the solar deck would outlast the brand new shingles…. And what’s the point of that 🤣
 

diy solar

diy solar
Back
Top