


JeepHammer
Solar Wizard
- Joined
- Nov 15, 2019
- Messages
- 1,149
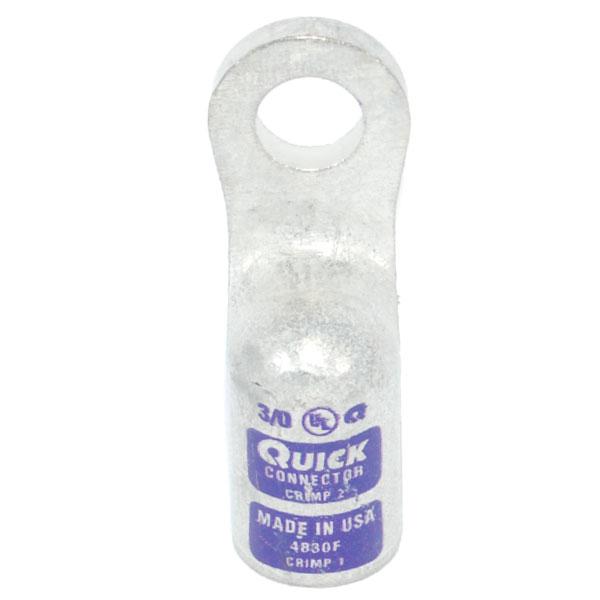
As an example,
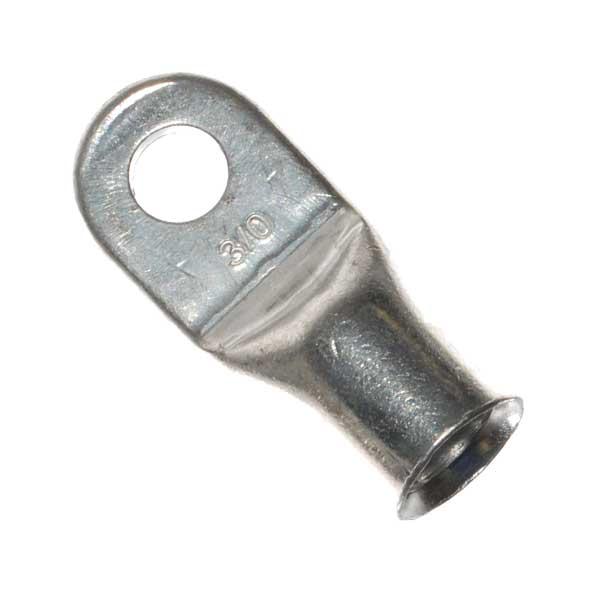
Look at the small surface area around the copper terminal bolt hole.
Small contact patch means lowered ability to conduct amperage between battery and terminal, or between ring terminals in a stack.
For lead/acid batteries, notice the separation line in the flattened tubing.
That's a highway directly to the wire conductor for battery acid, and if you don't believe acid will eat it's way right up that separation line because it's mashed too flat, keep in mind that same acid crawled out of the batter between terminal material the plastic case was molded around/stuck to/sealed with...

The large surface (and solid/thick body-neck) of the other terminals allow for MUCH more current to pass between terminals.
These terminals are also hard enough they don't mash out, distort, significantly deform to further screw up the contact surface area.
Silver being a better conductor of electrical current that copper, using silver plated terminals (and solder) makes sense to get your expensive & hard won current where it belongs.
Silver cadmium plating on these terminals, Silver Bearing Electrical solder to make the electrical connection and seal up your terminal connections/tin the wire with.
Something as simple as brass bolts/nuts instead of steel makes your terminal connections more electrically conductive.
You see a LOT of steel, aluminum, etc on consumer electronics, but heavy industrial you won't see electrically resistive and corrosion prone nearly as much.
Electrical connections aren't 'Structural', so steel bolts aren't needed, brass more closely matches the terminal materials and conducts current better.
Take a look at the big, old DC generator equipment from 100 years ago, Edison & Tesla/Westinghouse generators are still in use for subways trains, electric busses, trollies all over the world,
Original brass bolts & copper terminals that still function like new.
I like to say, 'Available' doesn't mean 'Suitable' or 'Optimum',
Spend money on 'Foundation' not 'Decoration'.
Look at the small surface area around the copper terminal bolt hole.
Small contact patch means lowered ability to conduct amperage between battery and terminal, or between ring terminals in a stack.
For lead/acid batteries, notice the separation line in the flattened tubing.
That's a highway directly to the wire conductor for battery acid, and if you don't believe acid will eat it's way right up that separation line because it's mashed too flat, keep in mind that same acid crawled out of the batter between terminal material the plastic case was molded around/stuck to/sealed with...
The large surface (and solid/thick body-neck) of the other terminals allow for MUCH more current to pass between terminals.
These terminals are also hard enough they don't mash out, distort, significantly deform to further screw up the contact surface area.
Silver being a better conductor of electrical current that copper, using silver plated terminals (and solder) makes sense to get your expensive & hard won current where it belongs.
Silver cadmium plating on these terminals, Silver Bearing Electrical solder to make the electrical connection and seal up your terminal connections/tin the wire with.
Something as simple as brass bolts/nuts instead of steel makes your terminal connections more electrically conductive.
You see a LOT of steel, aluminum, etc on consumer electronics, but heavy industrial you won't see electrically resistive and corrosion prone nearly as much.
Electrical connections aren't 'Structural', so steel bolts aren't needed, brass more closely matches the terminal materials and conducts current better.
Take a look at the big, old DC generator equipment from 100 years ago, Edison & Tesla/Westinghouse generators are still in use for subways trains, electric busses, trollies all over the world,
Original brass bolts & copper terminals that still function like new.
I like to say, 'Available' doesn't mean 'Suitable' or 'Optimum',
Spend money on 'Foundation' not 'Decoration'.

")