Hi, how did you connect you heat pads and how did you mount the BMS? I have the same. And with no mounting holes and wanting to use 70mm2 cables I am struggling... Any advise would be appreciated...I received the BMS today, it took me only 4 days from Spain.
View attachment 64498View attachment 64500View attachment 64501View attachment 64499


You are using an out of date browser. It may not display this or other websites correctly.
You should upgrade or use an alternative browser.
You should upgrade or use an alternative browser.
New 200 amp rated JBD
- Thread starter Just John
- Start date
MakeMePower
New Member
- Joined
- Oct 11, 2021
- Messages
- 55
any updates guys? figure out the heating app, etc?
My heater pads are lost in the post but as soon as they arrive I will install. Edinburgh is getting close to the 5c I have set for my cutoff so be interested to see.any updates guys? figure out the heating app, etc?
One fitted I will re-insulate my battery and let you know...
MakeMePower
New Member
- Joined
- Oct 11, 2021
- Messages
- 55
so the app got updated to support the heat parameters?
RV Truck Camper
New Member
- Joined
- Apr 3, 2020
- Messages
- 32
Take a look at this post the heating function.

 diysolarforum.com
JBD 4S 200A BMS
Systems build complete and running for over a week of travel. Not much sun in Scotland just now but B2B doing a great job of topping up. Runs my 3kw/6kw inverter no problem for microwave and water heater and induction plate plus other 12v loads. Fiddly to mount. Need to install the heat pads...
diysolarforum.com
LFP addict
New Member
I cannot find any info about the "heatport" ? connector ? voltage ? output ? soldering ?
RV Truck Camper
New Member
- Joined
- Apr 3, 2020
- Messages
- 32
The heating port is a 4mm screw. The two little heating pads I purchased I just crimped a wire connecter on it. 12v. I believe I read on the post I mentioned about it's 5 or 6 amps. My set up draws 1.5 amps.
John Frum
Tell me your problems
- Joined
- Nov 30, 2019
- Messages
- 15,230
@Just John did you have a chance to test the new 200 amp jbd?
@Just John did you have a chance to test the new 200 amp jbd?
Not yet, I'll start testing when I get back for the holidays. Visiting my sister right now, have a two day drive to get back in time for Christmas eve.
I only have a 1000 watt inverter for 12v, so it won't be a 200 amp test.
did the heating pad have a neg cable, did you just connect it to one of the postsThe heating port is a 4mm screw. The two little heating pads I purchased I just crimped a wire connecter on it. 12v. I believe I read on the post I mentioned about it's 5 or 6 amps. My set up draws 1.5 amps.
Where did you find a 48v JBD BMS rated for 300 amps?
This thread is about the (relatively new) 200 amp rated JBD 12v BMS, in fact Will just reviewed a battery that had one in it. You can also purchase it with a heating interface to power a heating pad to warm your cells before charging.
I've had mine put together a day or so, it's great. And if you turn of the charge balance button in app under functions, After charging it up, you can top balance. Was helpful because I didn't run the top balance completely. So it acts as a active balancer only when idle
Last edited:
Where did you find a 48v JBD BMS rated for 300 amps?
This thread is about the (relatively new) 200 amp rated JBD 12v BMS, in fact Will just reviewed a battery that had one in it. You can also purchase it with a heating interface to power a heating pad to warm your cells before charging.
This is the contactor 300amp bms, and also who i ordered it from, got it from hong kong fairly quickly like within a week.
Jiabaida Smart Bms 6s 8s 20s 16s 13s 22s Lifepo4 250a 72v 60v 48v 36v 24v Bms Lithium Battery Heating Electric Motorcycle - Buy Bms 36v,Bms 48v,Bms Lifepo4 250a Product on Alibaba.com
Jiabaida Smart Bms 6s 8s 20s 16s 13s 22s Lifepo4 250a 72v 60v 48v 36v 24v Bms Lithium Battery Heating Electric Motorcycle - Buy Bms 36v,Bms 48v,Bms Lifepo4 250a Product on Alibaba.com
Looks nice, you should probably start a thread on the subject.This is the contactor 300amp bms, and also who i ordered it from, got it from hong kong fairly quickly like within a week.
Jiabaida Smart Bms 6s 8s 20s 16s 13s 22s Lifepo4 250a 72v 60v 48v 36v 24v Bms Lithium Battery Heating Electric Motorcycle - Buy Bms 36v,Bms 48v,Bms Lifepo4 250a Product on Alibaba.com
Jiabaida Smart Bms 6s 8s 20s 16s 13s 22s Lifepo4 250a 72v 60v 48v 36v 24v Bms Lithium Battery Heating Electric Motorcycle - Buy Bms 36v,Bms 48v,Bms Lifepo4 250a Product on Alibaba.comwww.alibaba.com
John Frum
Tell me your problems
- Joined
- Nov 30, 2019
- Messages
- 15,230
I hope JBD makes an 8s version of this https://www.aliexpress.com/item/1005003167173178.html .
In the meantime I would like to see someone test 2 of these in series.
@Will Prowse ^
In the meantime I would like to see someone test 2 of these in series.
@Will Prowse ^
I hope JBD makes an 8s version of this https://www.aliexpress.com/item/1005003167173178.html .
In the meantime I would like to see someone test 2 of these in series.
@Will Prowse ^
JBD does not rate those for use in series. It might work for 24v, but I know the parts are not rated for 48v. I looked them up but can't remember if the parts are rated for 30v or 40v.
The 150 amp is rated for up to 48v since it uses 80v rated parts.

37.25US $ 42% OFF|Jbd Smart Bms 4s Lifepo4 100a With Free Bluetooth 3s 12v Bms Board 150a 120a 100a 80a 60a For Lithium Battery 3.2v Lifepo4 Bms - Battery Accessories & Charger Accessories - AliExpress
Smarter Shopping, Better Living! Aliexpress.com
RV Truck Camper
New Member
- Joined
- Apr 3, 2020
- Messages
- 32
I connected the neg to the battery post.did the heating pad have a neg cable, did you just connect it to one of the posts
DonPhillipe
New Member
- Joined
- Jul 13, 2020
- Messages
- 103
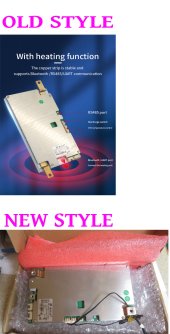
Looks like no sooner did they put a 200A model on the market, around a year later now they have shortened both high current terminal tabs which means if you are like me, just built a battery box based on the long tab terminals and you order a spare unig, it comes now with the short stubbie threaded stud terminals. I got one in the mail today and the terminal won't fit my setup because both have been cut to even with the PCB and also a female threaded stud has been inserted in both copper tabs. A lot of work to save 4 cents worth of copper. stubbie
Good luck on not touching the aluminimum shield with your battery cable. Frustrating.
Good luck on not touching the aluminimum shield with your battery cable. Frustrating.
Attachments
MakeMePower
New Member
- Joined
- Oct 11, 2021
- Messages
- 55
that does seem like quite a step back. I wonder if they were getting returns due to breaking the tab off the board
I'd imagine that is the problem, the way they have been packaging these would lead to these issues. i got lucky with my 2 units with the way it was packed, a lot weren'tthat does seem like quite a step back. I wonder if they were getting returns due to breaking the tab off the board
Im chasing down a a old spare as well for my setup, the new setup doesn't work for me
Andy6ft4Tall
New Member
- Joined
- Jul 21, 2021
- Messages
- 33
I can see the idea behind the changes but improving the packaging and keeping the original design would have been a better idea.
Alternatively they could have made the terminals wrap around the PCB and a bolt hole that passed straight through the PCB.
This new design limits the torque you can use to get a good connection.
Alternatively they could have made the terminals wrap around the PCB and a bolt hole that passed straight through the PCB.
This new design limits the torque you can use to get a good connection.
DonPhillipe
New Member
- Joined
- Jul 13, 2020
- Messages
- 103
OK, here is what HankzorBMS Store (SIC) who I bought from on Ali says about the change:
ME:
You switched products on me. If you will look at the photo in the top of this message, you see what the product looked like on your website when I ordered it - It had the long tabs that extended beyond the side of the circuit board. This one you sent me has short terminals and it will NOT fit in my battery box that I have designed for the long-terminal BMS like you your website photo showed last month This BMS will not work! The cables will short to the aluminum and a fire will result. I need to either get the long terminal 200A from you or I need to order it TODAY from someone else who is selling the exact item that is on their website.

All products have been revised and the production line has been adjusted. Thank you for your understanding,
ME:
You switched products on me. If you will look at the photo in the top of this message, you see what the product looked like on your website when I ordered it - It had the long tabs that extended beyond the side of the circuit board. This one you sent me has short terminals and it will NOT fit in my battery box that I have designed for the long-terminal BMS like you your website photo showed last month This BMS will not work! The cables will short to the aluminum and a fire will result. I need to either get the long terminal 200A from you or I need to order it TODAY from someone else who is selling the exact item that is on their website.
All products have been revised and the production line has been adjusted. Thank you for your understanding,
I just got one of these last week for a setup. Looks like the new version posted by @DonPhillipe.
So how do I program it? I'm having a hard time finding how to talk to it via PC and what application is needed.
Also, how about using the terminal for "heating film anode"? Just plug in a heater pad? What's the regulation on that? Using one of the 2 temp probes?
Sorry, but the spec sheet they sent me is pretty minimal.
I just got one of these last week for a setup. Looks like the new version posted by @DonPhillipe.
So how do I program it? I'm having a hard time finding how to talk to it via PC and what application is needed.
Also, how about using the terminal for "heating film anode"? Just plug in a heater pad? What's the regulation on that? Using one of the 2 temp probes?
Sorry, but the spec sheet they sent me is pretty minimal.

Download Center - LLT POWER ELECTRONIC
Welcome to Our Website to download necessary documents for our BMS installation purpose ,and please read our instructions carefully before…
 www.lithiumbatterypcb.com
You will need the USB to serial port interface. (AKA UART box)
UART = Universal Asynchronous Receiver Transmitter (serial port)

11.31US $ |Jiabaida Accessories Bluetooth Module Uart Rs485 Box For 3.7v 3.2v Lithium Battery Smart Bms 3s-20s With Communication Function - Battery Accessories & Charger Accessories - AliExpress
Smarter Shopping, Better Living! Aliexpress.com
Similar threads
- Replies
- 9
- Views
- 499
- Replies
- 2
- Views
- 225
- Replies
- 0
- Views
- 119