Yes I need to test Boost Converter using DC only loads.
You guys have probably said this a number of times but I was just too dumb.
I have been using a old 24VDC to 240VAC inverter with 240V globes on other side. to TRY & set load.
In hindsight this has been a mistake.
Yes.
I will get a string of 24V DC globes and add as many as I need to get the right amount draw setting if I can.
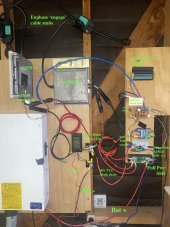
You can use DC bulbs or alternatively, you can use a multimeter to first set maximum voltage output / pot (no load) and then to set maximum current output / pot (either shorting positive to negative through a multimeter set to measure current or alternatively using a resistor as a load and measuring voltage across it to measure current).
For example, if you are aiming for 250W / 95% efficiency = 263W @ 35VDC, you would first adjust the voltage pot until you read 35VDC with no load or a high-valued resistance (1kOhm or more) as a load.
263W / 35VDC = 7.5A, so that is the current-limit you are aiming for.
R=V/I so the deal resistance to test 7.5A @ 35VDC would be 4-2/3 Ohms. But with a resistance that large, power will exceed 100W within the resistor itself - too much for the 100W power limit of a typical power resistor.
100W / 35VDC = 2.85 Ohms, so the power resistor you use should be 2 Ohms or 2.5 Ohms at most. Let’s assume you have a 2.0 Ohm 100W power resistor.
With an 2 Ohm resistance as a load and assuming the current limit is set too low - let’s say 1A, you will measure only 2.0V across the resistor.
As you start increasing the current pot, current will increase along with measured voltage across the resistance.
At 2.0A of current measured voltage will increase to 4.0V and at 4A of current the voltage will increase to 8.0V.
When you have adjusted the current-limit pot until you read 7.5A x 2.0 Ohms = 15.0VDC, you will know the current limit has now been set to 7.5A and you are done.
With a DCDC converter set for a maximum of 35VDC and 7.5ADC, you can now connect to your Microinverter to measure how much output power it delivers.
Let’s say, for example, you only measure 225W of AC power and want to increase by 11.1%.
You need to disconnect from the Microinverter, reconnect the 2.0 Ohm resistor and increase the current limit pot until you read 16.7VDC instead of 15.0VDC.
When you reconnect to the Microinverter, you should see that AC power output has increased from 225W to 250W (assuming your Microinverter can actually deliver that full level of power).
Using a power resistor is a more reliable way to adjust the current pot than using a DC lightbulb, but either can work.
Just measure resistance of the power resistor or lightbulb in advance, set voltage limit pot first with no load, and then set current limit pot second using voltage you measure across the power resistor or DC lightbulb rather than relying on the wattage rating of the lightbulb.
The resistance of a power resistor is the same whether the current being passed through it is small or large. I have no reason to believe that is not the case with a DC lightbulb as well but I am much less certain and if the resistance does change between when you measure it and when you put current through it, this technique breaks own.
My advice is to invest a few $$$s is a 2.0 or 2.5 Ohm 100 W power resistor…


") .
.