You can use some rubber bushings on the mounts to ease some of the vibration concerns. What is your shade scenario? Will you have any vents, decks, racks, or antennas on top of the roof you need to work around? If you are in unshaded parking most of the time, go for the highest series voltage you can safely power. More likely partial shade scenarios will benefit from more parallel options.


You are using an out of date browser. It may not display this or other websites correctly.
You should upgrade or use an alternative browser.
You should upgrade or use an alternative browser.
✅ What’s Better For Van? Two Big Solar Panels or Multiple Smaller Panels?
- Thread starter magentawave
- Start date
Ahjwinth
New Member
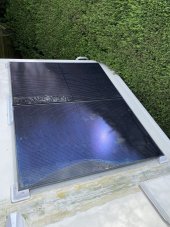
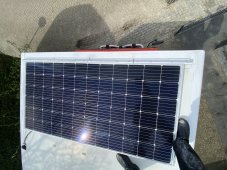
I had to be on the roof of my RV today so made some pictures so you have an idea of what you can do.
the panels I used are normal panels which I also have on the roof of my house. No special RV panels or for boats.
I have a home build RV with a complete flat roof except some items that are on the roof like hatches, airco and antenna. The roof is made from sandwhich panels with isolation inbetween. I have mounted my first 400wp panel 2 years ago using polymax only. No bolts or other mechanical fastening has been used and it functioned like this for the last 2 years. I used a full spoiler over the front of the panel to avoid any branches from trees can go under the panel and cause it to be damaged.
a year ago I installed 2 more 400wp panels on the back of the camper and support this from the edges only. When I would do it again I would add a support also in the middle over the longest length to reduce vibrations. Also these panels are glued on the roof with Polymax http://www.bison.net/en/product/poly-max-original/6312345
Attachments
I want at least 600 watts of solar panels on my van roof.
QUESTIONS:
1) What is better, two big 320 watt panels or multiple smaller panels (like, six @ 100 watts, or 3 @ 200 watts, etc.)?
2) Please explain why?
Thank you!?
P.S. Since I already own them, I’ll be charging two Delta 1300 power stations.
I like standard house PV panels for van mounting , 235w - 450w , probably like the 320ws you're looking at
All the flexible panels are rubbish they don't have a good lifespan
magentawave
New Member
- Joined
- Jun 28, 2021
- Messages
- 38
Do you bolt the 1515 rails into the factory threaded holes that are on the Transits roof?Everyone has their own favorite way to mount solar panels on vans.
Again - depends somewhat on the van.
I have the most experience with Transits but have done sprinters as well.
My default method is to use a 1515 rail on each side going the length of the van.
I then mount the panels on top of that cross wise, using panels with fairly strong frames.
If you use panels with thin frames, then it might require adding some cross bars to support the panels so they don't drum.
I don't use renogy for really anything that goes in a van - it just is not that robust.
magentawave
New Member
- Joined
- Jun 28, 2021
- Messages
- 38
I have seen flexible panels mounted on top of Coroplast on YouTube too. I like the low weight and low profile.. My concern is about the efficiency of flexible panels though. If a good rigid panel is only about 20% then what is the efficiency of a flexible panel?I've seen YouTube DIY'ers putting semi-flex PV (Sunpower etc) onto a Coroplast seperator layer then onto RV/trailer roof, both sides adhesively bonded. What is real-world experience with this penetration-free solution for vehicle rooftop PV?
Last edited:
HarryN
Solar Addict
Do you bolt the 1515 rails into the factory threaded holes that are on the Transits roof?
I have a photo on my web store, but need to first look at the site rules and make sure that it is ok to link to it.
If not, will compress a photo and post it here.
But yes, I use the bolt holes on top of the transit. Only use the official factory roof mount locations on top of a van.
I worked with a customer and her Transit to come up with a mounting kit with all of the individual parts required, but you can do the same thing on your own. It just makes life easier when we work with customers on solar installs.
_____________
I looked and it appears to be against the site guidelines to post a link. I will find a photo, compress it and then post it that way. It appears that I can post a link to other suppliers web site, but not my own.
But is really just some 8020 brackets bolted to the roof, a polymer pad to protect / seal, and the usual bolts / washers.
I had the brackets machined a bit to make it easier.
_________
Last edited:
HarryN
Solar Addict
I have seen flexible panels mounted on top of Corol on YouTube too. I like the low weight and low profile.. My concern is about the efficiency of flexible panels though. If a good rigid panel is only about 20% then what is the efficiency of a flexible panel?
Suppose that you have a 200 watt solar panel.
This requires ~1 000 watts of solar energy to shine on the panel.
~ 200 watts turns into electricity
~ 800 watts turns into heat
That heat has to go "somewhere". In a conventional panel this heat is removed by air flow on top of and under it.
When you put an insulator under the panel, then the heat just keeps building up until over time it destroys it.
____________
added:
- If you bond the panel to the van steel itself, then a substantial amount of this heat will try to conduct into the van itself.
- If you have an air space between the panel and the van - it can act partially as shade. On a hot day with intense sunlight, I can reach up and touch the interior of a vehicle and tell where the panels are vs not, but there needs to be an air gap.
________
Ultimately, a solar panel is an electronic device, and all of them fail faster when hot.
Last edited:
magentawave
New Member
- Joined
- Jun 28, 2021
- Messages
- 38
I can hope for no shade but will plan and build expecting shade.You can use some rubber bushings on the mounts to ease some of the vibration concerns. What is your shade scenario? Will you have any vents, decks, racks, or antennas on top of the roof you need to work around? If you are in unshaded parking most of the time, go for the highest series voltage you can safely power. More likely partial shade scenarios will benefit from more parallel options.
HarryN
Solar Addict
This is a photo that I found - not complete but you can get the idea.
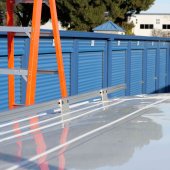
This is a Transit 148 MR standard length / not extended - looking toward the front of the van.
We were experimenting with various rail lengths because she wanted to get as much up there as possible.
In this photo you can see that the rails extended well past the front mount, but that ended up being too far forward for solar panels due to air flow coming off of the windshield.
In general you will not anything more than a few inches in front of that most forward mount point.
When done this way, the minimum panel length is 59 inches, but we ended up using I think a 62 on her van.
Panels placed on top of these rails have just enough height to clear the roof in the center - the roof top is not flat but has a high point in the middle. If you tried to put panels in between the rails mounted this way - it would not work.
Make sure to test drive after mounting panels - wind deflectors might be needed - depending on how you mount things.
We also put a 1515 cross beam at the back. It sticks out past the roof but not past the bumper. She leans her ladder against it and uses it to hang things when stationary.
________________
I like this approach, but don't dismiss the off the shelf roof racks on the market. The price of 8020 components adds up fast. By the time that you buy it all, including what it takes to mount the panels to the rails - it starts to push $2k pretty hard. Still - much more solid, safe and easier to mount it all up there in manageable piece sizes than some of the other systems on the market.
It is easy to get lulled into thinking that the individual prices will make it cheap - but in the end it won't.
I use spreadsheets for everything - for better or worse so I even count the bolts and washers.
What ever approach that you go down, really think through how every bolt and nut will get fastened up on that roof. My first sprinter project ~ 6 years ago we almost couldn't finish due to a handful of nuts in very tight locations. Had to buy and modify some special wrenches and rely on my youngest son's finger size at the time.
90% of this approach can be done with 1 person, and a helper for the last 10%.
(added) No one needs to go on top of the roof itself. The roof of vans will dent if you go up there. The customer is pretty light and had gone up there for some reason prior to adding the rails.
You can also add cross beams for a small walkway if you want on top of the rails, but even the mounting points are not designed to have multiple people on top of the roof.
Attachments
Last edited:
KITROBASKIN
Solar Enthusiast
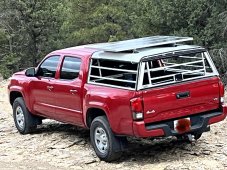
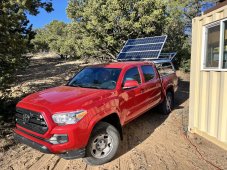
Possibly reaching midpoint of experimentation because considering a different mounting option. Turns out the latest Bouge rack has quality materials and simpler angle change, but very fiddley adjustability, though better than their older previous racks I understand. Rivet hinges make it less easy for thieves I hope? We live on a very rough road and go places with rough roads. This morning the 300W of panels was giving about 20W in that second image because of shading. I need 24W for battery and Victron inverter.
Attachments
KITROBASKIN
Solar Enthusiast
When the camper top manufacturer designed this shell for our dogs, I asked for lightweight.
The price of aluminum stock per piece is spendy I found out when looking at mounting options. This is an experimental first approach without more material.
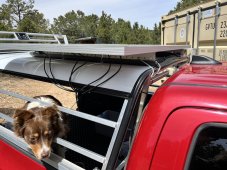
This week it is hoped perhaps offset angle aluminum can be used on the leading edge of the panels for aerodynamic compensation.
Key to locking the rack onto the shell is a cinch strap on the leading edge. In no way am I saying this system is guaranteed to function.
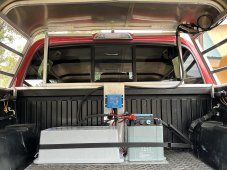
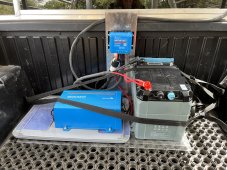
In addition to the rubber open mat on the floor of the bed to give traction for the dogs, it also provides some cushion for shock on components. Neoprene washers were also used under the nuts on the inverter.
Second image shows when inverter is in use (short term space heating, induction cooktop, etc.)
Apologies for thread stray but images were requested and it seemed proper to provide qualifiers to the images. Also hoped folks would consider whether rough roads will be in their future. Thanks!
The price of aluminum stock per piece is spendy I found out when looking at mounting options. This is an experimental first approach without more material.
This week it is hoped perhaps offset angle aluminum can be used on the leading edge of the panels for aerodynamic compensation.
Key to locking the rack onto the shell is a cinch strap on the leading edge. In no way am I saying this system is guaranteed to function.
In addition to the rubber open mat on the floor of the bed to give traction for the dogs, it also provides some cushion for shock on components. Neoprene washers were also used under the nuts on the inverter.
Second image shows when inverter is in use (short term space heating, induction cooktop, etc.)
Apologies for thread stray but images were requested and it seemed proper to provide qualifiers to the images. Also hoped folks would consider whether rough roads will be in their future. Thanks!
Attachments
Similar threads
- Replies
- 2
- Views
- 230
- Replies
- 5
- Views
- 681
- Replies
- 46
- Views
- 4K
- Replies
- 3
- Views
- 510
- Replies
- 8
- Views
- 295