diy solar

diy solar

Battleborn four BB10012 battery bank failure

So, what did you do to remedy the problem? Was that terminal bolt actually loose? Did you think of actually removing the plastick from between the busbar and the terminal then reassemble it with the teminal actually contacting the busbar? Is it possible? Thanks for sharing the pictures
They were loose alright. VERY loose.
I followed the original design,simply unscrewed the nuts and bolts, cleaned everything shiny, assembled with an anticorrosive conductor fluid and tightened the nuts as a 50 year journeyman mechanic would. Zero voltage drop.
Voltmeter showed 13.4vdc as soon as a proper connection was made.
But I will insure charging amps never exceed 30adc.
Repositioning the terminal post would have made replacing the cover I cut out, impossible. I went with how they did it, for some reason.?!?
 
They were loose alright. VERY loose.
I followed the original design,simply unscrewed the nuts and bolts, cleaned everything shiny, assembled with an anticorrosive conductor fluid and tightened the nuts as a 50 year journeyman mechanic would. Zero voltage drop.
Voltmeter showed 13.4vdc as soon as a proper connection was made.
But I will insure charging amps never exceed 30adc.
Good deal. Thank you. This is why the battleborn guy told me they will not grant warranty if this happens with my new batteries. Only one explanation: they know it's a known issue, manufacturing defect and probably don't wan't to be responsible.
 
First lesson. Any company talking about EBITDA isn't worth investing in. EBITDA is code for "Please don't look at our revenue numbers"
How naive am I. Although the inventory is Chinese, I assumed "Assembled in the U.S.A." meant something more.
When I was a curious lid in the 50s, "Made in Japan" meant pure junk. Then they named a manufacturing plant region USA.
That changed everything. Their products were the same, just labelled "Made in USA."

For you young guys, this was a time when the black & white TV went squirrely, we'd remove EVERY vacuum tube and carry them to Murphy's 5&10 and plug 'em into the machine to test them.............for a quarter!

Yes, new tech has me in a quandary. What comes next?
 
So basically BB have a piece of plastic between 2 current carrying metal bars with a loose bolt holding it all together ?
Simply put, yes. See my photos.

These were abused. My EIGHT BB10012s in s/p for 48vdc have performed flawlessly for three years. I never see the voltage drop below 52vdc.
 
So, what did you do to remedy the problem? Was that terminal bolt actually loose? Did you think of actually removing the plastick from between the busbar and the terminal then reassemble it with the teminal actually contacting the busbar? Is it possible? Thanks for sharing the pictures
I did consider doing this as I stated in the above post. But then the "lid" I cut off would no longer fit properly.
They must have had a good reason for doing this.???
 
Victron I might agree with you. Have you read any of the last 4 pages of this thread? Theres SO many that are better, and cheaper. By a lot.
Well certainly I read all of it…does the fact something was written make it true..? to be fair there should be two sides to every accusatory story presented …im only hearing one side ,and a lot of opinionated finger pointing….
There seems to be a gleeful desire among many for a rush to judgement in this case..

When all the facts are known I will make my own decision.
J.
 
Thank you. Look at the videos and see for yourself.

Hi - I looked at your video and I think that I might have an alternative way to connect the batteries that will reduce your challenge.

When working with a battery like a BB with a built in BMS, it is important to be able to re-set the BMS occasionally and the only way to do that is to disconnect that individual battery from the pack.

The way that I do this is to run a wire from each parallel battery series string - through a breaker - and then to a bus bar.

In your setup, you are running a fairly massive amount of current though the terminals that accumulates with each battery. Approaching 300 amps at the end battery connection. Imagine if you had 10 of those in a row - by the end it would potentially be 1 000 amps.

Re-wire your battery pack so that each battery has a 2 awg wire from the terminals to the bus bar. Ideally with a way to re-set the BMS built in (like a breaker ) or put a battery terminal fuse on each one so that you at least have some safety on the pack.

The final wire from the battery pack to your electrical system will then come from the bus bar - not from a battery terminal.

I am not an expert and of course no product is perfect - but I have not had this problem after quite a few mobile electrical builds with them in 24 and 48 volt configurations.
Thank you for the pointers. Will definitelly give it a look. This time around I will for sure video document the whole install to show proper install.
 
I did consider doing this as I stated in the above post. But then the "lid" I cut off would no longer fit properly.
They must have had a good reason fo
Well certainly I read all of it…does the fact something was written make it true..? to be fair there should be two sides to every accusatory story presented …im only hearing one side ,and a lot of opinionated finger pointing….
There seems to be a gleeful desire among many for a rush to judgement in this case..

When all the facts are known I will make my own decision
Good for you. Make your own decision. So will I
 
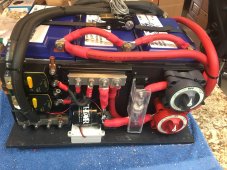
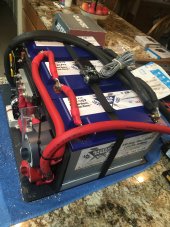
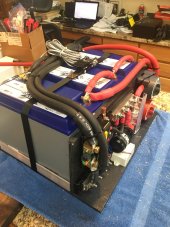
Took me some time to find this pic of my battery package devices and wire. In 2019 when I built this really compact 3P 12v BB battery package (to fit in a really small tight space, the generator compartment of my old Lance Y2k camper) this is how I stacked the wire lugs on the the battery terminals.
First note that all the wire lugs are on one side of the battery lug. The only current flowing thru the lug is the current assoc with the one battery. Current thru resistance causes heating. By limiting the current flowing thru the lug to that one batteries charge or discharge current, less heat is generated at the lug. Current from other two batteries does not flow from one side of the battery lug to the other. Current along with resistance creates the localized heat in the battery lug and wire terminals.

Front

IMG_1614.JPG

Side

IMG_1615.JPG

Other Side

IMG_1616.JPG
 
Last edited:
...................

When working with a battery like a BB with a built in BMS, it is important to be able to re-set the BMS occasionally and the only way to do that is to disconnect that individual battery from the pack.

.....................
Why is it important to 'reset the BMS ocassionally' ?
 
Back
Top