diy solar

diy solar

Best method for mounting 400w panels to cargo conversion roof racks

gooby

New Member
Joined
Aug 27, 2022
Messages
20
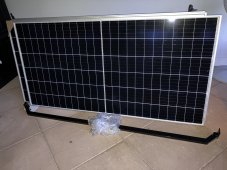
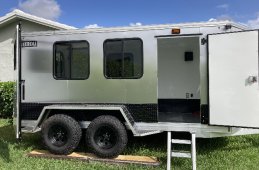
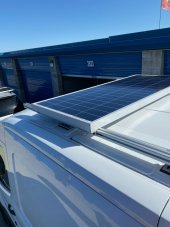
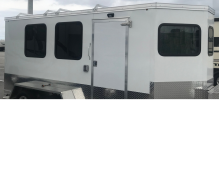
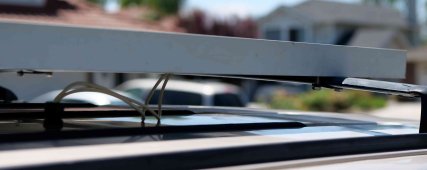
I have a 16' cargo trailer to mount these panels to. I have 4 of the roof racks in the photo. They will cover the entirety of the roof basically. I am wondering the most sturdy/safe way to mount these to the panels would be? Z brackets seem like they are made for 100-150w panels. Each long side on the panels has 6 mounting holes. I'm not sure if they should be mounted long-ways or perpindicular to the length of the trailer. I would prefer to not drill dozens of holes into my roof racks that would allow moisture and water to enter them. But if that is the only option, so be it.

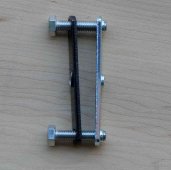
Some sort of U bolt seems like it would make the most sense, but I'm not entirely sure.

I would be more than happy to pay someone to do all of this for me, but I have yet to find anyone interested or competent enough that I would let them install on my trailer. Any tips would be appreciated.

Here is a link to the panels.
 

Attachments

  • IMG_0238.jpg
    IMG_0238.jpg
    255.6 KB · Views: 23
  • IMG_0240.jpg
    IMG_0240.jpg
    129.2 KB · Views: 23
  • IMG_3858.jpg
    IMG_3858.jpg
    305.1 KB · Views: 23
The way that you mount panels onto a van or trailer is to start with the roof and frame structure of it and design an attachment system.

Once you have this, then you choose panels that can fit and will be easy to attach in a solid and reliable way.

It is nice that you have panels already, but they may or may not have anything to do with what will actually work with the trailer. Based on what I have done on vans and trailers, I would not personally use those solar panels on a trailer even if they were free. There is nothing wrong with the panels - it is just the wrong panel for the application.
 
The next step actually is to get some photos of the roof of the trailer and how it is framed so that an attachment system can be put on.

There needs to be an air gap between the solar panels and the roof in order for the panels to work effectively.

The way that I normally attach panels to van roofs is to first attach a piece of 1515 rail to the roof - and then attach some smaller / nominal 26 x 60 ish size panels to the rails. This is very solid and will hold up much better to the vibrations of a trailer.

I will see if I can find an example photo.
 
Ok - here is an example. We were testing just how far we could push having a solar panel mounted toward the front of this Transit (customer request )

The original 1515 rail that I put on was 9 ft but we replace it with an 11 ft one and it extended forward past the front factory mounting pad location.

The solar panel was slid forward to be about 12 inches past this mounting point as well to max out the roof space.

Well - it was too far forward and there just was too much air flow coming up under it from the windshield. The nice thing about using this 8020 rail material is that it is easy to re-position things so not a big deal - just some time to loosen bolts and move it around.

This particular panel in the photo is a solarland poly panel. It is not cheap but it is very tough and it has a very wide light acceptance angle - so it will start to capture light early in the morning and run later into the afternoon.

_____________

BTW- I really like your trailer - what kind is it?

Harry
 

Attachments

  • panel 1 mounted on Danielles van.jpg
    panel 1 mounted on Danielles van.jpg
    168.1 KB · Views: 22
I looked some more at the trailer that you have - the supplier's web site.

Unfortunately I still could not really tell exactly how it is built from a frame work perspective and what the roof looks like.

The key is going to be figuring out how the framing is set up and how to tie into it without having it leak at very strong tie points.
 
The first pic is a little angle piece of aluminum less than one inch, taped on. I did not think it would hold but it is. The 2nd is the front end of the panel. The 3rd pic is the other side from the 1st pic, so is a little more taped on, and you can see the panel hanging off the back about 4 inches. The last is another panel that is the same front and back, each end just 3 tap screws and the aluminum taped on. The roof is corrugated so the I doubled up on tape in the divots, but that may or may not have worked as well..
There is nothing holding the long sides of the panels on except the rear panels that have the little pieces (1st n 2nd pic) bc the back of the panel is hanging in the air off the back. The front panels held on only at the ends, not the sides.
100 watt panels.
It has been years, and lots of travel and never any issues.
Roof is galvanized steel.
I left a little air gap under and that is enough the cables can run under also.
The vinyl fabric is the AC cover.
The self-tappers (with the drill bit end) just screw through the aluminum solar frame easily. I pre drilled the angle iron then self tapped into the panel, just dont hit the glass/solar cell portion of the frame.

I have taped to aluminum and to fiberglass with the same type glass panels with never any issues. I would advise DO NOT drill holes in your roof.

IMG_3952.jpgIMG_3953.jpgIMG_3954.jpgIMG_3955.jpg
 
I looked some more at the trailer that you have - the supplier's web site.

Unfortunately I still could not really tell exactly how it is built from a frame work perspective and what the roof looks like.

The key is going to be figuring out how the framing is set up and how to tie into it without having it leak at very strong tie points.
The trailer is 100% aluminum. The frame, interior, everything is aluminum.

The racks bolt into the sides of the aluminum trim on the roof. The racks are a few inches elevated on top of the roof as well. I attached a photo of someone elses trailer who has the same rack system from the manufacturer.

The roof is one sheet of aluminum. It's flimsy. The strong points are the aluminum frame which you can see on the aluminum trim surrounding the trailer. That is where the racks bolt to.

That's fine, if you think these are not appropriate for my trailer then I can sell them at a loss and find something else. I liked that I was capping out my ecoflow input at about 1600 max watt input. If you have other suggestions, I'm open to them. Thanks.
 

Attachments

  • Untitled.png
    Untitled.png
    917 KB · Views: 9
Last edited:
4 bolts per panel will be enough. You will be drilling into the rack, it will take decades for it to corrode, so i would not worry about that.
However you have to mount them. Once they are bolted in they will be very secure, sideways, frontways, it wont matter, just whatever seems to fit the best is all you need worry about.
Is not too late to sell the trailer still....
Sounds good.

Yeah, I certainly would like to reorder with a few changes(less windows, multiple inches of insulation, etc) but in my current financial/life situation it's just not possible. In the future, definitely. I'm gonna be in shaded state parks for the most part in the next few months so I'll be alright for now.

The good news is the trailer is fairly unique and I think I can get what I paid for it when I decide to sell. This trailer with like 3 inches on XPS board would probably be the perfect trailer for me.
 
Mostly I use parts from 8020 to do mounting.

On that van the L brackets are aluminum ones that they sell for their 15 series.

On my explorer I used the existing roof rack and some of the fasteners to make a sort of clamp to hold the panels on.
 

Attachments

  • side view of solar panel on explorer mount compressed.jpg
    side view of solar panel on explorer mount compressed.jpg
    131 KB · Views: 10
  • compressed mounting bracket for explorer solar panels.jpg
    compressed mounting bracket for explorer solar panels.jpg
    82.7 KB · Views: 10
Mostly I use parts from 8020 to do mounting.

On that van the L brackets are aluminum ones that they sell for their 15 series.

On my explorer I used the existing roof rack and some of the fasteners to make a sort of clamp to hold the panels on.
These brackets look good. So let me ask you this, if the panels only have one hole every 12 inches in the aluminum frame portion, would you need to drill out holes so the brackets can be used?
 
ok. I thought you said money was not a problem. Trust me though, if it were me knowing what I know now, 23 years on doing this sort of thing, I would sell trailer and make that life's issue and financial goals. You have a lemmon, sorry, this is not the trailer you want to invest time and money in. Yea, it looks super nice for a cargo trailer and you can sell it for top dollar pretty quick I bet. Then you know how to order a trailer for a camper.

Cut the window sq footage in half at least. That eats up a lot of cabinet space too.

You can drill as many holes in your solar panel frame as you want. Lots of room to drill away, bottom or sides, just obviously dont hit the solar cells....

If you are going the bracket route then get little c-clips and clip them on the roof rack. Not the do-it-yourselfer type ones for projects but ones for permanent mounting. They use them in construction to hold things to the roof structure. They bolt on, not the flimsy handles that you spin by hand.
 
These brackets look good. So let me ask you this, if the panels only have one hole every 12 inches in the aluminum frame portion, would you need to drill out holes so the brackets can be used?

You can drill holes anywhere along the bottom of the solar panel frame as desired and attach it as much as needed. That is what I did in that photo.

That particular setup is made from some 8020 T slot "triple nuts". I bored out the threads on one so the bolt would go through and slide - and then it just tightens up. You can do the same thing with any piece of material, I just happened to have those.

I was actually looking for some more official roof rack tie on brackets but everyone local was out of stock and they wanted ridiculous prices for stuff.

The big challenge to be honest is having enough room to work and get tools in there so don't go too crazy trying to have zero clearance or you will turn an easy job into an all day event.

The frame of a solar panel is sort of formed U shaped aluminum glued to the front glass.

AFAIK, the warranty of a solar panel is void if you drill through the side and attach there because it can result in stress and leaks, but you have to do what you have to do to make things work. What can happen though (and does happen ) is thermal expansion of various things - such as the trailer roof expanding more than the solar panels - and it literally ripping the seal apart.

I am not sure that the warranty matters on a solar panel used on a vehicle / trailer anyway as it is probably void.

Don't under estimate the forces of driving down the road at 60 -70 mph and having similar cross winds acting on solar panels. It is like flying a kite in a hurricane. Bolt them down well and consider to also add adhesive tape.

Added

For convenience here is what those T nuts look like. There is a 5/16 version and an 8mm thread version.

Multiple companies sell them.


You can make something on your own that will work but after having done this a few times I can tell you that having the threads in place like that on a piece that matches is a huge benefit when assembling in a tight spot.
 
Last edited:
Back
Top