diy solar

diy solar

BMS Drops to about 1-2 amps when I put a load on it?

bass-o-matic

New Member
Joined
Oct 26, 2023
Messages
62
Location
Austin, Texas
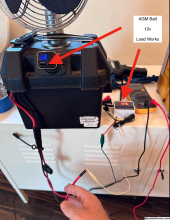
Oh man. So sad. Is my BMS busted?

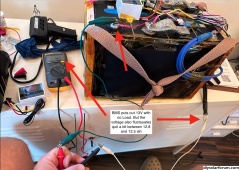
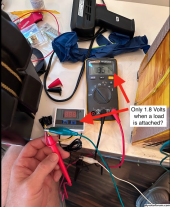
1. When I put my Meter on the + and - of the pack I get a lovely 14.x volts...

2. When I put my Meter on the + of the pack and the - of the BMS I get 13.1

3. If I attach my little thermostat control to a regular old AGM battery it turns on.

3.5 Update... if I attach the thermo control directly to the battery pack and not the BMS. It works fine. I thought for a minute I had a bad cell that would just die with any load.

4. If I attach my little thermostat control to the + of my pack and the - of the BMS:
a. I only get 1.8 amps on the meter
b. The little thermostat control obviously won't work.

I would expect the BMS to put out 13.1 and the thermostat control to work. What's going on? Thanks for any help!
1.png2.png3.pngtempImagem9GErW.jpg
 
Last edited:
Hi, how long have you used the battery?
Is it fully charged before connected to the load?
How many power does the load draw?
 
Brand new cells. Top Charged and Capacity tested. That thermostat draws nothing. MilliAmps. I may be new to this but is sure feels like the BMS is bad. Since I can power the thermostat (Load) if I just connect it to the battery without the BMS.
 
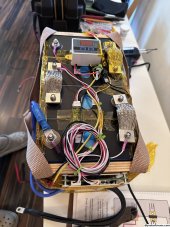
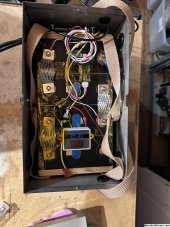
Is the BMS wired correctly? Have a link to directions?

Shouldn't these changes be made?

1.jpg
 
You should make changes as suggested by @#40Fan. I'm torn on how much difference it would make to the BMS but might as well do it right to eliminate doubt.

Pull the wiring harness out of the BMS and check the voltages on the connector.
Pin 1 is negative
Pin 1 vs pin 2 should be ~3.3V
Pin 1 vs pin 3 should be ~6.6V
Pin 1 vs pin 4 should be ~9.9V
Pin 1 vs pin 5 should be ~13.2V (aka battery voltage)

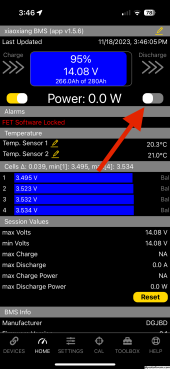
I see a bluetooth dongle there. What does the app show?
 
As sugested use the app to see the conditions In the BMS . There are switch settings that may need changing.
Is the temperature sensor connected to the BMS?
 
Fire up the app and see what it is showing. Are the charging and discharge FETs enabled?
 
Awesome suggestions! I'll try them out and report back. Might be a day.

Yea, I'm doubtful it's the BMS since it's the best money can buy! OverKill all the way!

I didn't realize the exact terminal needed to be that precise since the terminals are connected with a busbar and the diagram I followed, from the OverKill site... has the wire in the middle of the busbar... which made me feel like, "Meh, either one is good. Go for the prettiest." I guess I'm wrong... More laters.

Thanks!
 
1. When I put my Meter on the + and - of the pack I get a lovely 14.x volts...

2. When I put my Meter on the + of the pack and the - of the BMS I get 13.1
Something is not right, there should not be that great a voltage drop through the BMS.

Let us know when you've looked into the settings in more details.

In the meantime... I can't clearly see in pic #4, but is that some tape you've got all over the BMS at the end of the case? If so, best to remove it. The outside casing of the BMS should be in free air as those metal sides need to perform as a heatsink to keep the MOSFETs cool when a large current is drawn.
 
some tape you've got all over the BMS at the end of the case? If so, best to remove it. The outside casing of the BMS should be in free air as those metal sides need to perform as a heatsink
Nice Catch! Thanks!

1. Troy called me from OverKill... Ummm... You have to turn it on in the software. He he... All working.

IMG_2831.PNG
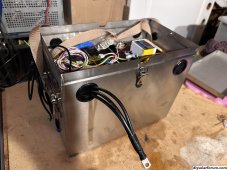
2. Now about the heatsink thing. I Waaaaassss going to mount it in this sexy stainless Group27 box I found...
a. Since I have silicone heating pads under a metal plate under the battery... I thought the box would keep them nice and warm.
b. But now I think I should move the BMS OUTSIDE the box... Keep BMS cool, Keep Batteries Warm. I could mount the BMS with 3m VHB tape... On the outside of the box.. Thoughts?

tempImageup7dYZ.jpg

tempImagemIijjg.jpg
FYI. The Nylon webbing is so I can drop the batt in the box and also pick up the box. I'm 57... it's 47 pounds! And I have to drop it under my bench seat so it's rather akward.
 
I slept on it and I think I've answered my own question. The metal box has to go. I'll remove the tape mounting the BMS and replace it with 3M VHB. Then I'll cut and mount custom angle iron on the bottom of the wood ends of the pack. I'll secure the pack to the oak floor of the RV with 1/4 bolts and Wood Nut inserts. https://a.co/d/fVxLN7L

I have to solve 4 problems.

1. The BMS needs to stay cool.
2. The cells need to stay somewhat warm but this is probably less important as the odds of it ever freezing INSIDE my RV are super low.
3. The pack needs to be SECURE. As I often go down washboard roads.
4. I have to be able to slide the whole pack forward since I have limited space to mount all my stuff. The Negative and Positive Terminal Bars will be behind the battery.

So, if I ever need to get behind the battery I can unbolt it, slide it forward. I'll just make the + and - 2AWG cables long enough to let the battery slide forward. We're only taking about 8 inches. This won't happen very often. Twice a year just when I feel like checking the torque on things.

Bob's your uncle.
 
Last edited:
Back
Top