The 1 kHz impedance measurement only represents a smaller portion of cell terminal voltage slump. Overvoltage slump dominates at most used range of load current. 1 kHz impedance is mostly conductive resistance of cell metallic connections within cell, with a minor amount of ionic diffusion resistance.
Cell 1kHz impedance cell terminal voltage slump has an almost linear relation to cell current.
Overvoltage slump, also called polarization potential, is overhead energy used by cell to move lithium ions within cell to supply demanded current. Its terminal voltage variance value has a logarithmic relation to cell current. It is highly dependent on aging of cell and cell temperature.
As cell ages, overpotential slump will degrade 3x or more from its initial new cell overpotential value for moderate, 0.2-0.4 C(A) cell demand current. Overpotential cell terminal voltage slump at moderate cell current correlates well to cell matching and extractable capacity. It has an exponential time constant decay to equilibrium. In the 15% to 90% state of charge range for LFP, the time to equilibrium terminal voltage is in the 1 to 3 minute range. For given model cell, it is dominate effect for cell matching. 1 kHz impedance measurement is not a good indicator of cell matching.
Overvoltage slump is highly dependent on cell temperature. It rises at a greater rate below about +10 degrees C. This is why LFP performance drops off significantly at cold temps.
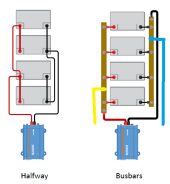
Many folks have trouble with bus bar connection resistance due to aluminum oxide build up on cell terminals. Clean terminals with solution of 50% - 70% water diluted white vinegar to remove oxide then clean then dry with 91-99% isopropyl alcohol. Aluminum oxide regrows quickly so terminal connections need to be clamped down soon after cleaned and dried. Keep salty fingers off of contact surfaces.
FYI, the slight bumps in SoC voltage curve is due to the way lithium ions are stored in the negative electrode graphite lattice layers. The lattice layers are like a multi-level parking garage that only opens particular levels when previous parking level is nearly full. The most prominent bumps are at about 55% and 10% state of charge points where a new parking level arrangement happens. There are four other minor bumps that are harder to detect by SoC open circuit voltage.
For LFP cells, the overall cell voltage is the positive LFP cathode electrode potential minus the negative graphite electrode potential. LFP cathode has a very flat voltage versus SoC until less than about 5% state of charge. Most of the SoC voltage profile is due to graphite negative electrode which ranges from about -0.25 vdc at totally discharged to about 0 volts at fully charged. LFP positive electrode potential is almost flat at 3.43 vdc from fully charge to about 5% state of charge where it starts to quickly collapse. This means fully charged cell is close to 3.43vdc rested open circuit voltage.
Cell open circuit voltage when absorb charged above 3.43v is due to surface charge, mostly in graphite. This has very little capacitance storage capacity, approximately 0.01% of cell AH capacity, and can be quickly dissipated with a short load. 0.01% of 280 AH cell is only 28 mAH's. This surface charge will bleed off on its own if cell is left open circuited in a few hours to a few days. Don't think because your top balanced cells have rested open circuit voltage between 3.45v and 3.65v they are not balanced. As long as their rested open circuit voltage stays above 3.45v they are full charged and balanced.