AndreasPassat
New Member
Just wanted to share some input (and my opinion) on the EG4 LL Server Rack I just received.
I didn't get a picture when the pallet arrived at my work, but the unit was mounted to the pallet upside down and now there's a portion of the top surface that's bent. Not a showstopper but it's just one of those things that could've been avoided had someone been paying attention or cared.
Ultimately when this install is complete it will be in the corner of my garage / shop, so esthetics are not that high of a priority for me.
I don't like it but I don't want the hassle of getting it replaced either. Going through that ordeal with Signature Solar now on a Mini Split unit, what a nightmare that is. But that's a whole other story for a different post.
Back on topic.
I rate the build and quality of this server rack at average or just slightly below average.
I will admit I was pleasantly surprised when I opened the box inside the server cabinet and saw leveling plate casters instead plain old casters. Those types of casters are of much higher quality than regular ones. The ability to adjust a solid rubber pad to take the weight off the caster wheel and make the cabinet nice and sturdy so it doesn't have any ability to roll around if pushed on is assuring.


This I don't quite understand the cable glands on the bottom of the cabinet.

If used there's only about 1-1/2" of clearance above the floor for wire / cable.

There's a video (link below) out there with Signature Solar talking about the differences between the (2) server racks that handle the LifePower4 and the EG4 LL series batteries.
S.S. states that the new EG4 LL server racks are fully welded instead assembled like the LifePower4 racks.
That's fine but I found this a bit odd, bracket was originally screwed in and then welded. All brackets are the same, screwed on then welded.
For me, it would have been nicer if the angle steel bracket were turned around, so the screw is on the bottom making the installation of the batteries a bit easier.
These batteries are heavy. Not everyone can maneuver these batteries around with ease. It would make sliding the batteries in just a bit easier for the people that aren't as strong as the next person. (Just a personal observation)
A note about the "Fully Assembled" claim mentioned on the S.S. website.
I think that means all of the screws are screwed into place for the battery mounting and busbar connections.
Admittingly, seeing all of the screws in place makes it as simplistic as possible to visually show all hardware is present.
However, all battery mounting screws must be removed from each slot that will be occupied before any battery installation can take place.
Also, the above referenced video S.S. mentions removing the battery handles for better wiring clearances after installation. I was able to leave my handles on without any issue. I'm guessing the rack I purchased has yet another slight revision with the busbar location than one in the video.

That cheesy little crossbar in the center I'm guessing is for shipping purposes only. I removed and discarded it.

Here's a shot of the busbar(s).
Those really need to be revised and improved upon.
There are (3) different screws on the busbar. (2) of them look the same but are not.
NOTE:
I just realized I need to clarify this a bit better with different colored arrows. I will add another post after I double check the screw locations and screw lengths.
There are total of (16) screws per busbar.
Ten of them are M6 thread. Four of them are for mounting the busbar to the cabinet (short threaded length).
Six of them are for the battery connections (long threaded length). It is extremely hard to discern which ones are which.
You definitely want to be sure you're connecting the batteries to the proper M6 screw. It is entirely possible to connect the battery cables to the (4) screws that mount the busbar to the cabinet. If those are used for battery connections, you run the risk of stripping out the thread standoff when torquing the screw to the specified torque value.
The remaining (6) screws are M8 thread and are for mounting the Battery Server Rack to the Inverter.
Another observation I had; the busbar has some kind of plastic sleeve on it. The sleeve has cut-outs around the screws so that when the cable lug is attached to the busbar it makes full electrical contact. Problem is that the cut-outs aren't concentric around the screw and some of them are so bad that when the cable lug is attached its contacting plastic instead of full face contact on the busbar.
Because everything I mentioned above, I actually removed the busbar to find out what screws are what and check the condition of this plastic sleeve.

Here's an example of that plastic that gets in the way of making full face contact. That's insane!

I actually reversed both bus bars to make sure all electrical contacts are the proper way.
Here is the busbar as I recieved the cabinet.
Notice the large exposed area (red circle) before I reversed the busbar.

Here is the same busbar reversed.
The battery cable connections line up much better with no risk of cable lug contacting the plastic film.
A few of the main lug connections are no good but I found locations that are of no risk.

I didn't get a picture when the pallet arrived at my work, but the unit was mounted to the pallet upside down and now there's a portion of the top surface that's bent. Not a showstopper but it's just one of those things that could've been avoided had someone been paying attention or cared.
Ultimately when this install is complete it will be in the corner of my garage / shop, so esthetics are not that high of a priority for me.
I don't like it but I don't want the hassle of getting it replaced either. Going through that ordeal with Signature Solar now on a Mini Split unit, what a nightmare that is. But that's a whole other story for a different post.
Back on topic.
I rate the build and quality of this server rack at average or just slightly below average.
I will admit I was pleasantly surprised when I opened the box inside the server cabinet and saw leveling plate casters instead plain old casters. Those types of casters are of much higher quality than regular ones. The ability to adjust a solid rubber pad to take the weight off the caster wheel and make the cabinet nice and sturdy so it doesn't have any ability to roll around if pushed on is assuring.
This I don't quite understand the cable glands on the bottom of the cabinet.
If used there's only about 1-1/2" of clearance above the floor for wire / cable.
There's a video (link below) out there with Signature Solar talking about the differences between the (2) server racks that handle the LifePower4 and the EG4 LL series batteries.
S.S. states that the new EG4 LL server racks are fully welded instead assembled like the LifePower4 racks.
That's fine but I found this a bit odd, bracket was originally screwed in and then welded. All brackets are the same, screwed on then welded.
For me, it would have been nicer if the angle steel bracket were turned around, so the screw is on the bottom making the installation of the batteries a bit easier.
These batteries are heavy. Not everyone can maneuver these batteries around with ease. It would make sliding the batteries in just a bit easier for the people that aren't as strong as the next person. (Just a personal observation)
A note about the "Fully Assembled" claim mentioned on the S.S. website.
I think that means all of the screws are screwed into place for the battery mounting and busbar connections.
Admittingly, seeing all of the screws in place makes it as simplistic as possible to visually show all hardware is present.
However, all battery mounting screws must be removed from each slot that will be occupied before any battery installation can take place.
Also, the above referenced video S.S. mentions removing the battery handles for better wiring clearances after installation. I was able to leave my handles on without any issue. I'm guessing the rack I purchased has yet another slight revision with the busbar location than one in the video.
That cheesy little crossbar in the center I'm guessing is for shipping purposes only. I removed and discarded it.
Here's a shot of the busbar(s).
Those really need to be revised and improved upon.
There are (3) different screws on the busbar. (2) of them look the same but are not.
NOTE:
I just realized I need to clarify this a bit better with different colored arrows. I will add another post after I double check the screw locations and screw lengths.
There are total of (16) screws per busbar.
Ten of them are M6 thread. Four of them are for mounting the busbar to the cabinet (short threaded length).
Six of them are for the battery connections (long threaded length). It is extremely hard to discern which ones are which.
You definitely want to be sure you're connecting the batteries to the proper M6 screw. It is entirely possible to connect the battery cables to the (4) screws that mount the busbar to the cabinet. If those are used for battery connections, you run the risk of stripping out the thread standoff when torquing the screw to the specified torque value.
The remaining (6) screws are M8 thread and are for mounting the Battery Server Rack to the Inverter.
Another observation I had; the busbar has some kind of plastic sleeve on it. The sleeve has cut-outs around the screws so that when the cable lug is attached to the busbar it makes full electrical contact. Problem is that the cut-outs aren't concentric around the screw and some of them are so bad that when the cable lug is attached its contacting plastic instead of full face contact on the busbar.
Because everything I mentioned above, I actually removed the busbar to find out what screws are what and check the condition of this plastic sleeve.
Here's an example of that plastic that gets in the way of making full face contact. That's insane!
I actually reversed both bus bars to make sure all electrical contacts are the proper way.
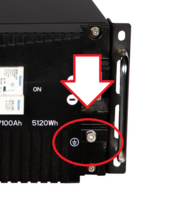
Here is the busbar as I recieved the cabinet.
Notice the large exposed area (red circle) before I reversed the busbar.
Here is the same busbar reversed.
The battery cable connections line up much better with no risk of cable lug contacting the plastic film.
A few of the main lug connections are no good but I found locations that are of no risk.
Last edited: