Ucatchmydrift
New Member
- Joined
- Jul 2, 2022
- Messages
- 195
So someone very clever over at home assistant forum had figured out how to grab the data from an epever upower hi series inverter and display it all in home assistant (thank you timnis?? (and marcos for the lead pin out) (according to epever themselves, this is not possible! - i think they are telling a few porkies!)
Still, being new to it all myself it still took me a good while to get it all working.. So, here is what i hope is a beginner friendly guide:
First, buy a ebox-wifi-01. - this is the blue first addition one. (if you have one that has problems with changing to sta mode, there is a fix for this now, so let me know and ill try and find it) - i bought one just the other day and it changes from ap to sta mode and back again no problem..
The ebox-wifi-01 comes with a rj45 lead. - cut one end off and buy this:
(ive deleted the link as ebay seller has changed the advert!) - but just buy a db9 rs485 connector like this:

Then scroll down this thread until you find the info on how to wire up the above serial connector:

 community.home-assistant.io
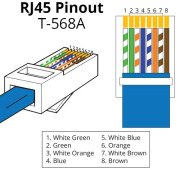
Then wire up the serial connector as shown in the above thread, for those with the hi series inverters like me, this is:
RJ45 - DB9
1-9 (5V). (so eg, pin 1 on the rj45 conn goes to pin 9 on the serial conn linked above)
3-8 (B-)
5-7 (A+)
7-4 (gnd)
8-5 (gnd).
You will then have a working lead that you can then plug into the inverter.
Test that it works by downloading the epever pair app: (not sure about iphone etc)

 play.google.com
Open up your phone and scan the wifi and you should see the wifi being broadcast by the ebox-wifi-01. Connect to it. Go to the app > wifi > and boom, should pick up your inverter settings. I was pretty hapoy just to get these settings remotely from such a simple trick making a lead up

But, that was the easy part.
Annoyingly, you have to connect to the ebox-wifi-01's wifi every time you want to check your inverter, but, you can change the settings of the ebox-wifi-01 in its firmware, which then allows it to be connected and accessed on your wifi network.
But, by doing this you then cant use the app!
But, you can use home assistant instead, which is much better, and no connecting to the ebox-wifi-01 ap mode anymore - awsome.
So, go to the ebox-wifi-01 firmware by typing 11.11.11.254 in your browser. Log in using details : admin, admin.
You should get this screen:

You want to put it in station mode, click sta settings first, find your wifi, enter in your wifi password, then go to mode settings, select sta. Then reset. (dont forget to save setting first!)
It will then connect to your home wifi network.
Log into your personal router settings page amd you should see the ebox-wifi-01 on your network like this:

The 4th one down is the ebox-wifi-01. Next to it you can see its ip address, you can type this into your browser to access the firmware again if you needed to put it back into ap mode at any time in the future. You will also need this ip address for home assistant.
Now your all ready to set it up with home assistant.
I will assume you have HA up and running on a RPI or similar, so, simply go to your config.yaml file and paste this:
(replace the host ip address with the one from your ebox-wifi-01 i said about earlier) i think the port will be the same as the one below. (oh, and the slave number in the code below is 10 for my inverter, it may be different for yours. You can find this by plugging in the lead that came with the inverter into a laptop running the epever station monitor software and in the settings somewhere you can read the inverter id. This will tell you your slave id for the code below..)
modbus:
- name: epever
type: rtuovertcp
host: 192.168.0.188
port: 8088
delay: 5
timeout: 10
close_comm_on_error: false
retry_on_empty: true
retries: 20
sensors:
# Utility
- name: "Grid Voltage"
unit_of_measurement: V
slave: 10
address: 0x3500
input_type: input
scale: 0.01
precision: 2
- name: "Grid Current"
unit_of_measurement: A
slave: 10
address: 0x3501
input_type: input
scale: 0.01
precision: 2
- name: "Grid State"
# 0:Normal, 1:Low input; 2:High input, 3: No connected
slave: 10
address: 0x3511
input_type: input
- name: "Grid Total"
unit_of_measurement: kWh
slave: 10
address: 0x350F
input_type: input
scale: 0.01
precision: 2
data_type: int32
swap: word
count: 2
# PV Array
- name: "PV Voltage"
unit_of_measurement: V
slave: 10
address: 0x3549
input_type: input
scale: 0.01
precision: 2
- name: "PV Current"
unit_of_measurement: A
slave: 10
address: 0x354A
input_type: input
scale: 0.01
precision: 2
- name: "PV Power"
unit_of_measurement: W
slave: 10
address: 0x354B
input_type: input
scale: 0.01
precision: 2
data_type: int32
swap: word
count: 2
- name: "PV Total"
unit_of_measurement: kWh
slave: 10
address: 0x3557
input_type: input
scale: 0.01
precision: 2
data_type: int32
swap: word
count: 2
# Load
- name: "Load Voltage"
unit_of_measurement: V
slave: 10
address: 0x3521
input_type: input
scale: 0.01
precision: 2
- name: "Load Current"
unit_of_measurement: A
slave: 10
address: 0x3522
input_type: input
scale: 0.01
precision: 2
- name: "Load Total"
unit_of_measurement: kWh
slave: 10
address: 0x3530
input_type: input
scale: 0.01
precision: 2
data_type: int32
swap: word
count: 2
# Battery
- name: "Battery Voltage"
unit_of_measurement: V
slave: 10
address: 0x3580
input_type: input
scale: 0.01
precision: 2
- name: "Battery Current"
unit_of_measurement: A
slave: 10
address: 0x3581
input_type: input
scale: 0.01
precision: 2
- name: "Battery Capacity"
unit_of_measurement: "%"
slave: 10
address: 0x3586
input_type: input
scale: 1
- name: "Battery Temp"
#ElectricChrgBatteryTemp
unit_of_measurement: "°C"
slave: 10
address: 0x3512
input_type: input
scale: 0.01
- name: "Battery State"
# 0:Normal, 1:Overvoltage, 2:Undervoltage, 3:Undervoltage Disconnect, 4:Fault
slave: 10
address: 0x3589
input_type: input
- name: "Charging Mode"
# 1:Solar Priority, 2:Utility & Solar, 3:Solar
slave: 10
address: 0x9607
input_type: holding
- name: "Inverter Mode"
# 0:Inverter priority, 1:Utility Priority
slave: 10
address: 0x9608
input_type: holding
- name: "Inverter Temp"
#LoadHeatSink2Temp
unit_of_measurement: "°C"
slave: 10
address: 0x3533
input_type: input
scale: 0.01
template:
sensor:
- name: "Grid Power"
unit_of_measurement: W
device_class: power
state: "{{((states('sensor.grid_current')| float(0) * states('sensor.grid_voltage')| float(0))) | round(2) }}"
- name: "Power into batt"
state: "{{ states('sensor.grid_power') | float + states('sensor.pv_power') | float }}"
unit_of_measurement: W
device_class: power
- name: "House Load"
unit_of_measurement: W
device_class: power
state: "{{((states('sensor.load_current')| float(0) * states('sensor.load_voltage')| float(0))) | round(2) }}"
sensor:
- platform: integration
source: sensor.house_load
name: energy_used
unit_prefix: k
round: 2
You will need to check when you paste it in that all the indents (use two spaces, not a tab) are correct as yaml is fussy about this.
The last two sensors grid_power and house_load i made up to calculate the watts from the voltage and current as it seems there are no registers in the inverter that store that info..
I contacted epever and they sent me the full rs485 modbus register addresses for the upower hi series, you can find the link at the bottom of this thread of you want to add more settings from the inverter to HA:
 community.home-assistant.io
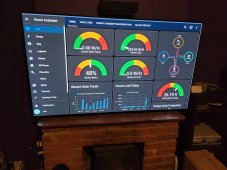
You can then make a dashboard that looks something like this:


Again, a big thank you to timnis on ha forum, else i could not have figured this all out myself, at liest, not without alot of hair pulling. ???
Still, being new to it all myself it still took me a good while to get it all working.. So, here is what i hope is a beginner friendly guide:
First, buy a ebox-wifi-01. - this is the blue first addition one. (if you have one that has problems with changing to sta mode, there is a fix for this now, so let me know and ill try and find it) - i bought one just the other day and it changes from ap to sta mode and back again no problem..
The ebox-wifi-01 comes with a rj45 lead. - cut one end off and buy this:
(ive deleted the link as ebay seller has changed the advert!) - but just buy a db9 rs485 connector like this:
Then scroll down this thread until you find the info on how to wire up the above serial connector:
EPEVER Modbus RS-485 Config
Hi, Ebox-wifi-01 works on 5vdc and below is Pinout from UPower (older version) RS485 port. So, I assume you need to connect following pins Rj45 - db9 1 - 9 (5vdc) 7 - 5 (gnd) 5 - 7 (A) 3 - 8 (B)
community.home-assistant.io
Then wire up the serial connector as shown in the above thread, for those with the hi series inverters like me, this is:
RJ45 - DB9
1-9 (5V). (so eg, pin 1 on the rj45 conn goes to pin 9 on the serial conn linked above)
3-8 (B-)
5-7 (A+)
7-4 (gnd)
8-5 (gnd).
You will then have a working lead that you can then plug into the inverter.
Test that it works by downloading the epever pair app: (not sure about iphone etc)
EPEVER Pair - Apps on Google Play
Solar controller, off-grid inverter, hybrid energy system remote control
Open up your phone and scan the wifi and you should see the wifi being broadcast by the ebox-wifi-01. Connect to it. Go to the app > wifi > and boom, should pick up your inverter settings. I was pretty hapoy just to get these settings remotely from such a simple trick making a lead up
But, that was the easy part.
Annoyingly, you have to connect to the ebox-wifi-01's wifi every time you want to check your inverter, but, you can change the settings of the ebox-wifi-01 in its firmware, which then allows it to be connected and accessed on your wifi network.
But, by doing this you then cant use the app!
But, you can use home assistant instead, which is much better, and no connecting to the ebox-wifi-01 ap mode anymore - awsome.
So, go to the ebox-wifi-01 firmware by typing 11.11.11.254 in your browser. Log in using details : admin, admin.
You should get this screen:
You want to put it in station mode, click sta settings first, find your wifi, enter in your wifi password, then go to mode settings, select sta. Then reset. (dont forget to save setting first!)
It will then connect to your home wifi network.
Log into your personal router settings page amd you should see the ebox-wifi-01 on your network like this:
The 4th one down is the ebox-wifi-01. Next to it you can see its ip address, you can type this into your browser to access the firmware again if you needed to put it back into ap mode at any time in the future. You will also need this ip address for home assistant.
Now your all ready to set it up with home assistant.
I will assume you have HA up and running on a RPI or similar, so, simply go to your config.yaml file and paste this:
(replace the host ip address with the one from your ebox-wifi-01 i said about earlier) i think the port will be the same as the one below. (oh, and the slave number in the code below is 10 for my inverter, it may be different for yours. You can find this by plugging in the lead that came with the inverter into a laptop running the epever station monitor software and in the settings somewhere you can read the inverter id. This will tell you your slave id for the code below..)
modbus:
- name: epever
type: rtuovertcp
host: 192.168.0.188
port: 8088
delay: 5
timeout: 10
close_comm_on_error: false
retry_on_empty: true
retries: 20
sensors:
# Utility
- name: "Grid Voltage"
unit_of_measurement: V
slave: 10
address: 0x3500
input_type: input
scale: 0.01
precision: 2
- name: "Grid Current"
unit_of_measurement: A
slave: 10
address: 0x3501
input_type: input
scale: 0.01
precision: 2
- name: "Grid State"
# 0:Normal, 1:Low input; 2:High input, 3: No connected
slave: 10
address: 0x3511
input_type: input
- name: "Grid Total"
unit_of_measurement: kWh
slave: 10
address: 0x350F
input_type: input
scale: 0.01
precision: 2
data_type: int32
swap: word
count: 2
# PV Array
- name: "PV Voltage"
unit_of_measurement: V
slave: 10
address: 0x3549
input_type: input
scale: 0.01
precision: 2
- name: "PV Current"
unit_of_measurement: A
slave: 10
address: 0x354A
input_type: input
scale: 0.01
precision: 2
- name: "PV Power"
unit_of_measurement: W
slave: 10
address: 0x354B
input_type: input
scale: 0.01
precision: 2
data_type: int32
swap: word
count: 2
- name: "PV Total"
unit_of_measurement: kWh
slave: 10
address: 0x3557
input_type: input
scale: 0.01
precision: 2
data_type: int32
swap: word
count: 2
# Load
- name: "Load Voltage"
unit_of_measurement: V
slave: 10
address: 0x3521
input_type: input
scale: 0.01
precision: 2
- name: "Load Current"
unit_of_measurement: A
slave: 10
address: 0x3522
input_type: input
scale: 0.01
precision: 2
- name: "Load Total"
unit_of_measurement: kWh
slave: 10
address: 0x3530
input_type: input
scale: 0.01
precision: 2
data_type: int32
swap: word
count: 2
# Battery
- name: "Battery Voltage"
unit_of_measurement: V
slave: 10
address: 0x3580
input_type: input
scale: 0.01
precision: 2
- name: "Battery Current"
unit_of_measurement: A
slave: 10
address: 0x3581
input_type: input
scale: 0.01
precision: 2
- name: "Battery Capacity"
unit_of_measurement: "%"
slave: 10
address: 0x3586
input_type: input
scale: 1
- name: "Battery Temp"
#ElectricChrgBatteryTemp
unit_of_measurement: "°C"
slave: 10
address: 0x3512
input_type: input
scale: 0.01
- name: "Battery State"
# 0:Normal, 1:Overvoltage, 2:Undervoltage, 3:Undervoltage Disconnect, 4:Fault
slave: 10
address: 0x3589
input_type: input
- name: "Charging Mode"
# 1:Solar Priority, 2:Utility & Solar, 3:Solar
slave: 10
address: 0x9607
input_type: holding
- name: "Inverter Mode"
# 0:Inverter priority, 1:Utility Priority
slave: 10
address: 0x9608
input_type: holding
- name: "Inverter Temp"
#LoadHeatSink2Temp
unit_of_measurement: "°C"
slave: 10
address: 0x3533
input_type: input
scale: 0.01
template:
sensor:
- name: "Grid Power"
unit_of_measurement: W
device_class: power
state: "{{((states('sensor.grid_current')| float(0) * states('sensor.grid_voltage')| float(0))) | round(2) }}"
- name: "Power into batt"
state: "{{ states('sensor.grid_power') | float + states('sensor.pv_power') | float }}"
unit_of_measurement: W
device_class: power
- name: "House Load"
unit_of_measurement: W
device_class: power
state: "{{((states('sensor.load_current')| float(0) * states('sensor.load_voltage')| float(0))) | round(2) }}"
sensor:
- platform: integration
source: sensor.house_load
name: energy_used
unit_prefix: k
round: 2
You will need to check when you paste it in that all the indents (use two spaces, not a tab) are correct as yaml is fussy about this.
The last two sensors grid_power and house_load i made up to calculate the watts from the voltage and current as it seems there are no registers in the inverter that store that info..
I contacted epever and they sent me the full rs485 modbus register addresses for the upower hi series, you can find the link at the bottom of this thread of you want to add more settings from the inverter to HA:
EPEVER UPower-Hi modbus setting, if you need :)
Yes thanks, ive done a template calculation instead, and works ok. Ive also emailed epever to see if they can send me the full register information for upower hi series.
community.home-assistant.io
You can then make a dashboard that looks something like this:
Again, a big thank you to timnis on ha forum, else i could not have figured this all out myself, at liest, not without alot of hair pulling. ???
Attachments
Last edited: