diy solar

diy solar

Got a mess

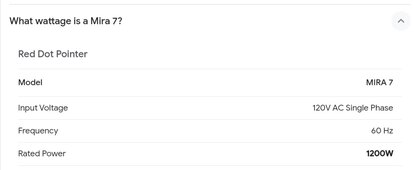
Do you know how many watts it takes to operate the laser engraver? I don't know a thing about them but the google suggested less than 150 watts so consumption is dramatically less than the heater and you'd probably be able to run the engraver for a decent amount of time.

Electric heat is a huge draw. Are you planning on using this for heat on a regular basis?

Feel free to walk us back and tell us what you want to do with this set-up. Operate a laser engraver at a craft show 8 hours a day? Keep your van warm? when it's 30 degrees outside?
No not planning on that sorta heat persay. This is a 12x20 shed that I'm using for a workshop aka craft room. As soon. As sun comes up it heats pretty quickly which will probably be a little problematic in july! I have 2 laser engravers in my house and my pro model is in the building partly in a crate. If I read correctly it's 1200 watts. No it's not for shows etc, I actually have a Jackery pro if I were into traveling with my equipment. I'd probably run 2 hours a day at best with this machine and not consecutive hours.
 
Last edited:
Okay, the Mira 7 consumes 1200 watts (not amps). 1200 watts/12 volts = 100 amps. Regardless, that's closer to your 1500 watt heater example than I thought, i.e. still a heavy draw for the 2 100 ah batteries.

So you have a 12 x 20' workshop that you want to power via solar? If that's correct you'll need to inventory electricity demand in order to build the system to support that. The demands include the engravers, heaters, lighting, etc. Then it becomes a math exercise to determine energy storage (battery capacity), solar panel capacity and inverter needs.

I know this is straying from your original question, that's easily solved with a bigger cable. I'm starting to talk about system design requirements which may be more than you want right now.

Are you off-grid on the entire property or just at the workshop?
 
Given the NEW INFO provided about just that ONE Lazer Engraver and considering that lights & other things will be needed, I have to say that 12 Volt is NOT Appropriate in this use case... At Minimum 24V could & would serve this application reasonably well.
12V @ 250A Max Draw can only deliver 3000W or 120V/25A while 24V can deliver 6000W 120V/50A (3x 120V/15A Circuits).

Further number crunching (back of envelope)
12V/100AH = 1280Wh / 1.28 kWh
24V/100AH = 2560Wh / 2.56kWh

Battery Packs in PARALLEL Share/Divide both Load & Charge proportionately to their relative capacity.

Given the lastest information, going to 24V is far more practical but a bigger battery system means more charging capacity and that means using 300+ Watt panels and a respectable SCC. Some AIO's could certainly accomplish it at a reasonable cost.
 
Okay, the Mira 7 consumes 1200 watts (not amps). 1200 watts/12 volts = 100 amps. Regardless, that's closer to your 1500 watt heater example than I thought, i.e. still a heavy draw for the 2 100 ah batteries.

So you have a 12 x 20' workshop that you want to power via solar? If that's correct you'll need to inventory electricity demand in order to build the system to support that. The demands include the engravers, heaters, lighting, etc. Then it becomes a math exercise to determine energy storage (battery capacity), solar panel capacity and inverter needs.

I know this is straying from your original question, that's easily solved with a bigger cable. I'm starting to talk about system design requirements which may be more than you want right now.

Are you off-grid on the entire property or just at the workshop?
Only my bldg is off grid. I would not be using a heater and machine at same time, it would be middle of day and it only gets cold in there late night or overnight, increasing the system capacity is certainly ok to discuss but I would just use 1 powered thing at a time.
 
@kdsmith Did you mention if you verified that the cable was in fact 1/0 copper? The one cable that is melted/smoked can you cut it and make sure it is copper? Do you have any way to accurately measure the diameter of the wire itself not including the insulation?
 
@kdsmith Did you mention if you verified that the cable was in fact 1/0 copper? The one cable that is melted/smoked can you cut it and make sure it is copper? Do you have any way to accurately measure the diameter of the wire itself not including the insulation?
My husband can test it. . He's a QA tech for a wire company. He can put it under xray. I've never had a reason to doubt anything until posting on here.
 
@kdsmithThe one cable that is melted/smoked can you cut it and make sure it is copper?
This is what I what I was thinking- even if the diameter is correct, you definitely want to make sure it's copper. If it's something like copper clad aluminum or just aluminum, you're going to get way, way less amps through it. Knowing the diameter is correct for 1/0 isn't enough- I would do as rhino suggested and cut it, especially if the insulation is already melted.
 
Everyone has been quite polite and unfortunately, as a seasoned solar person, none of us recommend or suggest Renogy, most often we call them RUN-O-Gee. They are marvelous at marketing, so so to dubious hardware and lackluster accessories some of which can be dubious at best. For Solar Systems & Battery Systems, using ultra-fine copper wire is the default for numerous reasons and that does have a cost attached for the quality & Grade of wiring.
 
Everyone has been quite polite and unfortunately, as a seasoned solar person, none of us recommend or suggest Renogy, most often we call them RUN-O-Gee. They are marvelous at marketing, so so to dubious hardware and lackluster accessories some of which can be dubious at best. For Solar Systems & Battery Systems, using ultra-fine copper wire is the default for numerous reasons and that does have a cost attached for the quality & Grade of wiring.
We just bought the stuff and followed YouTube video and Renogy was brand. My husband's job actually makes wire for panels ( not Renogy) and that's why he wanted to try solar. Plus our quote for electric was a lot more pricey for start up.
 
We just bought the stuff and followed YouTube video and Renogy was brand. My husband's job actually makes wire for panels ( not Renogy) and that's why he wanted to try solar. Plus our quote for electric was a lot more pricey for start up.

Just an additional note I always tell prospective buyers into solar equipment, is don't fall into the trap of boxing one's self into a corner by purchasing equipment that doesn't lend itself well to future expansion (scaling)...

I recommend to only buy systems like inverters, all-in-one units, that are parallel stackable, so if one runs out of sufficient power capacity, they can easily add more inverters where they sync together and allow for larger power draws.

Even with this concept though, one still has to be mindful of what equipment they purchase, because as we've seen as well, the cutting edge solar industry tends to run many models of units for not extremely long terms, as better models seem to be coming out regularly, where it can get harder to find original units, that are being discontinued in lieu of newer models.

There are some tried and true models which seem to stay on the market for longer durations though.

https://www.currentconnected.com/ and https://signaturesolar.com/ seem to be popular places for purchasing equipment and have lots of choices.
 
You mentioned using bus bars to address the number of connections on the positive battery terminal. (I would assume there are as many on the negative terminal). This concerns me and I will say, YES, get some quality bus bars rated higher than your current loads.

One question, did The battery cable heat along the entire length or at the battery terminal connection? Stacking lugs on battery terminals is not a safe thing to do. You are creating resistance that can cause problems like you are having. At the very least you should get one of these Blue Seas battery mounted fuses
.
 

Attachments

  • Blue Seas double fuse..jpg
    Blue Seas double fuse..jpg
    30.7 KB · Views: 2
Last edited:
Only my bldg is off grid. I would not be using a heater and machine at same time, it would be middle of day and it only gets cold in there late night or overnight, increasing the system capacity is certainly ok to discuss but I would just use 1 powered thing at a time.

Using one powered thing at a time can help with minimizing the peak capacity that your system needs to provide but a) it may become inconvenient and b) it won't change the fact that you may need increased battery capacity (batteries take time to recharge.

You can see that if you leave up to this gang we'll spec a much larger and more expensive system ready to scale when you do want to run more things simultaneously.

For now, if you want to test the concept of solar it seems you have enough info to correct the smoking wire problem and get the system running to support the engraver as a concept with the caveats:
- It will probably be able to run about an hour or so on a battery charge (being conservative)
- The 400 watts of panels will struggle to harvest enough energy in a day to run the engraver for an hour. They'll need to be positioned very well with lots of sunlight to keep up with engraver usage.

It sounds like you're in the early stages and I guarantee that you can get your shop up and running on solar and folks here can help. It'll take some learning, some experimentation and eventually more equipment. Some here would say to stop now, do the math bite the bullet and spend a few thousand on more gear and so it's 'right' from the start. Working incrementally or building a system to support the shop in the future today is your choice. The incremental approach often costs more in the end because, as mentioned above, some of the initial purchases eventually needs to be replaced.

As for heat, I'm in favor of propane or diesel heaters over electric: they'll keep you warmer and leave more electricity for your projects,
 
Just an additional note I always tell prospective buyers into solar equipment, is don't fall into the trap of boxing one's self into a corner by purchasing equipment that doesn't lend itself well to future expansion (scaling)...

I recommend to only buy systems like inverters, all-in-one units, that are parallel stackable, so if one runs out of sufficient power capacity, they can easily add more inverters where they sync together and allow for larger power draws.

Even with this concept though, one still has to be mindful of what equipment they purchase, because as we've seen as well, the cutting edge solar industry tends to run many models of units for not extremely long terms, as better models seem to be coming out regularly, where it can get harder to find original units, that are being discontinued in lieu of newer models.

There are some tried and true models which seem to stay on the market for longer durations though.

https://www.currentconnected.com/ and https://signaturesolar.com/ seem to be popular places for purchasing equipment and have lots of choices.
We went with this pkg because the videos stated you could add on. I actually upgraded to the 2000 watt inverter and 400 watt panels. That was doubling original pkg. Also have 2 controllers, 20 amp it came with in box and the 30 amp on wall that we are using. I'm all for expansion as needed.
 
Using one powered thing at a time can help with minimizing the peak capacity that your system needs to provide but a) it may become inconvenient and b) it won't change the fact that you may need increased battery capacity (batteries take time to recharge.

You can see that if you leave up to this gang we'll spec a much larger and more expensive system ready to scale when you do want to run more things simultaneously.

For now, if you want to test the concept of solar it seems you have enough info to correct the smoking wire problem and get the system running to support the engraver as a concept with the caveats:
- It will probably be able to run about an hour or so on a battery charge (being conservative)
- The 400 watts of panels will struggle to harvest enough energy in a day to run the engraver for an hour. They'll need to be positioned very well with lots of sunlight to keep up with engraver usage.

It sounds like you're in the early stages and I guarantee that you can get your shop up and running on solar and folks here can help. It'll take some learning, some experimentation and eventually more equipment. Some here would say to stop now, do the math bite the bullet and spend a few thousand on more gear and so it's 'right' from the start. Working incrementally or building a system to support the shop in the future today is your choice. The incremental approach often costs more in the end because, as mentioned above, some of the initial purchases eventually needs to be replaced.

As for heat, I'm in favor of propane or diesel heaters over electric: they'll keep you warmer and leave more electricity for your projects,
Certainly is always an option to grow the system. I am in a 1 year lease to own currently on this system other than batteries so I hope to get by with what I have until I can add more to it once lease is paid. I also have a Jackery pro generator and it can pull lights etc when needed. It has windows with nice natural light, And yes on heat, we heat house with a fireplace so we aren't keen on electric heat really either.
 
You mentioned using bus bars to address the number of connections on the positive battery terminal. (I would assume there are as many on the negative terminal). This concerns me and I will say, YES, get some quality bus bars rated higher than your current loads.

One question, did The battery cable heat along the entire length or at the battery terminal connection? Stacking terminals on battery terminals is not a safe thing to do. You are creating resistance that can cause problems like you are having. At the very least you should get one of these Blue Seas battery mounted fuses
.
Yes on both terminals ( only was talking about positive because negative side didnt have the issue.) has controller, cable from ANL fuse going to inverter and now the 2nd Battery is connected on so there's 3. Never knew anything about a busbar until asked in Renogy FB group which doesn't move as fast as this one.
 
We went with this pkg because the videos stated you could add on. I actually upgraded to the 2000 watt inverter and 400 watt panels. That was doubling original pkg. Also have 2 controllers, 20 amp it came with in box and the 30 amp on wall that we are using. I'm all for expansion as needed.


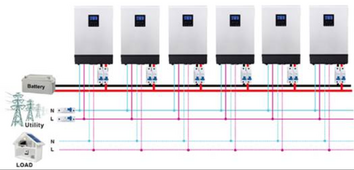
The idea of parallel stacking is visualized like this (with or without Utility connected, doesn't matter):

1704308147474.png


I don't know if Renogy has any of these or not. But I'd definitely just skip 12v or 24v system and just jump to a 48v single inverter (all-in-one, equipped with solar panel inputs) system, that is capable of stacking multiple units together. Then the equipment can grow with your needs, and you can move it to new location as needed later.
 
Also do I need 250 ANL rather than the 300? And to busbar or not?
The manual for your inverter calls for a 250A fuse. That's possibly part of the issue you experienced since you used a 300A fuse If the amp rating of the fuse is too large then it will not fail before the wiring does. I've also read from what looks like a reputable marine electrical installer that the max current should be ~80% of the overcurrent protection device's rating. Which for your inverter would be 200A, since the max constant draw is ~166A.

If you haven't I would recommend talking about this with Renogy. Obviously they want to provide you with the smallest cables they can justify but I find it unlikely they that don't have a technical explanation for why they supply those cables and call for that fuse size. Knowing what that reason is can help you determine what the cause of the wiring melting was.

The fuse should be as close to the busbar as possible between the inverter and the busbar.

You also need to make sure that wiring and overcurrent protection from the batteries to the busbar is appropriately sized.
 
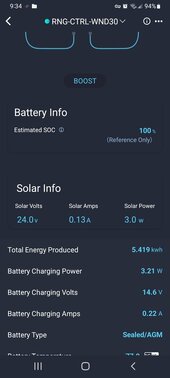
Nothing really to report yet. Someone asked earlier if system was 12 or 24. I have always thought 12v because batteries and panels were parallel. I grabbed this screenshot. Does this indicate different? Screenshot_20240111-093413_DC Home.jpg
 
Back
Top