diy solar

diy solar

Low cost balcony railing mount for Solar panels. : )

Chadd

New Member
Joined
Jul 13, 2022
Messages
92
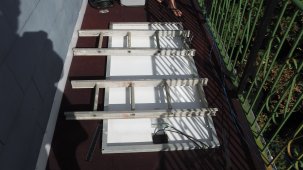
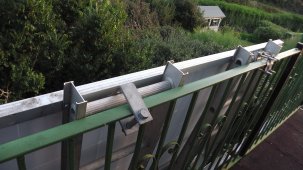
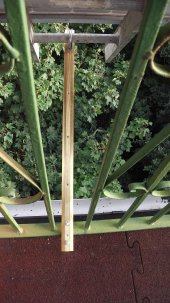
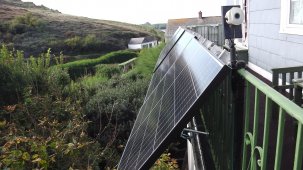
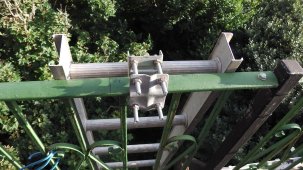
Good evening a suggested low cost balcony railing mount for Solar panels. : )

There will be two of these ladder sections to each panel, one either end.

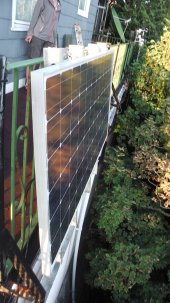
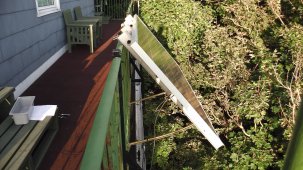
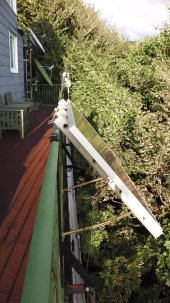
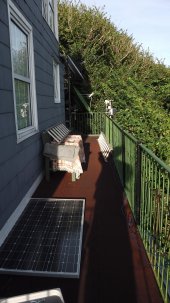
The panels will be mounted horizontally.

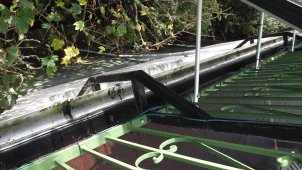
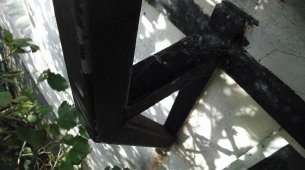
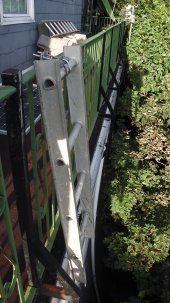
We have not sorted the configuration for the bottom of the cut off ladder section, to give the correct angle yet.

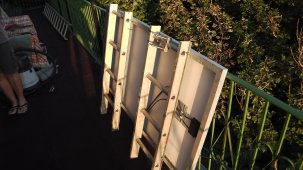
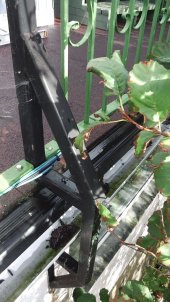
But its a start, four rungs to each ladder section hung by shelly mounts.

I have found some shelly mounts at about £5 each, I think one to each ladder section should do, that is two per panel ?

The ladders to cut up can be obtained on local Face book or Free Cycle for nothing : )

So far so good, any opinion as to using two shelly mounts per ladder section are welcome.

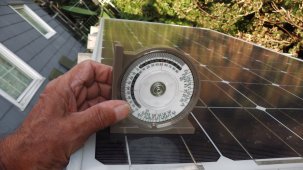
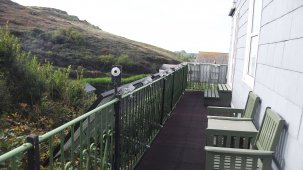
We are 50 yards due Souh West from the sea, the balcony faces South.

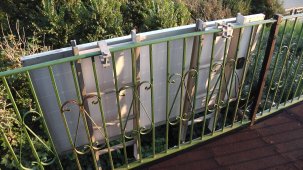
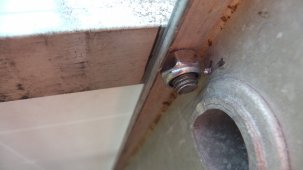
The panels should bolt through the edges of this ladder OK, but some ladders are a box section, so long bolts or threaded rod would be required.

The ladders sections will be cleaned up and possibly painted green to match the railings : )

There is a stream below the balcony, not one that is ever visited as it is private land and hidden away by trees.

God Bless Chadd & Alanna who provided lots of input : )
 

Attachments

  • IMGA0215.JPG
    IMGA0215.JPG
    454.3 KB · Views: 73
  • IMGA0216.JPG
    IMGA0216.JPG
    186.8 KB · Views: 71
  • IMGA0218.JPG
    IMGA0218.JPG
    164.2 KB · Views: 72
Last edited:
Good evening some more progress : )

We only have one shelly clamp at the moment, the others are on order so the left hand hanger is temporary.

Its an old power pole fitting that Alanna asked for when they were rewiring : )

Drilling four holes in each ladder section was fine, but rather nerve racking into the frame of the panel,

Drills sometimes have a mind of their own.

I put a small piece of wood at the bosses suggestion, directly under the spot the drill would penetrate so it could not hit the back of the glass.

It will be interesting to see how the panel output is tomorrow, as it has been flat on the deck : )

Next job is to work out a two position winter and summer device, to angle the panels towards the sun.

Then cut to length the rest of the ladder sections and lay in more cables.

A message just received informed us the four new 340w panels will be delivered next week.

We may fit some decorative mesh to cover up the rear of the panels from the balcony.

The ladder sections were extremely light, they are bolted on in four place each one, two top two bottom..

God Bless Chadd
 

Attachments

  • IMGA0222.JPG
    IMGA0222.JPG
    315.5 KB · Views: 32
  • IMGA0223.JPG
    IMGA0223.JPG
    394.9 KB · Views: 34
  • IMGA0224.JPG
    IMGA0224.JPG
    497.2 KB · Views: 34
  • IMGA0225.JPG
    IMGA0225.JPG
    155.6 KB · Views: 34
  • IMGA0226.JPG
    IMGA0226.JPG
    222.6 KB · Views: 31
  • IMGA0229.JPG
    IMGA0229.JPG
    394.1 KB · Views: 32
Looks good so far. I'd be cautious of the forces you are putting on the railing with the additional weight, especially if wind were to get behind the panels.
 
Looks good so far. I'd be cautious of the forces you are putting on the railing with the additional weight, especially if wind were to get behind the panels.
The railings were well made locally in Mullion Village and galvanised.

I installed them, the mounts are thick metal with heavy raw bots into a block wall.

The winds we get are South West so side on to the panels, the Cove has high cliffs to the South and North, the building is to the north behind the panels..

We have several weather stations, the anemometers on the balcony read low wind speeds compared to one on a pole above the building roof.

I have two 1.5 m sat dishes at one end of the balcony and they survive the winds at that level.

Nothing is completely bomb proof but every thing we do is thought through so we can sleep through the storms : )

Besides I have Alanna to make sure I do it property LOL
 
It looks like it will work perfectly right up to the time where it doesn't. (TIC)

Of course we all are always on the hunt for lower cost mounting solutions but every time I try to reinvent the wheel I discover that I should have just bought a factory engineered solution. Granted you've got a pretty unique application.

Thanks for sharing and good luck!
 
Drilling four holes in each ladder section was fine, but rather nerve racking into the frame of the panel,

Drills sometimes have a mind of their own.

I put a small piece of wood at the bosses suggestion, directly under the spot the drill would penetrate so it could not hit the back of the glass.

Slip a piece of tubing, e.g. copper water tubing, over the drill bit and against chuck. That will serve as a fail-safe drill stop. If drill slips in chuck, hole is shallower not deeper.
 
Thank you for the reminder, I shall do that with the new panels : )
 
Good evening I managed a temporary device to elevate the panel.

It has a pole clamp on each end, the metal I used is not strong enough, but was sufficient to try it out.

I am however not able to make sense of the level device pictured, it has several scales.

I read that : -

90 - lat = 50 + 23 is winter = 63

90 - lat = 50 -23 is 17 = winter

An average setting for all year 30 to 40 so they say ?.

The satellite dishes in the back ground are pointing approx south at the Clarke belt.

At mid summer round mid day the sun can block signals.

So they shoulds be at the same angle as the panel for mid summer ?

I will make the angle of the panels adjustable for winter and summer.

This should be simpl;e to a do by drilling several extra holes, to move the clamp further along the metal that is holding the panel out.

Perhaps a phone app would be simpler than the level gauge I have ?

Can anyone looking at the images give a rough guess as to the angle I have the panel at.

This would enable me to perhaps make some sense of the gauge : )
 

Attachments

  • IMGA0230.JPG
    IMGA0230.JPG
    575.1 KB · Views: 32
  • IMGA0234.JPG
    IMGA0234.JPG
    350.4 KB · Views: 31
  • IMGA0236.JPG
    IMGA0236.JPG
    475.7 KB · Views: 30
  • IMGA0237.JPG
    IMGA0237.JPG
    189.7 KB · Views: 29
  • IMGA0232.JPG
    IMGA0232.JPG
    222.5 KB · Views: 31
Last edited:
An update I have just installed an angle meter on my phone it looks like 37 degrees, will see if it looks right in the day time : )
 
Looking at the photos I'd guesstimate 35-40 degrees tilt.
I like your ingenuity.
For your tilt adjustment you could make/buy a turnbuckle type design, make fixed mounting locations on the balcony and panel then adjust the length of the connector to change the angle.
Ps it looks like you have some pretty awesome views.


Thank you for your reply,

I had to look up Turnbuckle, even though it turns out I use them as guy wire tensioners : )

I have a couple of spare jacks, the type used to motor dive satellite dishes, but that would be over the top.

Besides at least one would be required for each of the four new panels due soon.

The suns position could be tracked, as the dishes track the Clarke belt from horizon to horizon.

I have read some panels do track, not sure if they just turn or follow the suns ark ?

Maybe something will turn up at the Wednesday boot sales, wood to replace the temporary metal elevator will hold it for now.

Anything not galvanised or duralumin corrodes quickly in the salt air.

Thank you for you estimation of the angle, it coincides with the angle meter phone app : )

The increase in output today, compared with the panels previous position flat horizontal on the balcony is very considerable.

Yes the views are great, even after 36 years, there are large rocks and an island a mile out to sea.
 
Tracking is definitely not worth it, especially now that panels are 1/10th the price they used to be.
Back then, more panels cost the same as buying a tracker, but the tracker was expected to fail in 5 years.
Just install more, maybe with different orientation.
You might do a seasonal tilt adjustment.
That sound about right, the jacks used to move larger satellite dishes often fail due to water ingress, I have put plastic bags over mine.

I suppose if you had an array of ground mounted panels, an arrangement could be made to move them all together.

We have no ground level space to speak of, so its the roof or the balcony.

Its a very interesting subject, not really a hobby but still boys toys : )

The best things in life are free, as the light from our star.

God Bless Chadd
 
All done : )

Thank you to all for assistance.

We have had some high winds and nothing moved.

Four 340w panels facing South and one 190w facing West, which picks up the evening sun very well.

Four 130 amp leisure batterys which so far are fine.

The red charger with timer is to take advantage of off lower cost off peak mains power if required.

God Bless
 

Attachments

  • IMGA0290.JPG
    IMGA0290.JPG
    123.1 KB · Views: 31
  • IMGA0268.JPG
    IMGA0268.JPG
    390.8 KB · Views: 31
  • IMGA0269.JPG
    IMGA0269.JPG
    500.7 KB · Views: 31
I like to see poeple come up with great ideas to mount their panels, you are very cleaver and inventive. Great job. you power room is also well thought out and the wiring is clean with no messes. If you batteries are in parallel you may want to look at Victronenergy.com, download section,then Tech information, then The Wiring Unlimited Book around page 19, it shows the best configuration for parallel batteries. Great views.
 
I would note that the panels are supported only by the fence, and the fence meets the balcony deck in a line. No triangles. The torsional strength of fence posts and connection to deck is what bears the weight of cantilevered panels, and wind. (except where fence turns a corner at the end.)

Yours may be supported well enough. Often, just screws into deck.
My old wood fences can't even stand on their own anymore, so I've diagonally braced with 2x4 to stake in ground.

I did a fence mount, but with additional provisions:

The metal balcony railings have steel box section posts each section, these go round the gutter to heavy bracket / pads that are fixed with large raw bots into the block wall.

There were pads as well down to the walk on surface screwed through the deck, but this caused leaks.

Peter from the Atlantic Forge in the village who made the railings, said the pads were just an extra.

The leaks had rotted the decking and the beams.

About five years ago Alanna and I striped it all off and replaced the beams and decking, we then laid a rubber roof and covered that with interlocking rubber tiles.

I cut off the pads, the railings were just as secure due to the heavy wall mounts.

They also turn at right angles at both ends.

Had they been just screwed through the decking. I agree it would have been risky to say the least : )
 
Last edited:
I like to see poeple come up with great ideas to mount their panels, you are very cleaver and inventive. Great job. you power room is also well thought out and the wiring is clean with no messes. If you batteries are in parallel you may want to look at Victronenergy.com, download section,then Tech information, then The Wiring Unlimited Book around page 19, it shows the best configuration for parallel batteries. Great views.
Thank you for your kind words, it has been an interesting project and watching the free power generated is great : )

I shall take a look at the URL you kindly provided.

They are not expensive batteries, maybe later we will upgrade, the supplier had top marks on Trust Pilot which is good, people normally only go there to complain : )

We have a river / stream in the Cove that once powered several water mills, if only I could get the locals interested : )

God Bless Chadd
 
The metal balcony railings have steel box section posts each section, these go round the gutter to heavy bracket / pads that are fixed with large raw bots into the block wall.

There were pads as well down to the walk on surface screwed through the deck, but this caused leaks.

Peter from the Atlantic Forge in the village who made the railings, said the pads were just an extra.

The leaks had rotted the decking and the beams.

About five years ago Alanna and I striped it all off and replaced the beams and decking, we then laid a rubber roof and covered that with interlocking rubber tiles.

I cut off the pads, the railings were just as secure due to the heavy wall mounts.

They also turn at right angles at both ends.

Had they been just screwed through the decking. I agree it would have been risky to say the least : )
The railing wall fixings
 

Attachments

  • B1.jpg
    B1.jpg
    210.7 KB · Views: 17
  • B2.jpg
    B2.jpg
    322.8 KB · Views: 16
  • B3.jpg
    B3.jpg
    183.4 KB · Views: 18
Back
Top