diy solar

diy solar

LV6548 Stripped connector

EastTexCowboy

Solar Wizard
Joined
Jan 19, 2022
Messages
1,598
Location
East Texas
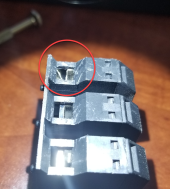
I finally got around to changing out some of the wiring on my two LV6548 inverters and one of the connectors for AC output is stripped. I think I've seen something on here about others having an issue with these but I couldn't find it. I emailed Ian at watts447 to see if he keeps any of these in stock. Does anyone have any alternative suggestions on either fixing it or where I could get one without waiting on one from China?
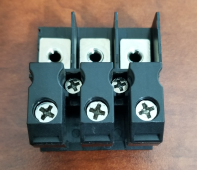
1675619922018.png

I swear I don't think I overtightened the thing. As soon as it started snugging up it felt spongy. But either way I gotta fix it. Ugh.
 
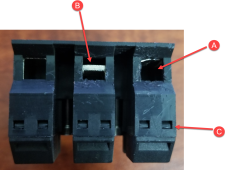
Good questions. I'm trying to figure that out myself. It seems to be stripped inside where the screw engages the jaw that tightens down on the wire, (A) in photo. (B) shows one partially engaged. It looks like the little clips (C) might allow me to get it apart but so far I haven't had any luck. Gonna go put it in a vice so I can put a little pressure on the clips and see if I can get it apart. Fixing it would be much faster than waiting on a part, but I need to be able to trust it as well.

1675620984178.png
 
That's a clam shell type connector. When fully opened the screw will only have probably one thread engaged. If the screw is required to exert any pressure before more threads are engaged. It's very easy to strip out. It's possible to re tap a larger thread in it for the next size up. But still not great if the wire is large enough to require it to be fully released.

This is the AC input or output connection?
For a temporary solution you could switch the location with the ground terminal. (Moving both top and bottom wires) you only need one ground connection to the unit.
 
It's not stripped, it's broken. Looks like pot metal to me.

It's on the AC output so I could swap out the entire assembly from AC input and not have to mess with moving the top wires. I may do that. I'm not in a situation where I need AC input yet.

Theses things are a pain in the rear to get a 4 ga. wire into them. After taking this out I'm thinking I may get the wires installed then slide the whole assembly back in. Worth a try anyway.

1675622311374.png
 
Can you just bypass the thing entirely?
Not in any practical way. But I got it going again. I went ahead and swapped out the connector from AC input and got everything connected again (other than AC input). It's back up and running. Hopefully Ian can come up with a part for me. If not I'm going to mail it to Tim and have him fix it. :ROFLMAO:
 
That's a clam shell type connector. When fully opened the screw will only have probably one thread engaged. If the screw is required to exert any pressure before more threads are engaged. It's very easy to strip out. It's possible to re tap a larger thread in it for the next size up. But still not great if the wire is large enough to require it to be fully released.

This is the AC input or output connection?
For a temporary solution you could switch the location with the ground terminal. (Moving both top and bottom wires) you only need one ground connection to the unit.
I finally found the thread where someone else had this same issue.


According to the OP, he contacted Ian who said he would ship him a replacement block connector. Hopefully I'll be able to get one as well, and maybe a spare. In the post he mentioned that Ian recommended switching the wires around as you suggested. I'm happier that I switched the block from the AC input to get by for now. Worse case scenario I can definitely fabricate something to replace this but I can't imagine that would be a good thing when it comes to warranty down the road.

Appreciate the help.
 
Ian responded (on a Sunday no less) and I've already sent him the money for two of these @ $15 each. I have been VERY happy with his service and support. The only thing that would make it better would be if he was in Texas!
 
Back
Top