Tinkerpete
New Member
- Joined
- Aug 31, 2022
- Messages
- 11
Ok, i had make it on windows 10.I tried the same on my Raspberry, no luck. Still the same error message:


Ok, i had make it on windows 10.I tried the same on my Raspberry, no luck. Still the same error message:
python3 -m pip install bluetti_mqtt to force it to use Python 3.7 instead of Python 2.7 on your system. It's also possible that pip3 install bluetti_mqtt would work too - you might not have a pip3 command though.@Tinkerpete Yeah, the string you need to send for the DC Input Power isCan you tell me how i must do this? Or can you send me an example string for the DC-input query?
"\x01\x03\x00\x24\x00\x01\xc4\x01". I did a detailed breakdown of how this is all built earlier in the thread so I'm not sure if you read that and there was something I said that was still unclear or you just missed that.$ python
Python 3.7.3 (default, May 22 2022, 10:21:14)
[GCC 10.3.0] on linux
Type "help", "copyright", "credits" or "license" for more information.
>>> from bluetti_mqtt.core import QueryRangeCommand
>>> bytes(QueryRangeCommand(0x00, 0x24, 1))
b'\x01\x03\x00$\x00\x01\xc4\x01'In the moment this is my biggest problem. I know this is hex code. I think i can read this as: 0103-0024-0001-c401. But I did not understand, where i must insert this in a notify characteristic string like this: "0000ff01-0000-1000-8000-00805f9b34fb"?@Tinkerpete Yeah, the string you need to send for the DC Input Power is"\x01\x03\x00\x24\x00\x01\xc4\x01".
I have see this, but not analyzed!I did a detailed breakdown of how this is all built earlier in the thread so I'm not sure if you read that and there was something I said that was still unclear or you just missed that.
") I will do it.
I will do it.For MODBUS i found that:For the last two bytes you're going to need to find a C++ library that can do MODBUS CRC16 if you you actually want to construct arbitrary commands yourself in C++, but another option would be to just use the Python code for now for that.

 stackoverflow.com
Yes, i can run your python code on my PC. But it did not find the bluetti.It sounds like you managed to install the Python code, and so you should be able to use that like this:
This works!>>> bytes(QueryRangeCommand(0x00, 0x24, 1))
b'\x01\x03\x00$\x00\x01\xc4\x01'[/CODE]
Are you not comfortable with us continuing this in this thread?Edit: Feel free to DM me or send me an email at the address on my Github profile if you have more questions. I might not respond immediately, but I'll definitely get back to you as soon as I can. I'm happy to help anyone who wants to work on this.
unsigned int CRC16_2(unsigned char *buf, int len) {
  unsigned int crc = 0xFFFF;
  for (int pos = 0; pos < len; pos++)  {
    crc ^= (unsigned int)buf[pos];    // XOR byte into least sig. byte of crc
    for (int i = 8; i != 0; i--) {    // Loop over each bit
      if ((crc & 0x0001) != 0) {      // If the LSB is set
        crc >>= 1;                    // Shift right and XOR 0xA001
        crc ^= 0xA001;
      }
      else                            // Else LSB is not set
        crc >>= 1;                    // Just shift right
    }
  }
  return crc;
}
unsigned short rightRotate(unsigned short x, short d) {
return (x >> d) | (x << (SHORT_SIZE - d));
}Code:Write Command - FF02 - Value: 0103 000A 0037 241E
- The final two bytes, 0x241E, are the checksum. I can calculate this checksum with the code I already have, which is a good sign that I should be able to use it for any devices they have. When I add "01" to the beginning and checksum everything except the last two bytes, I also get 0x241E (which suggests that I'm probably running the checksum on the wrong stuff if changing the payload does not change the resulting checksum).
It's not a UUID - it's just a string of raw bytes. Once you have the write characteristic (theIn the moment this is my biggest problem. I know this is hex code. I think i can read this as: 0103-0024-0001-c401. But I did not understand, where i must insert this in a notify characteristic string like this
BLERemoteCharacteristic*) you'll notice it has a writeValue method for either a string or raw uint8_t array. You'll just call it with any command string. The default for setting response to false here works fine. If you did it correctly, then shortly afterwards you should receive a notification on the notify characteristic with a response payload (which you can then decode).Yes, that's the same value I get from the Python function I'm using. Most of the binary protocol seems to use network byte order (big-endian), but the CRC appears to be little-endian, so when you use it to build your string the byte order is reversed.Is this correct, because the bytes are changed in order?
$ python
>>> import struct
>>> from bluetti_mqtt.core.utils import modbus_crc
>>> modbus_crc(b'\x01\x03\x00\x0a\x00\x37')
7716
>>> struct.pack('<H', 7716).hex()
'241e'If it's working for you then that's all I'm looking for.Are you not comfortable with us continuing this in this thread?
Thanks for the Tip, with the force function is working now by using the !!! "python3 -m pip install bluetti_mqtt"@MrGPS Hmmmmmm. That warning that it's using Python 2.7 for pip seems like a problem. I went ahead and installed Python 3.7 just to test this and it works perfectly to install without any dependency issues. You might want to trypython3 -m pip install bluetti_mqttto force it to use Python 3.7 instead of Python 2.7 on your system. It's also possible thatpip3 install bluetti_mqttwould work too - you might not have apip3command though.

If it's working for you then that's all I'm looking for.
@ApolloSK@slowdiver:
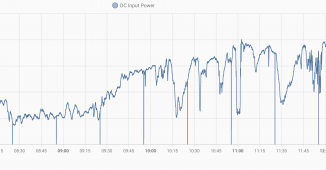
How do you log data via iobroker? I've connected my Raspberry PI with iobroker and MQTT-Broker. But there are only states from the beginning of the connection but no actual data.
View attachment 110586
This works fine for a certain time (a few hours up to a few days). Suddently no data are sent to the mqtt broker anymore. I have to restart the service and the data come immediately again.[Unit]
Description=Bluetti MQTT
After=network.target
StartLimitIntervalSec=0
[Service]
Type=simple
Restart=always
RestartSec=30
TimeoutStopSec=15
User=pi
ExecStart=/usr/local/bin/bluetti-mqtt --broker 192.168.10.152 --username sh --password 12345 --interval 10 00:15:83:8A:FF:D3
[Install]
WantedBy=multi-user.target
It's possible this is the same reason as this other report. When running services with systemd, logs are automatically sent to syslog, and should be readable by runningHow can i detect the reason for stopping the transmission of data ? Are there log files generated ?
journalctl -u name-of-the-service.target. You can use the -n 100 flag to specify the number of lines to print out, or the -f flag to print out each log line as it's generated by the service.How do you log data via iobroker? I've connected my Raspberry PI with iobroker and MQTT-Broker. But there are only states from the beginning of the connection but no actual data.
I started the service on the 12. Sept at 22:10 and i see these data in the log:It's possible this is the same reason as this other report. When running services with systemd, logs are automatically sent to syslog, and should be readable by runningjournalctl -u name-of-the-service.target. You can use the-n 100flag to specify the number of lines to print out, or the-fflag to print out each log line as it's generated by the service.
There are no further data till now, but the service does not send data. The service is still running:Sep 12 22:10:27 garage systemd[1]: Started Bluetti MQTT.
Sep 12 22:10:34 garage bluetti-mqtt[851]: INFO:root:Starting to poll clients...
Sep 12 22:10:34 garage bluetti-mqtt[851]: INFO:root:Connecting to MQTT broker...
Sep 12 22:10:34 garage bluetti-mqtt[851]: INFO:root:Connecting to clients: ['00:15:83:8A:FF:D3']
Sep 12 22:10:34 garage bluetti-mqtt[851]: INFO:root:Connected to MQTT broker
Sep 12 22:10:34 garage bluetti-mqtt[851]: INFO:root:Sent discovery message of AC200M-2211001616047 to Home Assistant
The process is visible in "ps -ef" too.pi@garage:~ $ sudo systemctl status bluetti-mqtt
● bluetti-mqtt.service - Bluetti MQTT
Loaded: loaded (/etc/systemd/system/bluetti-mqtt.service; enabled; vendor preset: enabled)
Active: active (running) since Mon 2022-09-12 22:10:27 CEST; 2 days ago
Main PID: 851 (bluetti-mqtt)
Tasks: 2 (limit: 779)
CPU: 16min 11.366s
CGroup: /system.slice/bluetti-mqtt.service
└─851 /usr/bin/python3 /usr/local/bin/bluetti-mqtt --broker 192.168.10.152 --username sh --password 12345 --inte>
Sep 12 22:10:27 garage systemd[1]: Started Bluetti MQTT.
Sep 12 22:10:34 garage bluetti-mqtt[851]: INFO:root:Starting to poll clients...
Sep 12 22:10:34 garage bluetti-mqtt[851]: INFO:root:Connecting to MQTT broker...
Sep 12 22:10:34 garage bluetti-mqtt[851]: INFO:root:Connecting to clients: ['00:15:83:8A:FF:D3']
Sep 12 22:10:34 garage bluetti-mqtt[851]: INFO:root:Connected to MQTT broker
Sep 12 22:10:34 garage bluetti-mqtt[851]: INFO:root:Sent discovery message of AC200M-2211001616047 to Home Assistant
@chromedshark: Now i have a working ble client! Thank you very much for your help!@chromedshark: I am going away for 2 - 3 weeks. After that I will be in touch again.
Now i can monitor my device continuously.[Unit]
Description=Bluetti MQTT
After=network.target
StartLimitIntervalSec=0
[Service]
Type=simple
Restart=always
RuntimeMaxSec=3600s
RestartSec=30
TimeoutStopSec=15
User=pi
ExecStart=/usr/local/bin/bluetti-mqtt --broker 192.168.10.152 --username sh --p>
[Install]
WantedBy=multi-user.target
@twister36 I only have a single AC300, but I suspect this is because one of the two places that value is stored should be ignored in this case. The question is which. If you use theOne thing that I notice is that when I added my second AC300 the "AC Output" entity bounces back and forth from enabled to disabled. I'm thinking this is because my system is in Split-Phase mode and even the Bluetti app only shows my Master unit's AC Output enabled. The slave unit shows it always off on the app.
bluetti-logger command to collect logs from both your devices (just run it for ~5 minutes against each device) and send them to me I can probably fix this.@Tinkerpete Short answer is that there is a way to fetch multiple values at once and I'm doing that in bluetti-mqtt.@chromedshark: My program fetches one value at a time. Do you do the same? Or is there a way to fetch all values at once?
010300240001C401 will return a single field, the DC Input Power (stored at 0x00, 0x24). The command 01030024000E8405 will return 14 fields (0x0E) from 0x24 to 0x31 inclusive, covering all the data that the mobile app displays on the main page.#!/bin/bash
pip install bluetti_mqtt
nohup bash -c "bluetti-mqtt --broker 127.0.0.1 --username USERNAME --password PASSWORD DEVICE_ID &"
shell_command:
install_start_bluetti: bash /config/shell/install_start_bluetti_mqtt.sh
- id: '1665937079543'
alias: Install and start bluetti-mqtt on HA start
description: ''
trigger:
- platform: homeassistant
event: start
condition: []
action:
- service: shell_command.install_start_bluetti
data: {}
mode: single

Really appreciate getting all this started @chromedshark and others!
For anyone looking for a super simple way to integrate into HA OS (Home Assistant Operating System), here's the cleanest, lowest code route I've found:
Find your device ID: I did this by getting into the HA OS host, then Docker instance, then manually installing bluetti_mqtt (pip install bluetti_mqtt) and running the --scan command (there's likely an easier way to do this).
Setup MQTT (if you haven't yet): Follow directions here - https://www.home-assistant.io/docs/mqtt/broker/ (including user/password combo)
Create script/shell_command integration: I created a new directory in /config/ called "shell" and placed a new script called install_start_bluetti_mqtt.sh in it. Inside that script (replace USERNAME, PASSWORD, DEVICE_ID with yours):
#!/bin/bash
pip install bluetti_mqtt
nohup bash -c "bluetti-mqtt --broker 127.0.0.1 --username USERNAME --password PASSWORD DEVICE_ID &"
Once that's in there, add this to the root of your configuration.yaml:
shell_command:
  install_start_bluetti: bash /config/shell/install_start_bluetti_mqtt.sh
Setup automation: Super simple automation that trigger's on HA start:
- id: '1665937079543'
  alias: Install and start bluetti-mqtt on HA start
  description: ''
  trigger:
  - platform: homeassistant
    event: start
  condition: []
  action:
  - service: shell_command.install_start_bluetti
    data: {}
  mode: single
-
Have this up and running for my WIP AC300+2xB300+2xPV350 build - running HA OS 9 on a Raspberry Pi 3. Obviously a temp solution, but working well for now! Going to dig into HA OS 9+ BT support and see if I can help further a native HA integration.
View attachment 116612
Hi thank you for the manual the only what by me make troubles is the Setup Automation show hereReally appreciate getting all this started @chromedshark and others!
For anyone looking for a super simple way to integrate into HA OS (Home Assistant Operating System), here's the cleanest, lowest code route I've found:
Find your device ID: I did this by getting into the HA OS host, then Docker instance, then manually installing bluetti_mqtt (pip install bluetti_mqtt) and running the --scan command (there's likely an easier way to do this).
Setup MQTT (if you haven't yet): Follow directions here - https://www.home-assistant.io/docs/mqtt/broker/ (including user/password combo)
Create script/shell_command integration: I created a new directory in /config/ called "shell" and placed a new script called install_start_bluetti_mqtt.sh in it. Inside that script (replace USERNAME, PASSWORD, DEVICE_ID with yours):
#!/bin/bash
pip install bluetti_mqtt
nohup bash -c "bluetti-mqtt --broker 127.0.0.1 --username USERNAME --password PASSWORD DEVICE_ID &"
Once that's in there, add this to the root of your configuration.yaml:
shell_command:
  install_start_bluetti: bash /config/shell/install_start_bluetti_mqtt.sh
Setup automation: Super simple automation that trigger's on HA start:
- id: '1665937079543'
  alias: Install and start bluetti-mqtt on HA start
  description: ''
  trigger:
  - platform: homeassistant
    event: start
  condition: []
  action:
  - service: shell_command.install_start_bluetti
    data: {}
  mode: single
-
Have this up and running for my WIP AC300+2xB300+2xPV350 build - running HA OS 9 on a Raspberry Pi 3. Obviously a temp solution, but working well for now! Going to dig into HA OS 9+ BT support and see if I can help further a native HA integration.
View attachment 116612
 have you a idea what is wrong ?