diy solar

diy solar

My first PV System

"But 100 x easier to work with."

How so?
I've used wire that came with spiral metal jacket around it, and I've bought the flexible metal conduit and stuffed wire through it.
Some is steel, some is aluminum.
I don't know the difference between MC and BX.
BX was steel (possibly galvanized) and a pain to work with. MC is aluminum and is as simple as Romex to work with.
 
It looks awesome for a temporary solution. I would worry that the wind may cause havoc with your solar panels.
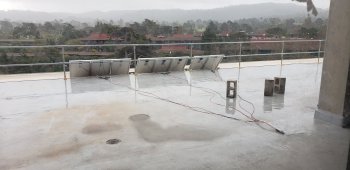
Looks like your wind concerns are valid, I mean these cement blocks large and heavy and I am using 9 blocks to weigh 8 panels down, the very next morning I went up to the roof and most of the blocks were tilted towards the panels back surface. Now that may have simply been the square block tops wanting to settle down and be flush up against the panels since they were being secured with heavy tie wraps and the wind helped with that. Well, we are getting two more days of heavy rain with high warnings, so......my choices are cut the wraps and pull the panels inside the lab, or call this podunk panel mount beta wind testing.
 
Looks like your wind concerns are valid, I mean these cement blocks large and heavy and I am using 9 blocks to weigh 8 panels down, the very next morning I went up to the roof and most of the blocks were tilted towards the panels back surface. Now that may have simply been the square block tops wanting to settle down and be flush up against the panels since they were being secured with heavy tie wraps and the wind helped with that. Well, we are getting two more days of heavy rain with high warnings, so......my choices are cut the wraps and pull the panels inside the lab, or call this podunk panel mount beta wind testing.
I would eventually drill some holes in the concrete and fasten them down with some concrete bolts. The concrete blocks are fine to rest them on but I suspect that if you got enough of a wind gust they would just lift the concrete blocks off the ground.

You could get some solar panel fasteners or 1" aluminum strips and then just screw them into the concrete and then they would not go anywhere.

Putting holes in concrete is easy with a hammer drill and a concrete drill bit.
I just had to do an emergency tear down, the wind was shredding the tie wraps the panels were starting to overlap, the cement blocks were being tossed around like a chew toy. 350 pounds of cement blocks were not enough to weigh down 8 panels during a mild storm. Which also takes the cheap PVC Pipe mounting system off the table. There is a heavy metal safety guard that surrounds the roof so I may be able to mount the panels about 30 feet from the lab. But one thing is for sure...at this point the school is going to have to spend some money and get me the proper mounting brackets. I was willing to spend my own money for some cheap cement blocks and tie wraps but all I got was less than 24 hours of operation and my hands all cut up from trying to hurry up and get the panels inside before the storm damaged some panels. As luck would allow, no panels were damaged and only one cement block was destroyed with it was knocked over.
 
I just had to do an emergency tear down, the wind was shredding the tie wraps the panels were starting to overlap, the cement blocks were being tossed around like a chew toy. 350 pounds of cement blocks were not enough to weigh down 8 panels during a mild storm. Which also takes the cheap PVC Pipe mounting system off the table. There is a heavy metal safety guard that surrounds the roof so I may be able to mount the panels about 30 feet from the lab. But one thing is for sure...at this point the school is going to have to spend some money and get me the proper mounting brackets. I was willing to spend my own money for some cheap cement blocks and tie wraps but all I got was less than 24 hours of operation and my hands all cut up from trying to hurry up and get the panels inside before the storm damaged some panels. As luck would allow, no panels were damaged and only one cement block was destroyed with it was knocked over.
I am glad that you are okay and that the panels are okay. I am sure some of the DIY members can come up with some cheap methods of helping you mount your panels. I have seen some very creative designs on this forum.

I had 12 of mine attached to the roof and they weathered the winds okay. I had a slope on the roof so that was not an issue. I just used some super struts and 1/2" bolts with nuts and rubber washers. I moved them off of the roof and onto some ground mounts because I got tired of cleaning the snow off of them.
Where I went wrong is not getting with you, the WindWizard and have you work some of your Mojo Magic on our rooftop. Joking aside, I should have went with my original plan. A simple 2 X 4 frame with 12 inch bolts securing all the joints and using L bracket screws to secure the panels to the frame, it has been sitting propped up against the house with nothing securing it since around August of 2021 and it seems unaffected by the wind, mostly because it is below the fence line so it has the house and the fence providing some protection against the wind. My boss didn't want me using 2 X 4 wood because he said each 3 panel set would be too heavy to move around easily, but as I found today, moving them around with nothing attached to the panels is also hard because you have unhook all the splitters and cables and then move them all in one by one... probably better for back I suppose. Well, it's just about April and tax time is here so at this point the school can spend money on some
I am glad that you are okay and that the panels are okay. I am sure some of the DIY members can come up with some cheap methods of helping you mount your panels. I have seen some very creative designs on this forum.

I had 12 of mine attached to the roof and they weathered the winds okay. I had a slope on the roof so that was not an issue. I just used some super struts and 1/2" bolts with nuts and rubber washers. I moved them off of the roof and onto some ground mounts because I got tired of cleaning the snow off of them.
All solutions now require that I figure out a way to secure them to the rooftop, if 350 pounds worth of brick is not enough to hold 8 panels down, then not securing them is an epic no, no. Well, for the moment the only time we can do solar academics is when the sun is shining and wind is manageable. I can use a power supply to keep the batteries charged and....I think I am going to pull my wind generator out of storage and mount it on the upper roof and use it to keep the batteries full, who knows maybe a student can do some wind technology thesis. Oh well. Moving on.
 
I am glad that you are okay and that the panels are okay. I am sure some of the DIY members can come up with some cheap methods of helping you mount your panels. I have seen some very creative designs on this forum.

I had 12 of mine attached to the roof and they weathered the winds okay. I had a slope on the roof so that was not an issue. I just used some super struts and 1/2" bolts with nuts and rubber washers. I moved them off of the roof and onto some ground mounts because I got tired of cleaning the snow off of them.
A better solution but not finished yet. 20230329_154740.jpg
 
That looks much better. Do you have something on the bottom of the panels to hold them down.
Not yet, the top mounts are fairly tight, so a couple of ballast weights will hopefully keep them down overnight, only one or two of them were slightly moving up and down, when the hailstorm hit, so I just layed a couple of bricks down in front of them and that made short work of that. I am thinking about an L bar across the bottom and then anchor the ends down, but first I have figure out a good panel angle. I wish I could raid the public works supply building like I used to, but they don't allow that crap any more, no more bench stock....bastards. It wasn't my intentions, but once again I have hijacked someone else's thread, even if it is a common thread regarding PV panel mounts. Lord knows what I could do, if funding wasn't always a dance. The OP's mount is awesome.
 
Last edited:
I was concerned about the same.
Mounted higher, could have tied in at top and bottom, but you probably want it less obtrusive.

There are guardrail verticals in several places. You could clamp a pipe to them, extending them down over the drop to elevation of panel bottoms. From there struts or just wires to secure base of panels.

If you did put them on top of top rail, then you could adjust tilt. For educational purposes, of course.

Top rail was my first choice for the reasons you spoke of, but then I realized that mounting them on the bottom rail gave me an instant angle and put the final theoretical best angle (a load of hooey if you ask me) within easy reach. I believe the best angle is best using the bottom bar. Assuming that is not your sig, it looks like I have another thread to look at to get some ideas. Thanks.
 
"Best" angle depends on what you want to optimize.
Most kWh/year?
Most air conditioning in the summer?
Most lighting in winter?
Minimum Ah cycling of battery?

For the last one, I would use multiple orientations to flatten production during the day, and extend to morning and night.

For winter, people have said that straight up might be better when clouds are the light source.

On line insolation calculators could be used to evaluate the choices. Or assign the coding and evaluation software to some students.
 
I was concerned about the same.
Mounted higher, could have tied in at top and bottom, but you probably want it less obtrusive.

There are guardrail verticals in several places. You could clamp a pipe to them, extending them down over the drop to elevation of panel bottoms. From there struts or just wires to secure base of panels.

If you did put them on top of top rail, then you could adjust tilt. For educational purposes, of course.

Well, my mounting systems was disapproved because it is on a safety rail, and.....just to make life interesting, NAVFAC just approved a vendor to replace the roof and that will kill the solar lab on the roof for 4 months. Good times. Well at least that will allow me the opportunity to learn about amp hours @ hours.
 
Well, my mounting systems was disapproved because it is on a safety rail, and.....just to make life interesting, NAVFAC just approved a vendor to replace the roof and that will kill the solar lab on the roof for 4 months. Good times. Well at least that will allow me the opportunity to learn about amp hours @ hours.

Maybe you can get attachment points built into the new roof.
Meanwhile, maybe mounting on a vehicle would work.
 
Maybe you can get attachment points built into the new roof.
Meanwhile, maybe mounting on a vehicle would work.
I just let the professor know that the rooftop lab won't be accessible for 3 months starting in about 1 month. Just in case, as you suggested an alternative. If she has a research or thesis project coming up soon, we may have to move the entire lab over to the golf course. Never a dull moment. Quick question, if I have 4 100 AH @ 20 Hours AGM batteries (1C) in parallel (12 Volts/ 400 AH) does that mean I can pull 20 amps for 20 hours before the batteries discharge down to 11.65 from 12.85 VDC? I think my batteries are getting worn out and I need to know that so we can order more if they are shot. And is 12.85 actually the VOC? (2 hour settle time)? Man I really suck at this. Edit: OK, maybe I suck less at this. I realized that pulling that amount of power is not really all that impressive. Just turning on the the inverter and part of the electronic loading system pulled 60 watts and that alone will eat up one battery in 20 hours, so really I only need 240 watts to expect 20 hours of operation before the batteries reach 11.65 volts and that is with the loading system barely operating, my system is designed to provide an adjustable 1.5 KW load for testing. No wonder it requires so much battery power to get a home through the night. "we're gonna need a bigger boat"
 
Last edited:
20A x 20 hours = 400 Ah would drain battery from 100% to 0%, whatever voltages the battery makes at those SoC at that current.
See technical manual for curves.

Some people say don't draw below 50%, but I've planned around 70% DoD (30% SoC) before disconnecting loads, and down to 20% SoC keeping inverter alive (because PV is AC coupled when the sun comes up).

I have one bank that size 100 Ah @ 48V, another 400 Ah @ 48V.
The bigger one can only get my home through the night if a number of unnecessary loads are shut off. (Several older refrigerators are probably the main drain.)

Here's the manual for mine. If you can't find the detail for your brand/model then this could be reasonable to use.

50 percent is my rule of thumb that I use for my little home system. I suspect that the batteries I am using, made in 2018 and abused by students and me, are probably toast. I suspect that when I get to work in the morning, I will find that 60 watts has taken 4 batteries down to what I would expect one battery to be. Yea....toast. But the good news is, apparently I have the budget to buy 4 new batteries and one more panel. Some day, we are going to talk about seeing electromagnetic fields....another coo coo for coco puffs theory I have.
 
Your system should have automatic disconnect at some SoC. Which is a bit difficult, because for a given SoC, voltage varies with load. Some equipment will track current in/out and also measure voltage and current. You might just set a conservative low voltage disconnect.

The keys to long lead-acid battery life are:
1) Don't over-discharge
2) Recharge as soon as possible, so they don't sit at low SoC (AGM is more tolerant, can leave disconnected for 6 or 12 months at a time)
3) Keep cool.
4) Fully recharged often, including a couple hours at absorption voltage.
5) If SoC differs between batteries/cells, equalize them. AGM is normally not equalized, while FLA is periodically over-charged with high SoC cells bubbling as they carry current to top off low cells. AGM, you can at least check voltage (after a few hours rest) of each battery connected in series, but yours are in parallel. Separate them to check individually. SunXtender technical manual has equalization instructions for their AGM. I find it does raise resting voltage, but I haven't checked accurately what if anything it does for capacity. Maybe just reduces rate of degradation (cell no longer undercharged.)

I tested my 13 year old 104 Ah 48V bank by powering 600W heater and a mechanical timer. The 80% DoD shutdown indicated 40% of original capacity. Not very useful for powering something, but I used it to test 3x inverters in a 3-phase setup. Yours should serve for similar tests.
My batteries are toast. Part of the testing that was being done by the last student was stress testing the batteries, he really beat them up as part of his thesis and it shows. One battery had been left sitting by itself for years, without being tended to so not a shocker that these 4 batteries are not good anymore. Basically I gave them a 100 AH 20 hour test and they failed and that was a test for just one battery, so the 400 AH parallel 12 volt system should have easily pulled 60 watts for 20 hours, they should have passed 240 watts for 20 hours but I suspected they were bad so I only gave them 60. If I had given them 240 watts the inverter would have long shut off. As it was, the hall effect monitor I had issues operating at the 10.1 volts it was at when I arrived. I am surprised that the inverter didn't auto shut off, it wasn't even screaming at me so....hmmmm. This was a good opportunity for me to quickly learn the AGM A,B,C's Well, hopefully the next student doesn't beat up the next set too badly but the professor decides what testing is being done for research or thesis projects. OK...moving on. Thanks guys for letting me sound board off you.
 
Back
Top