diy solar

diy solar

Off grid system upgrade

offgrid-curious

New Member
Joined
Aug 29, 2023
Messages
34
Location
Canada
I have recently acquired a small off-grid 3 season cottage/cabin. The cottage has a rudimentary solar set up that was installed by the previous owner that I’m looking to upgrade. The property has a few constraints (lots of trees, no direct south facing mount point) that are making the design of a new system challenging. I’m new to solar, and I’ve been poring over the material on this forum (thanks so much to all!) and everywhere else over the past few weeks to try to come up with an optimal solution.

We will be using the cottage maybe a few times a month for 2-3 days at a time from April-November. I’ve estimated that conservatively we’ll use approximately 4kWh/day when we’re there. When we’re not there, there are minimal power requirements - propane powers a fireplace, fridge, stove, lights. The current system is 12v, and the cottage uses 12v for the lake pump, some lights and water filter. Other than the fridge, everything else is off when away.

The property has a significant number of trees (that I don't want to cut down) that make the array placement challenging. Many people in the area have pole mounted set ups, but even with a 20’ pole, I believe there is too much shade/trees to justify the cost. The roof is not perfect - it faces roughly east/west, but I believe is the best mounting location I have available. My plan is to try to over panel to try to harvest as much power as I can, when I can.
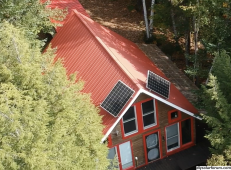
CleanShot 2023-10-20 at 12.26.09.png

I’m currently planning on setting up separate 3S2P arrays on each side of the roof (12 panels total), with each side going to its own charge controller. The roof is at a 45 degree angle. I’m looking at Longi LR4-60HPB-350M panels, as I can get 3 of them in a string under 150v, and they seem to be relatively decent for low light performance. I’ve used PVWatts and tried to fudge its results to account for specific shading conditions at my location (e.g. in June, the east side of the roof should be clear for at least 4-5 hours in the morning, but shaded in the afternoon). My hope is that over a 3-5 days I’ll generate enough power to fully replenish the batteries.

Another constraint is that I have limited space to put the equipment. There is what is essentially a 4'x3' closet under the stairs that I intend to use for the batteries, inverter, charge controller, etc.

My plan is to build a 48v system. For the batteries, I’m thinking of using four 12v SFK v5 304AH, giving me a total of 14.6kWh of energy. These seem to have a good physical size/power ratio. While I don’t currently plan on using the system in the winter, the heaters (and insulated bags) are appealing if I do decide to in the future. And having four separate batteries allows me more flexibility in placement than a server rack battery would. The battery bank should cover at least 3 days of use.

I’m leaning towards Victron for the inverter, charge controllers, etc. They seem to have a very good reputation with regards to reliability and having separate components will allow me to customize the placement of individual components within the utility room. I also appreciate the lower inverter idle power consumption when compared to an AIO.

For the charge controllers, I am thinking of the Victron MPPT 150/45. I believe this SCC closely matches the max power of the array, and two of them are small enough to fit cleanly in the limited space I have.

For the inverter, I’m thinking of the Multiplus II 3k. I think it should accommodate my wife using her hair dryer, while also allowing kids to stream videos. I also have a small 2600w generator that can be used to charge the batteries (or for the Victron power assist function, if I decide to use some power tools while my wife is drying her hair).

Anyway, at a high level this is my plan. Is there anything that I’m missing, or that I have just plain wrong? Thanks!
 
You said "Victron." You're speaking my love language.

If you have an internet connection, remote monitoring and control with VRM is luscious. I couldn't maintain my sanity if I couldn't check on it every day. If you don't have internet, they do have a LTE device for dedicated connectivity.

If you only need 4kW/day, 48V is probably overkill, especially if you're going to build a 48v from 12V batteries. That's often a headache, especially in an infrequently used systems... the individual 12V need to stay in balance with each other, or you get voltage spikes that cause the inverter to cut off.

The 45A @ 48V is properly sized for your array, so there is that benefit. It may be the sole justification needed for 48V since you have very compromised PV, and you want to maximize what little full solar time you have. 3S2P is fine, but 2S3P might see better shade performance.

Looks like you pretty much have a worst case for PV. You're on the right track targeting powering your 3 day visits almost exclusively on battery. given your northern latitude, it may be completely ineffective in the winter.

See the PVWatts link in my signature line #1. You can simulate your array at your exact location.

Are there any places on the ground you could install the array or multiple spots of smaller arrays that could yield better output?

Not considering the structure, the optimal placement would likely be as close to the peak line as possible. You want shade to hit the long side of the panel first as that will take out 1/3rd of a panel at a time. If shade hits the short side first, as soon as the first row of cells is shaded, the entire panel behaves as if it's 100% shaded.

While Victron charge controllers do not recommend the use of optimizers, I would consider it in your case. Tigo optimizers are about $50 each.

The MP-II 3K is an excellent unit.

Don't forget the Cerbo and smartshunt.
 
Last edited:
If you have an internet connection, remote monitoring and control with VRM is luscious. I couldn't maintain my sanity if I couldn't check on it every day.
Yes - I'm the same way. The plan is to install Starlink once the new system is in place, and hopefully I can generate enough power so that it can run 24/7 while I'm away, as well as maybe power a camera or two.

If you only need 4kW/day, 48V is probably overkill, especially if you're going to build a 48v from 12V batteries. That's often a headache, especially in an infrequently used systems... the individual 12V need to stay in balance with each other, or you get voltage spikes that cause the inverter to cut off.
Yeah, I do think it's a bit overkill, but I'm trying to plan for a future where maybe we would want to stay up longer, or our power needs change. My thinking is I'd rather pay a bit more up front now than have to change things later. I've been looking at potentially using the Victron battery balancers, but I'm going to wait and see how it goes before doing that. I think if I plan to use the system in the winter, I'll definitely need to have some balancers to deal with the effects from the individual battery heaters.

3S2P is fine, but 2S3P might see better shade performance.
I don't suppose there's any way to really quantify the difference? I'm having the panels professionally installed and my concern is that once they're up, the configuration will be very difficult to change. So I want to get it right the first time (this is what's been SO hard about designing this whole system).

given your northern latitude, it may be completely ineffective in the winter.
Yeah I am sort of expecting/accepting this. We do have a 2600 watt generator that I will likely hook up to the inverter once the system is set up and if in the future we do decide to use the cottage more in the winter that should help. Most residents who live in the area year round pretty much require generators in the winter, regardless of their PV is mounted.

Are there any places on the ground you could install the array or multiple spots of smaller arrays that could yield better output?
There really aren't unfortunately. There is a small clearing behind the house, but the trees are so tall there that shading is constant. The house itself is the only (semi) clear area because it's lakefront, and there are no large trees directly in front (but plenty along the sides). I think the only other option would be in front of the house, but the roof has the highest elevation and I don't want to block our lake view with a pole.

While Victron charge controllers do not recommend the use of optimizers, I would consider it in your case. Tigo optimizers are about $50 each.
? I will look into this.

The MP-II 3K is an excellent unit.

Don't forget the Cerbo and smartshunt.
Yup!

Thank you for your reply, this is just what I was looking for!
 
Yes - I'm the same way. The plan is to install Starlink once the new system is in place, and hopefully I can generate enough power so that it can run 24/7 while I'm away, as well as maybe power a camera or two.

I have V1, and it's pretty power hungry. V2 is a bit less demanding. Both versions now have a sleep schedule option where you can specify a single inactive period. At a minimum, since you can't check it while sleeping, having it offline during your sleep hours makes sense.

I have some solar powered blink cameras - the older kind that don't require a subscription and some Reolink Duo 180 cams (one active, one to install) powered by AC via AC to DC brick.

Blink (stores to cloud):
1697832264709.png

Reolink Wifi duo (stores to MicroSD and is accessible over wifi):
1697832304299.png

The Blinks require no power (Batteries or solar panel), but the Reolink draws about 4-8W in its current config + conversion inefficiencies.

You'll want to look into getting all your connectivity stuff powered by DC, so you can power the inverters down while off-site. You can even do that remotely via VRM.

I'm in the process of converting everything over to Starlink from Frontier DSL, so I don't yet have everything DC powered.

Yeah, I do think it's a bit overkill, but I'm trying to plan for a future where maybe we would want to stay up longer, or our power needs change. My thinking is I'd rather pay a bit more up front now than have to change things later. I've been looking at potentially using the Victron battery balancers, but I'm going to wait and see how it goes before doing that. I think if I plan to use the system in the winter, I'll definitely need to have some balancers to deal with the effects from the individual battery heaters.

With the MPPT, cost is a driving factor as 2100W on 24V requires 2X the charge current and a few hundred more $. 48V can totally be justified.

The good battery heaters should only draw when there is an external source. Insulation around each battery will be very helpful... maybe you could insulate the whole closet too?

I don't suppose there's any way to really quantify the difference? I'm having the panels professionally installed and my concern is that once they're up, the configuration will be very difficult to change. So I want to get it right the first time (this is what's been SO hard about designing this whole system).

Consistently, paralleled PV performs better than string in shading/partial shading situations. Typically, the shaded panels in series with the unshaded panels adversely impact the performance of the unshaded panels. The bypass diodes are supposed to minimize this, but it also requires the MPPT algorithm to be very robust and be able to find a dramatically different MPPT.

That's where optimizers come in handy. They use some trickery to be able to maximize the amount of current flowing through the series circuit to allow the unshaded panel to perform as best as possible for the conditions.

Lastly, now that I think about it, 2S3P isn't practical as you need 3 panels on each roof facing, so 3S2P makes a lot more sense. 3S on that controller with those panels should be good to about -34°C.

Yeah I am sort of expecting/accepting this. We do have a 2600 watt generator that I will likely hook up to the inverter once the system is set up and if in the future we do decide to use the cottage more in the winter that should help. Most residents who live in the area year round pretty much require generators in the winter, regardless of their PV is mounted.

Sounds like you've done your homework.

There really aren't unfortunately. There is a small clearing behind the house, but the trees are so tall there that shading is constant. The house itself is the only (semi) clear area because it's lakefront, and there are no large trees directly in front (but plenty along the sides). I think the only other option would be in front of the house, but the roof has the highest elevation and I don't want to block our lake view with a pole.

bummer!

You're definitely on the right track. Simply double check all your numbers before each purchase, and you shouldn't have any big surprised. I've paid some stupid tax replacing parts due to a bad design. Most notably... I went 3S on a 150/100 when those panels produce 135Voc. by the numbers, I would be over 150V just below freezing. Fortunately, I caught it in time. Since I had 18 panels, I didn't have the option to reconfigure the array in 2S9P as that would have resulted in lost performance due to the 70A PV input current limit. Left as 3S and went for a 250/100.
 
Again, I really appreciate you taking the time!

Both versions now have a sleep schedule option where you can specify a single inactive period. At a minimum, since you can't check it while sleeping, having it offline during your sleep hours makes sense.

Perfect - I didn't know this. Getting the Starlink dish mounted in a clear location is going to be another challenge, but I'm trying to not think too much about that one just yet lol.

You'll want to look into getting all your connectivity stuff powered by DC, so you can power the inverters down while off-site.

? I've been looking at 12v wifi routers, along with powering Starlink with DishyPowa.

The good battery heaters should only draw when there is an external source. Insulation around each battery will be very helpful... maybe you could insulate the whole closet too?
One of the things that also attracted me to the SFK batteries was that they sell an insulated jacket (read: hot/cold storage bag) that is custom-sized for their battery kits. I may end up trying those down the road...

Most notably... I went 3S on a 150/100 when those panels produce 135Voc. by the numbers, I would be over 150V just below freezing. Fortunately, I caught it in time. Since I had 18 panels, I didn't have the option to reconfigure the array in 2S9P as that would have resulted in lost performance due to the 70A PV input current limit. Left as 3S and went for a 250/100.
This is the sort of thing that's my nightmare! I am double checking and triple checking everything!

The panel install is scheduled for next Friday. It's unlikely I'm going to get to installation of the entire system before the end of the season, but I will try to post updates to this thread as I go along!
 
Perfect - I didn't know this. Getting the Starlink dish mounted in a clear location is going to be another challenge, but I'm trying to not think too much about that one just yet lol.

Yeah. That occurred to me. Good luck!

? I've been looking at 12v wifi routers, along with powering Starlink with DishyPowa.

Most routers are 12V to start with. You just have to supply the right power cable. I typically just cut the brick off and attach to a DC source. Regulated 12V is best.

I didn't use dishypowa. I used this. This adapter allows you to NOT modify the V2 cable.

the 48-56V range is too restrictive for me, so I did a wide input 30-60V to 12V converter (for my 12V stuff) then feeding a 12V to 48V converter to power the PoE unit.

One of the things that also attracted me to the SFK batteries was that they sell an insulated jacket (read: hot/cold storage bag) that is custom-sized for their battery kits. I may end up trying those down the road...

Nice!

Make sure you allow plenty of time to individually charge each 12V to full as well as a parallel charge to full. This ensures all 4 12V are at 100% at the same time. Too many accounts of a single battery being higher than the others triggering charge protection and forcing the MPPT to spike the output current before it can clamp down on the output.

This is the sort of thing that's my nightmare! I am double checking and triple checking everything!

FWIW, you're already ahead of me at this stage. I did some very broad brush stuff and mostly got lucky. My big picture was pretty good, but some of the details were lacking... most notably the MPPT.

The panel install is scheduled for next Friday. It's unlikely I'm going to get to installation of the entire system before the end of the season, but I will try to post updates to this thread as I go along!

Nice!

Good luck!
 
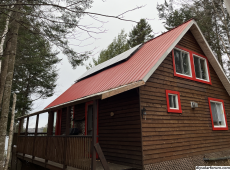
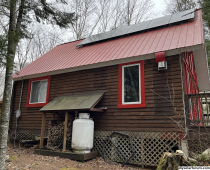
I've reached the milestone of completing the panel install. It's started to get cold here which made the installation quite difficult, but the installers that I hired were great and got it done. It took two days to complete, but I'm really happy with the result:


CleanShot 2023-11-05 at 13.03.06.pngCleanShot 2023-11-05 at 13.04.17.png

Each side is 3S2P, where the two series are connected with Y connectors on the roof. The wiring runs along the roof cap, then underneath the soffit down to the junction box on the back part of the house. It looks really clean and there are very few visible wires. The wires come out at the soffit to a PVC weather head and through 1 1/4" conduit that runs down to a junction box. I used duct seal around the soffit exit point and inside the weather head to try to prevent any moisture from getting down into the box.

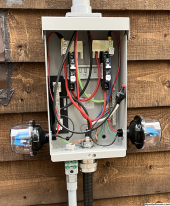
For the box itself, I ended up using a Midnite MNPV6 combiner. Even though I'm not using it as a combiner, it felt like an easy and cost effective approach that gives me flexibility even if I did want to use it as a combiner in the future. I did all of the wiring myself:

CleanShot 2023-11-05 at 13.10.54.png

I split the busbar in two to keep the arrays separate. There are two MNEPV30 breakers. I'm running 8 AWG 4 conductor TECK90 cable to the inside of the cottage. I have one MNSPD-300-DC surge protector for each array. I had initially thought to use the PV negative busbar for both arrays, but after reading some posts on here I decided to splice the negatives for one of the arrays to keep the circuits completely separate.

There is currently no earth ground system at all at the cottage. The ground is quite rocky here and I doubted that I would be able to bury a grounding rod deep enough, so I opted to install a grounding plate at 2' depth instead and ran 6 AWG wire up to the junction box.

Next step is batteries!
 
A bunch of my equipment has been arriving over the past few weeks and it's both exciting but also frustrating because I'm not able to actually install anything until the spring (which feels like forever).

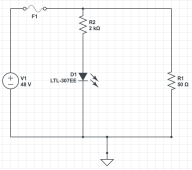
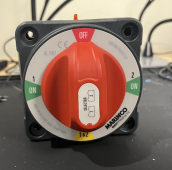
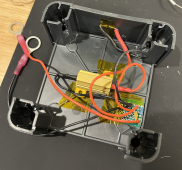
I picked up a BEP battery switch and added a pre-charge resistor to it. I really like the idea that others have of using a lightbulb, but wanted something more compact. I have been using my solar project as an excuse to learn more about electronics, so I decided to augment a 50ohm resistor with an LED to indicate when charging is complete. I used @FilterGuy's excellent inverter disconnect switch doc as my foundation. The circuit is pretty simple and just looks like this:

20231213-15-00.49.png

I drilled a small hole in the top of the switch to add the LED:

20231213-15-03.03.png


For now I've just used kapton tape to stick the resistor and small circuit board to the inside of the switch case:

20231213-15-04.39.png

Because I haven't built my battery yet I can't actually try this "for real", but I did try it on my workbench with my bench power supply and a small 100uF capacitor and the LED lights up for a brief moment while the cap is charged. I'm definitely not an expert, so if something looks wrong here I'd love for someone to let me know!
 
This is turning into my build thread ...

Spring is coming so I finally decided to start to testing all of the equipment that I ordered in the late fall, before bringing it up to the cottage to do the real installation.

For the batteries, I’m thinking of using four 12v SFK v5 304AH, giving me a total of 14.6kWh of energy.

Rather than use the SFK batteries, I've opted to build my own battery. I ordered 16 EVE LF304 cells back in November from Ezeal and they've been stored in my heated basement. I checked them roughly every month and they all stayed steady at about 3.284V. I picked up an EBC-A40 tester and did do a capacity test on one of the cells. I fully charged it to 3.65V with a cut-off of 15.2A, let it rest for 30 minutes then did a full discharge down to 2.5V. I ended up getting 309AH out of it! I can't really be bothered to test all the other cells - as they're all from the same batch, I assume they'll perform similarly.

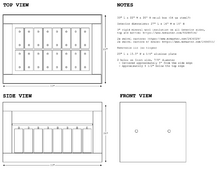
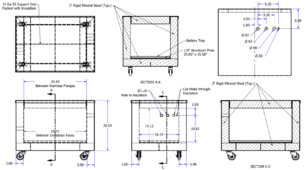
I was inspired by @Horsefly's insulated battery case build and have decided to DIY my own insulated case as well. I have a friend who owns a metal fabrication company and have sent him plans to build a custom insulated case with 3" of rigid mineral wool insulation on all sides.

20240301-20-41.32.png

In the meantime though I assembled the cells into a pack and wired everything up with the BMS. After reading a ton, I went with the JK BMS with the active balancer.

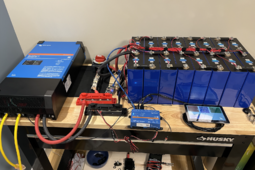
After ensuring that the battery pack was working as expected, I laid out the rest of the system:

20240301-20-36.42.png

So far everything is working just as I had hoped. Now I just wait for the battery case and for the temperatures to warm up a bit more so I can start the actual install!
 
Things are progressing nicely. My battery box design has been completed and is now being manufactured:

20240411-09-50.54.png

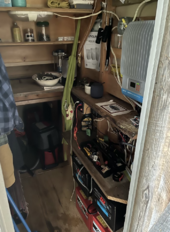
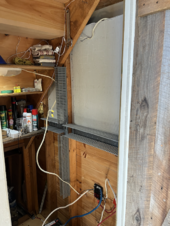
I made it up to the cottage earlier this week to start mounting and wiring up the system. One of the challenges of upgrading this system is that there is an extremely limited amount of space. I've spent a ton of time trying to figure out the best combination of components that will fit. This is a photo of the system before I started:

20240411-09-54.35.png

I pulled out all the existing equipment, shelves and mounted some concrete backer board:

20240411-09-57.49.png

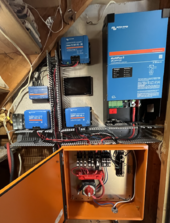
And have finally started to get all my blue and orange equipment mounted and wired:

20240411-10-00.32.png

I haven't really run into any problems, so far. But the thing that I did not really appreciate is how long it takes to get everything mounted and wired. I think I have another day or two ahead of me before I can say that I'm "done" the DC wiring. I'm really happy with the Vevor 20x20x6 enclosure - I had ordered it in gray, but they sent me the orange one instead, which I think actually looks good with the Victron blue!

The battery box should be arriving before the end of the month, so I hope to have the full system up and running soon!
 
Back
Top