ezwryder
New Member
After seeing stories of mini split installations on this forum (especially @timselectric) I decided to install a Pioneer 9,000 BTU system in our off grid cabin.This isn’t a step-by-step guide, just some of my impressions and notes for the next person who may be considering the same type of project. I’ll say up front that I am very happy with how the installation turned out and how the system is performing.
I bought this system to eliminate having to use propane for heat. It’s inconvenient to get propane refills and the bottle always seems to run out in the middle of the night. I’ve also been trying to eliminate any open flame products which is why I replaced the camp stove with an induction cooktop and microwave. I knew that with the power this uses, I might have to run the generator some in order to supplement my solar panels. But gas is easier to get and my 17 year old Honda eu1000i generator is very efficient. I felt it was worth the tradeoff.
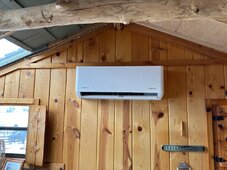
It wasn’t my intention to install a heat pump in a mountain cabin in mid-January. But having purchased the system on Black Friday, I had a three month installation window to qualify for Pioneer’s 5 year warranty. If the Pioneer extended warranty is important to you, the purchase date and installation window are worth planning for.
Prior to installation, I watched a lot of DIY videos, many of them featuring Pioneer units. I found the video by Robert Dunn (YouTube channel Under Dunn) to be the most informative, and, he’s funny:
The written instructions were fairly clear but I was glad I had watched Robert’s installation video a few times.
Before you buy a system, I’d recommend figuring out where the inside and outside units will be located so you can determine what length of line set you will need to run between them. I did some math and figured the standard 16 foot line set would work for my setup. The inside unit is located on the west wall and the outside unit is on the north side.
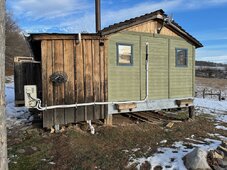
I found that Pioneer has made some small changes to improve the installation process that have not yet been reflected in the written instructions. For example, the control cable that runs between the units now has numbers on the wires which makes it less likely that you’ll screw up the connection between units.
At the point of installing the lines, I made a mistake that I only discovered after it was too late to fix. It was my intention to install a line set cover over the lines but I didn’t really look at it until I was done with the installation. I didn’t realize that some pieces like the elbow would have needed to go on prior to attaching the lines at both ends. My bad. Well, that’s okay, I can just make another project out of building a line set cover, which means another trip to the cabin, which is fine with me. But if you intend to use a cover set, take a look at it before you start your installation.
I had one Oh Shit moment during the installation (there is always at least one). Following the instructions for evacuating the line set, I did the vac procedure using the Pioneer gauge set. When I got to the step of opening the high pressure valve for 5 seconds, nothing happened. I didn’t hear anything, the gauge didn’t swing from negative to positive pressure, nothing. I tried it again a couple of times, no change. At this point I called the Pioneer tech line and described the issue. After a little wait, the tech came back on the line and explained that the pin in the valve attachment on the gauge set needed to be adjusted to make contact with the pin in the poppet valve on the unit (see pic).
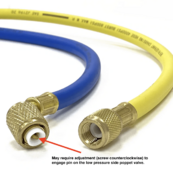
In other words, the gauge set never opened the low pressure valve on the unit, I was only drawing a vacuum on the blue gauge hose. When I opened the high pressure valve, I didn’t hear refrigerant because there was no vacuum on the system. So this is the bottom line: I had not performed a vac test, I had not evacuated the lines and from my repeated manipulations of the high pressure valve I had already released all the refrigerant into the line. Was I screwed? Had I hauled all this equipment from Florida to Virginia, up a snow-covered hill and installed it in 30 degree temps, only to get to the end of the installation and then be foiled by a misadjusted pin in a gauge set I bought specifically so I wouldn’t make a mistake???
“It’ll probably be fine,” the tech said. He had me adjust the pin in the end of the gauge set and reattach it, which generated an instant positive pressure reading. “If that reading doesn’t move, you should be okay,” he said. But shouldn’t I have evacuated the line set first, I asked? What will happen now that the refrigerant has mixed with the common ordinary outside air that was in the lines? “Well the *proper* thing to do is to get a tech up there to evacuate the line and recover the refrigerant, then go from there,” he said. “But as long as there are no leaks in the line, it will be fine.”
Now the reason I tell you all this in detail is because you will read countless arguments about the proper procedure for preparing a mini split; vacuums, evacuations and nitrogen testing and 600 psi and a whole lot of things. And I DO NOT discount the value of those procedures. But what I took away from this moment of panic is that as long as your line connections are solid and leakproof, you are pretty much in the clear. If I knew then what I know now, I would skip the whole vacuum/gauge process and just use Pioneer’s line evac kit to flush the lines and get on with my day. Following that bit of drama, I fired up the unit and within minutes it was pumping warm air into the cabin.
A day or two later I tackled installing the WiFi module. This process could use some clarification because I found three different sets of instructions online using different apps and the process for pairing the inside unit to WiFi was different for each one. And none of the instructions really matched the remote for the particular unit I was installing. If I didn’t already have a lot of experience setting up WiFi devices, this step might have stumped me but I eventually got it done.
I was really curious to find out how much power this system would use because I haven’t seen a lot of data on this. The specific unit I bought was the Energy Star-rated Pioneer Diamante Ultra 9,000 BTU 23 SEER2. And as I said, this was installed in an off grid cabin. I have 1.2 kw of panels and 600 AH of storage. I was really anxious to find out just how much power the system would use overnight and if I would be able to reliably recover that via solar during the day.
Generally speaking, if I set the unit to 70-72 degrees, it would run at a rate of about 1 kwh for the first twenty minutes as it raised the cabin temp from 55-59 degrees up to 70ish. Once it did that, it would dial down its power consumption pretty significantly. If I kept the indoor temp at 70, it would average about 500 wh consumption overnight. If I dialed the temp back to 65, it would drop to around 300 wh to maintain that temp. This is with an outside temp that ranged from mid-20s to low 30s during the week.
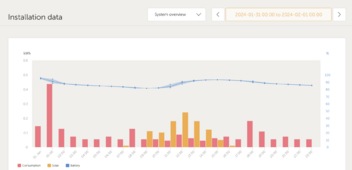
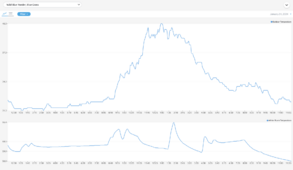
The next morning the battery pack would be between 40 and 60 percent. That meant I had to put somewhere between 250 and 350 AH back into the batteries. On a sunny day this was no problem for the panels. I could count on the peak four hours of the day to generate around 280 AH with another 100 AH or so coming from the shoulder hours. Of course, not every day featured clear blue skies. On about 2 days out of 3 I had to supplement the solar with a few hours of generator time. I have enough roof space for another row (or two) of panels, so I may choose to add some more capacity to reduce generator use. On the other hand, I don’t plan to regularly use the system during the coldest part of the year. More often, I will be using it for heat at times when the temperature differential is much smaller and I may not need more panels. Oh, who am I kidding. Of course I will add more panels.
To sum it all up, I am really happy with how this installation went and how the system performs. I’ll know more over time about the reliability of the system, but as far as I can tell everything is working fine despite my issue with the line evacuation process. While I have to run the generator for a few hours on some days to recharge the batteries, on other days I get enough solar so that I don’t have to run it at all. And I no longer need to rely on propane to heat the cabin. As it stands now, I would choose the same system and do the same thing again. But I would probably time my purchase so I would be installing it in any season other than the middle of winter. Now, about that new row of panels…
I bought this system to eliminate having to use propane for heat. It’s inconvenient to get propane refills and the bottle always seems to run out in the middle of the night. I’ve also been trying to eliminate any open flame products which is why I replaced the camp stove with an induction cooktop and microwave. I knew that with the power this uses, I might have to run the generator some in order to supplement my solar panels. But gas is easier to get and my 17 year old Honda eu1000i generator is very efficient. I felt it was worth the tradeoff.

It wasn’t my intention to install a heat pump in a mountain cabin in mid-January. But having purchased the system on Black Friday, I had a three month installation window to qualify for Pioneer’s 5 year warranty. If the Pioneer extended warranty is important to you, the purchase date and installation window are worth planning for.
Prior to installation, I watched a lot of DIY videos, many of them featuring Pioneer units. I found the video by Robert Dunn (YouTube channel Under Dunn) to be the most informative, and, he’s funny:
Before you buy a system, I’d recommend figuring out where the inside and outside units will be located so you can determine what length of line set you will need to run between them. I did some math and figured the standard 16 foot line set would work for my setup. The inside unit is located on the west wall and the outside unit is on the north side.

I found that Pioneer has made some small changes to improve the installation process that have not yet been reflected in the written instructions. For example, the control cable that runs between the units now has numbers on the wires which makes it less likely that you’ll screw up the connection between units.
At the point of installing the lines, I made a mistake that I only discovered after it was too late to fix. It was my intention to install a line set cover over the lines but I didn’t really look at it until I was done with the installation. I didn’t realize that some pieces like the elbow would have needed to go on prior to attaching the lines at both ends. My bad. Well, that’s okay, I can just make another project out of building a line set cover, which means another trip to the cabin, which is fine with me. But if you intend to use a cover set, take a look at it before you start your installation.
I had one Oh Shit moment during the installation (there is always at least one). Following the instructions for evacuating the line set, I did the vac procedure using the Pioneer gauge set. When I got to the step of opening the high pressure valve for 5 seconds, nothing happened. I didn’t hear anything, the gauge didn’t swing from negative to positive pressure, nothing. I tried it again a couple of times, no change. At this point I called the Pioneer tech line and described the issue. After a little wait, the tech came back on the line and explained that the pin in the valve attachment on the gauge set needed to be adjusted to make contact with the pin in the poppet valve on the unit (see pic).

In other words, the gauge set never opened the low pressure valve on the unit, I was only drawing a vacuum on the blue gauge hose. When I opened the high pressure valve, I didn’t hear refrigerant because there was no vacuum on the system. So this is the bottom line: I had not performed a vac test, I had not evacuated the lines and from my repeated manipulations of the high pressure valve I had already released all the refrigerant into the line. Was I screwed? Had I hauled all this equipment from Florida to Virginia, up a snow-covered hill and installed it in 30 degree temps, only to get to the end of the installation and then be foiled by a misadjusted pin in a gauge set I bought specifically so I wouldn’t make a mistake???
“It’ll probably be fine,” the tech said. He had me adjust the pin in the end of the gauge set and reattach it, which generated an instant positive pressure reading. “If that reading doesn’t move, you should be okay,” he said. But shouldn’t I have evacuated the line set first, I asked? What will happen now that the refrigerant has mixed with the common ordinary outside air that was in the lines? “Well the *proper* thing to do is to get a tech up there to evacuate the line and recover the refrigerant, then go from there,” he said. “But as long as there are no leaks in the line, it will be fine.”
Now the reason I tell you all this in detail is because you will read countless arguments about the proper procedure for preparing a mini split; vacuums, evacuations and nitrogen testing and 600 psi and a whole lot of things. And I DO NOT discount the value of those procedures. But what I took away from this moment of panic is that as long as your line connections are solid and leakproof, you are pretty much in the clear. If I knew then what I know now, I would skip the whole vacuum/gauge process and just use Pioneer’s line evac kit to flush the lines and get on with my day. Following that bit of drama, I fired up the unit and within minutes it was pumping warm air into the cabin.
A day or two later I tackled installing the WiFi module. This process could use some clarification because I found three different sets of instructions online using different apps and the process for pairing the inside unit to WiFi was different for each one. And none of the instructions really matched the remote for the particular unit I was installing. If I didn’t already have a lot of experience setting up WiFi devices, this step might have stumped me but I eventually got it done.
I was really curious to find out how much power this system would use because I haven’t seen a lot of data on this. The specific unit I bought was the Energy Star-rated Pioneer Diamante Ultra 9,000 BTU 23 SEER2. And as I said, this was installed in an off grid cabin. I have 1.2 kw of panels and 600 AH of storage. I was really anxious to find out just how much power the system would use overnight and if I would be able to reliably recover that via solar during the day.
Generally speaking, if I set the unit to 70-72 degrees, it would run at a rate of about 1 kwh for the first twenty minutes as it raised the cabin temp from 55-59 degrees up to 70ish. Once it did that, it would dial down its power consumption pretty significantly. If I kept the indoor temp at 70, it would average about 500 wh consumption overnight. If I dialed the temp back to 65, it would drop to around 300 wh to maintain that temp. This is with an outside temp that ranged from mid-20s to low 30s during the week.


The next morning the battery pack would be between 40 and 60 percent. That meant I had to put somewhere between 250 and 350 AH back into the batteries. On a sunny day this was no problem for the panels. I could count on the peak four hours of the day to generate around 280 AH with another 100 AH or so coming from the shoulder hours. Of course, not every day featured clear blue skies. On about 2 days out of 3 I had to supplement the solar with a few hours of generator time. I have enough roof space for another row (or two) of panels, so I may choose to add some more capacity to reduce generator use. On the other hand, I don’t plan to regularly use the system during the coldest part of the year. More often, I will be using it for heat at times when the temperature differential is much smaller and I may not need more panels. Oh, who am I kidding. Of course I will add more panels.
To sum it all up, I am really happy with how this installation went and how the system performs. I’ll know more over time about the reliability of the system, but as far as I can tell everything is working fine despite my issue with the line evacuation process. While I have to run the generator for a few hours on some days to recharge the batteries, on other days I get enough solar so that I don’t have to run it at all. And I no longer need to rely on propane to heat the cabin. As it stands now, I would choose the same system and do the same thing again. But I would probably time my purchase so I would be installing it in any season other than the middle of winter. Now, about that new row of panels…


