diy solar

diy solar

Ryobi Zero-Turn Mower SLA to LiFePo4 Conversion - (Updated - Build Complete With Pics!)

Just be careful with Nylock nuts if you have never used them before so you don't over-torque.

Perhaps practice on something non-critical first to feel them "bottom out" and go no further. Taking them beyond this point defeats the purpose. They may *feel* tight, but have been degraded by going too far. A little practice goes a long way.

And, they are one-time-use only. If you back one out (a pita!), discard it.
 
Just be careful with Nylock nuts if you have never used them before so you don't over-torque.
Thanks for the tip. So you don't think hitting the original torque spec using a torque wrench is sufficient? I suppose that might make it slightly under-torqued on the threads which I thought would be a safe bet.
 
@Nizadar Good luck with your conversion. Regarding your first two questions, I'm not sure what is the correct protocol when top-balancing pre-fabricated batteries vs individual cells but I assume it's the same as you describe. You will probably get more responses asking those specific questions somewhere else in the forums (if they haven't been asked and answered already).

The charger you point to should be good. 18A is more than what the original charger pushes (~13A), so the only concern is whether the charge port and the cables between the charge port and the battery can handle it. If you're planning to bypass the charge port and go straight to the battery terminals (i.e., via the Anderson plug), then it's totally fine. But if you are planning to use the charge port then I would personally try to limit the charge current to no more than 15A.

Keep us posted and share pictures! For a while I was very close to going the CHINS route.
 
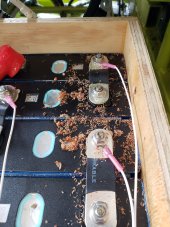
Opened my box back up to inspect everything and found a couple strange things. My box is not fully enclosed; there is an opening of about 10 sq in. that the power cables go through. Plenty large for stuff to get in, for sure. I expected to find some grass clippings, but not this:
20220504_125631.jpg
I'm not exactly sure what that is but looks like a mouse or chipmunk brought in a snack and hung out for a while. Luckily there is no visible damage to anything, nothing being chewed on. I'll be sealing that opening soon.

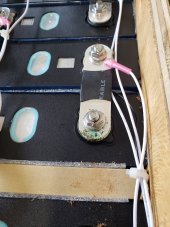
But in that same area, I found some weird green discoloration in some of the bus bars:
20220504_130102.jpg
The nuts are tight, and this does not look like charring. I'm scratching my head trying to figure out what this is. Am I looking at mouse pee? Sure hope so :/
 
These sort of issues are why companies spend much time and resources on R&D to eliminate such problems, or at least try to reduce them. Vermin, vibrations, environmental ingress, human idiocy are all things they seek to mitigate through design.
 
It does look like mouse pee. Maybe the plating on the copper isn't a solid as you thought. I would remove the bus bar, thoroughly clean all surfaces - not just the contact surfaces - and reinstall.
 
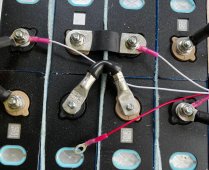
I opened my battery after about 5 hours of very bumpy mowing to check things out and I saw no loosening of bolts. I did build one #2 AWG interconnect with plans to replace my bus bars, but quickly decided that it's really not much better than the bus bars. Have a look at the picture: with the large lugs I was only able to fit in about 1.5" of wire and had to strain to bend the wire to get this one to fit. It was putting quite a bit of force on the battery studs and really didn't seem flexible at all. I don't have much overhead clearance to poke the wire upwards in my box, so this was a nonstarter for me. I put the bus bar back in place. I did replace the OEM nuts with nylon locking nuts, so I have more confidence nothing will come loose.


IMG_7494.jpg
 
Correct me if I'm wrong, but the balance leads on the studs on the left and right hand sides of the picture appear to be under the cable lug. If so, you want the balance lead on top of the cable lug.
You're correct. I noticed that when I was replacing the nuts with the nyloc nuts and corrected it. Thanks!
 
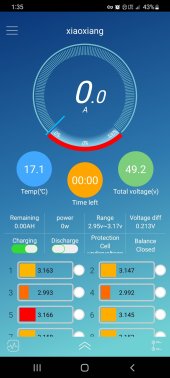
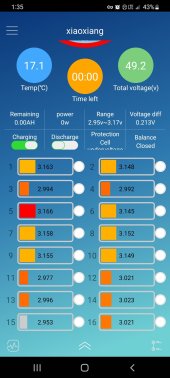
Sunday afternoon I was mowing the lawn for the 4th time and lost all power. When it quit the meter on the mower was showing 47.9 volts, 69.98AH capacity, and 46.0%. I checked the main fuse on the mower and it was still good. There were no loose wires or obvious signs of problems. I opened the BT app for the BMS and it showed 0% capacity, the voltage matched the 47.9 on the meter. The lowest cell was just under 2.9vdc and the highest just over 3.1vdc. Temperature on the 3 sensors average about 87°F.

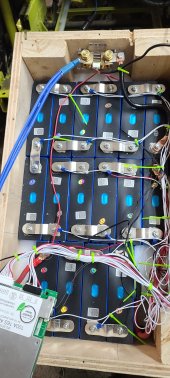
I got the mower back up to the house and plugged in the AIMS charger but it wouldn't charge. The charger wouldn't even start, no LED indicators lit up on it. I pulled the battery pack and opened the box to see if there was any visible signs of problems. I can't see anything wrong, no loose wires, no loose nuts, nothing burned, no smell of burning. It looks just like it did when I put it in the mower.

Today when I went out to dig into it more, the meter was now 49.24VDC, 68.94AH, and 46%. It still doesn't charge though. I even connected the BMS leads to the charger to bypass anything on the mower that might be causing a problem. Still it doesn't charge.

The log data from the app doesn't show any red notes that would indicate a reason why it shut down. I did find in the parameter settings the cycle is set to 80AH which is probably why it shutoff at 69.98AH remaining, given my pack is 150AH total capacity.

So I can't find anything wrong, there's no indications in the BMS log of any errors.

The only thing I can see for why it quit was that it dropped below 70AH capacity. But why won't it charge now?

Any suggestions would be helpful.

display1.jpgdisplay2.jpg


battery.jpgBMS1.jpg
 
Sunday afternoon I was mowing the lawn for the 4th time and lost all power. When it quit the meter on the mower was showing 47.9 volts, 69.98AH capacity, and 46.0%. I checked the main fuse on the mower and it was still good. There were no loose wires or obvious signs of problems. I opened the BT app for the BMS and it showed 0% capacity, the voltage matched the 47.9 on the meter. The lowest cell was just under 2.9vdc and the highest just over 3.1vdc. Temperature on the 3 sensors average about 87°F.

I got the mower back up to the house and plugged in the AIMS charger but it wouldn't charge. The charger wouldn't even start, no LED indicators lit up on it. I pulled the battery pack and opened the box to see if there was any visible signs of problems. I can't see anything wrong, no loose wires, no loose nuts, nothing burned, no smell of burning. It looks just like it did when I put it in the mower.

Today when I went out to dig into it more, the meter was now 49.24VDC, 68.94AH, and 46%. It still doesn't charge though. I even connected the BMS leads to the charger to bypass anything on the mower that might be causing a problem. Still it doesn't charge.

The log data from the app doesn't show any red notes that would indicate a reason why it shut down. I did find in the parameter settings the cycle is set to 80AH which is probably why it shutoff at 69.98AH remaining, given my pack is 150AH total capacity.

So I can't find anything wrong, there's no indications in the BMS log of any errors.

The only thing I can see for why it quit was that it dropped below 70AH capacity. But why won't it charge now?

Any suggestions would be helpful.
View attachment 94010


View attachment 94013View attachment 94014
What is your protection cell undervoltage set to ? It cuts if off on your app screen
 
Sunday afternoon I was mowing the lawn for the 4th time and lost all power. When it quit the meter on the mower was showing 47.9 volts, 69.98AH capacity, and 46.0%. I checked the main fuse on the mower and it was still good. There were no loose wires or obvious signs of problems. I opened the BT app for the BMS and it showed 0% capacity, the voltage matched the 47.9 on the meter. The lowest cell was just under 2.9vdc and the highest just over 3.1vdc. Temperature on the 3 sensors average about 87°F.

I got the mower back up to the house and plugged in the AIMS charger but it wouldn't charge. The charger wouldn't even start, no LED indicators lit up on it. I pulled the battery pack and opened the box to see if there was any visible signs of problems. I can't see anything wrong, no loose wires, no loose nuts, nothing burned, no smell of burning. It looks just like it did when I put it in the mower.

Today when I went out to dig into it more, the meter was now 49.24VDC, 68.94AH, and 46%. It still doesn't charge though. I even connected the BMS leads to the charger to bypass anything on the mower that might be causing a problem. Still it doesn't charge.

The log data from the app doesn't show any red notes that would indicate a reason why it shut down. I did find in the parameter settings the cycle is set to 80AH which is probably why it shutoff at 69.98AH remaining, given my pack is 150AH total capacity.

So I can't find anything wrong, there's no indications in the BMS log of any errors.

The only thing I can see for why it quit was that it dropped below 70AH capacity. But why won't it charge now?

Any suggestions would be helpful.

View attachment 94009View attachment 94010


View attachment 94013View attachment 94014
Did you confirm the output voltage on a DMM? My guess is that it'll read 0, as your app shows the battery discharge is turned "off," probably because of the max Ah setting you put in. Click that toggle button while connected to the charger and it should start up. The AIMs charger is a smart charger and won't deliver current until it senses a voltage.
 
Did you confirm the output voltage on a DMM? My guess is that it'll read 0, as your app shows the battery discharge is turned "off," probably because of the max Ah setting you put in. Click that toggle button while connected to the charger and it should start up. The AIMs charger is a smart charger and won't deliver current until it senses a voltage.
I did not check output voltage on a DMM. If it's 0 I'll toggle the button to see what happens. I'll do that when I get home from work in a few hours and report back.

Thanks bobbie_ohio and UltrasoundJelly for the quick responses!
 
I did not check output voltage on a DMM. If it's 0 I'll toggle the button to see what happens. I'll do that when I get home from work in a few hours and report back.

Thanks bobbie_ohio and UltrasoundJelly for the quick responses!
Yep, no output voltage. Toggled the discharge button and it came then turned off. I changed the cycle capacity from from 80ah to 90ah and now it's on and charging.

I didn't realize those buttons on the app could be toggled.

Thank you UltrasoundJelly
 
Yep, no output voltage. Toggled the discharge button and it came then turned off. I changed the cycle capacity from from 80ah to 90ah and now it's on and charging.

I didn't realize those buttons on the app could be toggled.

Thank you UltrasoundJelly
Yeah, it's kinda cool that you can software-disable the charge and output. Though, it seems that the way engineers design BMSs is for them primarily to be for battery protection, and not routinely regulate the depth of charge/discharge. For me, it would be cool if the BMS would allow a max 80% SOC and then disable charging, but I guess the BMS leaves that up to the charger. Would be nice to have some standardized method of communication between charger and BMS so they can together optimize battery life.
 
Would be nice to have some standardized method of communication between charger and BMS so they can together optimize battery life.

To make use of what you've got, read SoC then use spring-wound timer to put in limited Ah charge?
Occasionally, you'd want to hold it above knee to allow balancing.
 
That’s what I’m doing now. I find that charging for 2 hours at 12 amps gets me 30-40% charge, just enough for my mow.

Interestingly I find that the BMS reported SOC drifts from what the shunt reads over a month or so. Charging to 100% syncs them up again.
 
Back
Top