You are using an out of date browser. It may not display this or other websites correctly.
You should upgrade or use an alternative browser.
You should upgrade or use an alternative browser.
WOW Finally Making Free Energy
- Thread starter Solarmadness
- Start date
Solarmadness
Let the Sun Shine On Crazy Diamonds
Started Solar design in Nov 2022. Now up and making power. Thanks to all that helped with all of critical info to make this operate. What a cool and awesome journey.Thanks again you Gentelman you are awesome. Pat
Last edited:
OzSolar
Whatever you did, that's what you planned.
Pretty fun, right? Just yesterday I wired up another 2kW at my place and it was just as cool as was the first time I did it over 25 years ago.
Solarmadness
Let the Sun Shine On Crazy Diamonds
Ive been walking in circle all after noon with minimal sunshine. Making 114vdc on 9 3p 3s panels.So happy !
crossy
Solar Addict
Yeah ^^^.
There really is nothing like seeing those free Watts starting to flow
The next milestone (which we are about 6 months from) is when your generated energy exceeds the investment in your system and you truly have free power!
There really is nothing like seeing those free Watts starting to flow
The next milestone (which we are about 6 months from) is when your generated energy exceeds the investment in your system and you truly have free power!
MichaelK
Solar Wizard
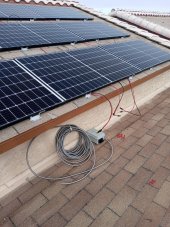
I'm sorry, but this does not appear to be a proper install? Is your panel positioning final, or is that just a pic of the panels during construction? You are in Los Vegas? The panels need to be suspended ABOVE the roof, not on it. In summer, the panels will get very hot, voltage will drop, and at best, you will lose a lot of power. At worst, the panels might get physically damaged by the extra heat.
The second issue I see is it appears that panels are not actually attached to the brackets hold them in place. They appear to be just keeping them from sliding off the roof. I'm afraid that they will all get pulled off the roof with the first big thunderstorm.
Finally, those do not look like proper rubber-gasketed roofing screws on the brackets. I think that will result in multiple roof leaks once the rains come.
timselectric
If I can do it, you can do it.
- Joined
- Feb 5, 2022
- Messages
- 19,107
Those type of brackets are attached to the back of the panel frames. And support the panels approximately 1" above the mounting surface.I'm sorry, but this does not appear to be a proper install? Is your panel positioning final, or is that just a pic of the panels during construction? You are in Los Vegas? The panels need to be suspended ABOVE the roof, not on it. In summer, the panels will get very hot, voltage will drop, and at best, you will lose a lot of power. At worst, the panels might get physically damaged by the extra heat.
The second issue I see is it appears that panels are not actually attached to the brackets hold them in place. They appear to be just keeping them from sliding off the roof. I'm afraid that they will all get pulled off the roof with the first big thunderstorm.
Finally, those do not look like proper rubber-gasketed roofing screws on the brackets. I think that will result in multiple roof leaks once the rains come.
And to me it looks like there's some kind of gasket or sealant between the brackets and roof.
This type of installation is usually standard on an RV.
I can't comment on whether or not there will be enough airflow in this installation. But a pitched roof is better than a flat roof. For heat to natural create airflow.
MichaelK
Solar Wizard
Ok, that makes me feel better. I've never used that type of bracket before. Wish the photography showed that a bit better. I was wearing my glasses.Those type of brackets are attached to the back of the panel frames. And support the panels approximately 1" above the mounting surface.
timselectric
If I can do it, you can do it.
- Joined
- Feb 5, 2022
- Messages
- 19,107
sunshine_eggo
Happy Breffast!
Ok, that makes me feel better. I've never used that type of bracket before. Wish the photography showed that a bit better. I was wearing my glasses.
Not me. Those panels are way too close to the roof. 1" clearance isn't enough, and I really doubt those are much more than 1/2 to 3/4" above the asphalt. They are going to get hot, underperform and degrade much faster than the datasheet indicates.
We just pulled my neighbor's 25 year old panels off his pump house. There was negligible spacing between the shingles and the panels along 1 edge and about 1" along another. After 25 years, he'd lost about 70% of his production.
The new 330W panels with commercial racking have about 5" of clearance.
Hogheavenfarm
Regulation Stifles Innovation
- Joined
- Jun 24, 2022
- Messages
- 439
I would add a small "roof" or enclosure to that combiner box, they are supposed to be "watertight", but mine wasnt. It is located directly under the drip line of the above roof.
crossy
Solar Addict
such optimists here. If you got everything for free than yes it is free energy, otherwise you are just prepaying for electricity.
Ah, but once we've generated what we "pre-paid" for the energy really is free
We are approaching that point (about 6 months away). Barring failures of course, or me getting the urge to add panels.
We have family coming over from the UK in May, whilst they love the Thai weather, they also love running the A/C at arctic temperatures. Definitely need more panels for then.
MichaelK
Solar Wizard
Yes, well, I am guilty of that myself when staying in Kuala Lumpur. Add three showers per day, on top of the air-conditioning.We have family coming over from the UK in May, whilst they love the Thai weather, they also love running the A/C at arctic temperatures. Definitely need more panels for then.
Similar threads
- Replies
- 22
- Views
- 983
- Replies
- 12
- Views
- 301
- Replies
- 1
- Views
- 200
- Replies
- 5
- Views
- 356


