It's either 4/5 ton unit, but I cannot remember what the owner had said. It was my fastest move ever, we had just moved to another state and wanted to rent till we were situated. But then banks, sheriff, counter top company, police showed up at the rental looking for the owner. The home was in foreclosure and we had two weeks to find a home. Its a split system which I do not like, installiing a mini split downstairs saved between 400 to 600kwh per month.42 amps for electric heat would sound right maybe even low..
but for cooling not at all.. how many units and how many tons


You are using an out of date browser. It may not display this or other websites correctly.
You should upgrade or use an alternative browser.
You should upgrade or use an alternative browser.
Help with 128 batteries each one is 280ah, and want to configure for 48v system.
- Thread starter kromc5
- Start date
curiouscarbon
Science Penguin
- Joined
- Jun 29, 2020
- Messages
- 3,026
nice looking battery pack.
pretty busbar! ?
nice batrium setup
pretty busbar! ?
nice batrium setup
coolwaterxii
New Member
- Joined
- Mar 12, 2021
- Messages
- 54
So you'll have 2 x 4p16s with BMS on each?I have one 4p16s completed, and waiting on some spares to finish the other. I'm also adding more panels to guarantee surplus
through the day. The ac/heating pulls 5300 watts avg and 110amps from the battery. My original supplier just kept saying ok for 4 months to me trying to buy more. So I'm way behind sadly, I have placed two orders and waiting on the spares.
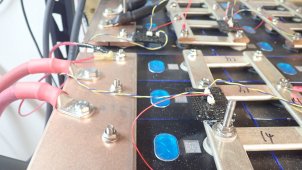
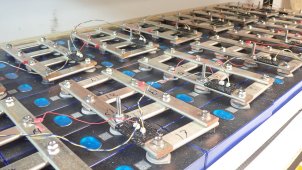
Very niceA few pics of one completed 4p16s:
I like it! If you don't mind, where did you get those busbars?A few pics of one completed 4p16s:
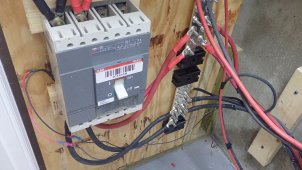
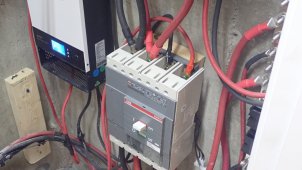
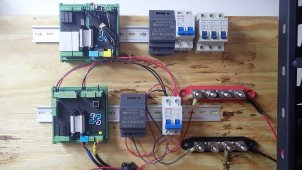
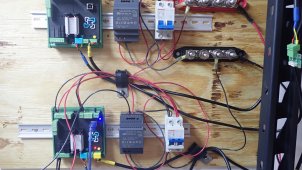
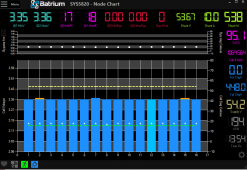
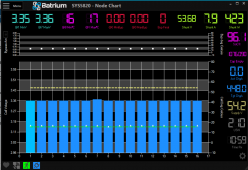
I bought them in 144-inch sections from onlinemetals and made them, used my bevel saw with dewalt carbide blade and drill press. The smaller are .25 by 1 inch and the larger are .25 by 3 inch. I want to have 2 x 4p16s for the heating/cooling and then 1 for the rest of the home. I would like to combine two and have one batrium manage two and then a second batrium of the last battery. Here's pic of the batriums two watchmon 4 and one core the core "at the top" is the new replacement for the watchmon.So you'll have 2 x 4p16s with BMS on each?
Very nice
I like it! If you don't mind, where did you get those busbars?
I have more pics here of the batrium software, growatt server etc.

Very new to solar but started purchasing items, not sure of the final specs of the whole system.
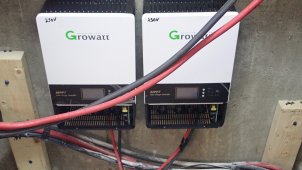
First order was from Signature Solar: 1. 36x ZNShine 390W 72 Cell Bifacial Mono 2. 1x Off-Grid 48V DC 12kW Inverter 120V/240V 120A/150V MPPT with Wifi Monitoring 3. 1x Growatt 12 KW Off-Grid Inverter Spare Boards Found the we were using around 50kwh per night and that has to be corrected, I'm...
 diysolarforum.com
Attachments
coolwaterxii
New Member
- Joined
- Mar 12, 2021
- Messages
- 54
That's so cool! I wish Batrium is compatible with Sol-Ark's communication.I bought them in 144-inch sections from onlinemetals and made them, used my bevel saw with dewalt carbide blade and drill press. The smaller are .25 by 1 inch and the larger are .25 by 3 inch. I want to have 2 x 4p16s for the heating/cooling and then 1 for the rest of the home. I would like to combine two and have one batrium manage two and then a second batrium of the last battery. Here's pic of the batriums two watchmon 4 and one core the core "at the top" is the new replacement for the watchmon.
I have more pics here of the batrium software, growatt server etc.
Very new to solar but started purchasing items, not sure of the final specs of the whole system.
First order was from Signature Solar: 1. 36x ZNShine 390W 72 Cell Bifacial Mono 2. 1x Off-Grid 48V DC 12kW Inverter 120V/240V 120A/150V MPPT with Wifi Monitoring 3. 1x Growatt 12 KW Off-Grid Inverter Spare Boards Found the we were using around 50kwh per night and that has to be corrected, I'm...
Batrium will try and getting it working they would need the protocols from sol and a zoom session. I'm hoping to get it functioning on the growatt:That's so cool! I wish Batrium is compatible with Sol-Ark's communication.
Batrium
coolwaterxii
New Member
- Joined
- Mar 12, 2021
- Messages
- 54
Thanks!Batrium will try and getting it working they would need the protocols from sol and a zoom session. I'm hoping to get it functioning on the growatt:
Batrium
support.batrium.com
A few pics of one completed 4p16s:

Shawn Hayes
Learning Everyday
Very nice! I’m doing pretty much an identical setup. So it good to see pictures of a setup like this!! I’m doing just a single 4p16s setup, still waiting my 280ah batteries to arrive though.A few pics of one completed 4p16s:
Also ordered the Batrium Watchmon Core with16 M8 Blockmons. How was the setup process and software install process?
I’m using the Sol-Ark 12k so I know they will not communicate directly.
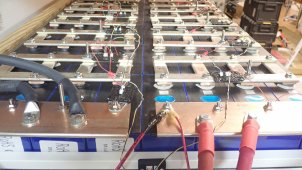
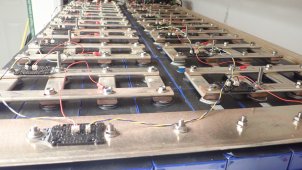
I also order 1/8” X 1” copper 101 bar for my bus bars. Copper 101 is supposed to best for conducting electricity. So to see what you’ve done gives me a great visual on what my setup will look like. I see your serial connections are on first then parallel? I know this how people are doing bus bars, but the first real clear picture of it done.
Any tips on making these bus bars?
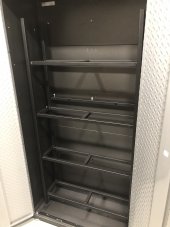
However my batteries will be mounted horizontally on a metal rack, 4 wide, 4 high = 16 per shelf, inside a metal cabinet. Each row of 4 will be compressed with 1/4” threaded rods between each set of batteries.
Hope this turns out as nice as your setup!!
Attachments
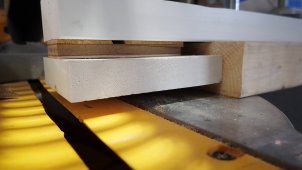
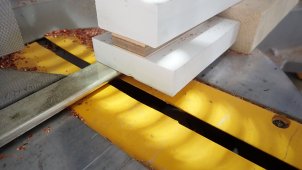
I really like the batrium, the installations are very easy from configuration to firmware updating. Having never worked with copper plate I found it very grabby. I'm using a bevel saw with dewalt carbide blade, and 10.3mm bit on a drill press. I made a better template for cutting the copper and cut if flush with the saw. For safety if you use a bevel saw do not want to give the copper any movement when cutting. You can try and contact sol for the protocols and do a zoom with batrium and maybe get that working, I'm in the process of trying that with growatt. Few pics from the watchmon 4 today and the template / safety holder I made.Very nice! I’m doing pretty much an identical setup. So it good to see pictures of a setup like this!! I’m doing just a single 4p16s setup, still waiting my 280ah batteries to arrive though.
Also ordered the Batrium Watchmon Core with16 M8 Blockmons. How was the setup process and software install process?
I’m using the Sol-Ark 12k so I know they will not communicate directly.
I also order 1/8” X 1” copper 101 bar for my bus bars. Copper 101 is supposed to best for conducting electricity. So to see what you’ve done gives me a great visual on what my setup will look like. Any tips on making these bus bars?
However my batteries will be mounted horizontally on a metal rack, 4 wide, 4 high = 16 per shelf, inside a metal cabinet. Each row of 4 will be compressed with 1/4” threaded rods between each set of batteries.
Hope this turns out as nice as your setup!!
Attachments
Shawn Hayes
Learning Everyday
Cabinet is from Lowe’s, Gladiator 36” wide, 18” deep and 72” tall.Do you have a link to the rack and cabinet? I like that setup.
The rack was custom made for me according to my specifications by a local welder.
Last edited:
Sanwizard
Solar Wizard
- Joined
- Feb 2, 2021
- Messages
- 2,715
Thanks for the info! I did just buy a stick welder to play with. Always need something new to learn and a new hobby!Cabinet is from Lowe’s, Gladiator 36” wide, 18” deep and 72” tall.
The rack was custom made for me according to my specifications by a local welder.
Shawn Hayes
Learning Everyday
After I got the rack made, I bought a flux core welder as well to learn to weld with for future projects.Thanks for the info! I did just buy a stick welder to play with. Always need something new to learn and a new hobby!
Since that picture was taken, I’ve added thin rubber matting to the sides and floor of the cabinet. Hopefully to prevent any arcing from any accidental loose or dropped wire.
The cabinet is bolted to the wall to prevent tipping forward. The battery rack will also be bolted to the same area to prevent tipping. Should be very sturdy!!
Using thin nylon matting between all batteries as an extra layer of protection.
For compression I’m using 5/16”, 6061 grade aluminum for compression plates instead of plywood. As stated above, 1/4” threaded rod between every set of 4 batteries.
Shawn Hayes
Learning Everyday
I used McMaster-Carr for the copper 101 bar for bus bars. Very please with that company customer service and very fast shipping! Check them out if you need anything, they carry many products. I learned about them from you tuber David POZ.
I used Midwest metals for the 6061 5/16” aluminum compression plates I’ll be making.
Just trying pass along good resources for those who may need them.
I used Midwest metals for the 6061 5/16” aluminum compression plates I’ll be making.
Just trying pass along good resources for those who may need them.
Last edited:
Shawn Hayes
Learning Everyday
Planning on using a band saw to cut copper bus bars. So that should be easy to cut and use.I really like the batrium, the installations are very easy from configuration to firmware updating. Having never worked with copper plate I found it very grabby. I'm using a bevel saw with dewalt carbide blade, and 10.3mm bit on a drill press. I made a better template for cutting the copper and cut if flush with the saw. For safety if you use a bevel saw do not want to give the copper any movement when cutting. You can try and contact sol for the protocols and do a zoom with batrium and maybe get that working, I'm in the process of trying that with growatt. Few pics from the watchmon 4 today and the template / safety holder I made.
I have a small drill press to use for drilling holes for M-6 battery terminals.
I was curious where you attached the Blockmons, you have much longer terminals? Did your batteries come with welded studs? Or did they come with no studs and you added your own M-6 studs?
I did not like the idea of the weld studs, as I wanted more flexibility. I purchased a bunch of the uxcell M6 x 25mm Fully Threaded 304 Stainless Steel rods from amazon. I would recommend 35mm though just for the extra clearance. The others are 50mm way to long but got those super cheap.Planning on using a band saw to cut copper bus bars. So that should be easy to cut and use.
I have a small drill press to use for drilling holes for M-6 battery terminals.
I was curious where you attached the Blockmons, you have much longer terminals? Did your batteries come with welded studs? Or did they come with no studs and you added your own M-6 studs?
Then to install them I used this:
The threaded rods with the allen key were so much more expensive and this works very well.
I will measure the bars this evening to and post the lengths I used. Make sure to deburr them and fully smooth the holes, and a decent amount ox on the bottom connections. I found that it really can affect the balance of the pack. I had hand deburred the first batch and just put a thin layer of ox. The bars felt decent but I did have cells that went up and down faster. I had put the shelves to close and was very hard to pull batteries to check them. I took the pack apart and made sure each hole was perfect, clean the terminals and hit them with 1500 grit dustless paper. Used a little more ox on the terminals and really made a difference. After dsicharging last night and no active balancing they are near perfect this morning.
Attachments
Last edited:
Shawn Hayes
Learning Everyday
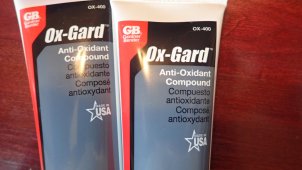
What brand of OX did you use?I did not like the idea of the weld studs, as I wanted more flexibility. I purchased a bunch of the uxcell M6 x 25mm Fully Threaded 304 Stainless Steel rods from amazon. I would recommend 35mm though just for the extra clearance. The others are 50mm way to long but got those super cheap.
Then to install them I used this:
The threaded rods with the allen key were so much more expensive and this works very well.
I will measure the bars this evening to and post the lengths I used. Make sure to deburr them and fully smooth the holes, and a decent amount ox on the bottom connections. I found that it really can affect the balance of the pack. I had hand deburred the first batch and just put a thin layer of ox. The bars felt decent but I did have cells that went up and down faster. I had put the shelves to close and was very hard to pull batteries to check them. I took the pack apart and made sure each hole was perfect, clean the terminals and hit them with 1500 grit dustless paper. Used a little more ox on the terminals and really made a difference. After dsicharging last night and no active balancing they are near perfect this morning.
I'm using:What brand of OX did you use?
Attachments
Similar threads
- Replies
- 31
- Views
- 638
- Replies
- 2
- Views
- 194
- Replies
- 27
- Views
- 737
- Replies
- 5
- Views
- 211
- Replies
- 43
- Views
- 2K