diy solar

diy solar

Unique Travel Trailer LiFePo Conversion – Compact Two-Layer Build

EricR

New Member
Joined
Aug 8, 2021
Messages
48
Earlier this year the wife and I began dry camping (aka boondocking) and we now prefer this over RV parks. About this same time the lead acid batteries that came with the trailer were failing and it seemed like a good time to upgrade the power system.

The initial idea was to just put a couple of lithium batteries on the trailer tongue, in place of the old SLAs. Next, I began designing a build with significant solar capability and even purchased a Growatt 24V 3000W all-in-one as the basis for the project.

In the end I decided on a less expensive and somewhat simpler build described below.

First though, some shout-outs to others who helped. To @Short_Shot , @eXodus , @HRTKD , @Zwy and @12VoltInstalls, all who helped me think this though and not do something stupid, like building something that didn’t really meet my goals. A double shout-out goes to @smoothJoey who patiently shared both his time and expertise to this build. Thanks guys, for your help! And I am happy to report there was no smoke, no fire, and not a single blown fuse!

Here are the main components of this build:
  • 2 Lion Energy UT1300 12V LFP 150A 105AH batteries
  • KISAE AC1260 60A 12V Battery Charger (from the good folks at donrowe.com)
  • 100W portable solar panel and basic SCC
  • Victron BMV-712 Smart Battery Monitor
  • Blue Sea 5196 MRBF Fuse Block – 3 Circuits
  • Class T fuse block with 150A fuse (also available from Don Rowe)
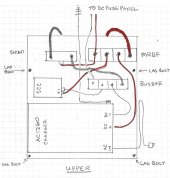
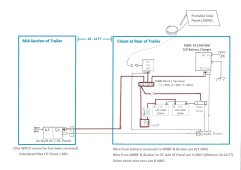
Here is the design diagram of the electrical components and connections.

01-Electrical_Design.jpg

After considering various locations for these components, the only good place was a small storage area at the rear of the trailer. This raised the issue of how to fit the above design into a space just 18 inches wide, 20 inches deep, and 23 inches high.
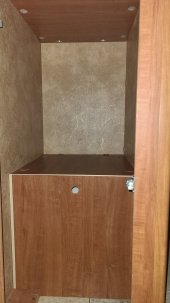
02-Closet_Space.jpg

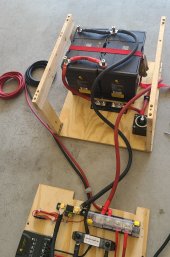
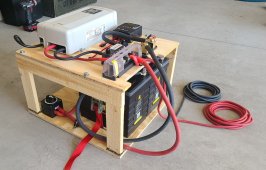
Since there wasn’t room to put all the components on a single board (as you see in the Will Prowse videos), I went with a stacked design. That is, two 18x20 inch boards with risers on the lower board to support the upper board.

Here is the physical layout of each board.
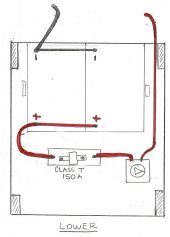
03-Lower_Physical_Design.jpg
04-Upper_Physical_Design.jpg


Once built, it looks like this.
05-Two_Halves.jpg
06-Stacked_ Together.jpg
NOTE: in these photos the shunt for the BMV-712 is wired backwards. Until I swapped the connections the amp meter ran positive when consuming and negative when charging.

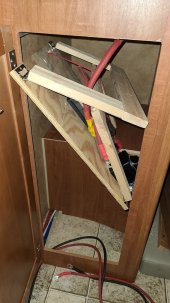
The build was progressing and seemed fairly clean and compact. Then came a major snag! How could I have missed this? The opening of the storage area is smaller than the interior space. The design would fit the internal space very nicely – if only I could get it through the opening. After a short time of consternation, the proverbial light bulb went on. Hinges could be added to the risers on the lower board, allowing them to fold down, thus fitting through the opening and unfolding once in place.
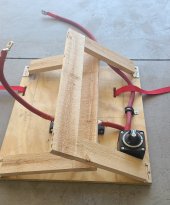
07a-Hinged_Design.jpg
07b-Hinged_Design.jpg

Here the lower half is installed, and the cables that need to connect to the upper board are hanging from a couple of cup hooks at the top of the storage space.
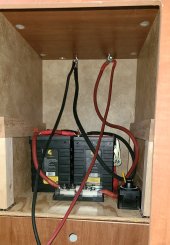
08-Lower_Half_Installed.jpg

Then, the upper board going in.
09-Upper_Half_Installation.jpg

... continued below.
 
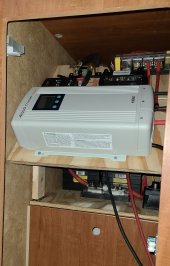
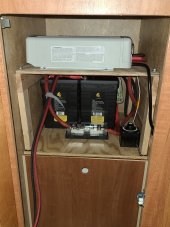
Here with the two boards completely installed.
10-All_Installed.jpg

So now the new batteries, charger, etc. are installed, but how is this power fed to the trailer's existing 12V system? Well, this was accomplished by running 4 AWG cables from the batteries in the rear to the existing DC fuse panel at mid-trailer.

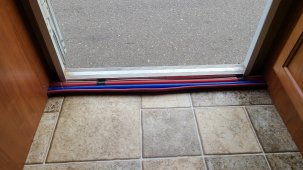
Here you can see the new DC cables routing forward alongside the existing romex cable and water lines (threshold cover off for visibilty).
12-New_Wires_w_Orig_Water&Power.jpg

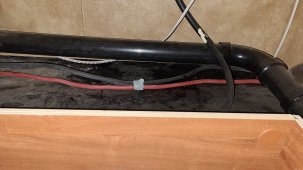
Further forward they route over the fender well.
13-Routing_Over_Fender_Well.jpg

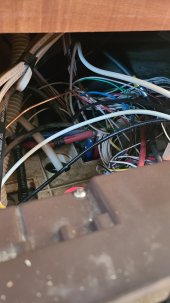
Here is the space behind the existing WFCO 8950 power panel (a unit which consists of an AC breaker box, DC fuse panel, and AC-DC inverter). As you can see, there are wires running every which way, along with water and propane lines – so I wanted to disrupt this area as little as possible.
14-As-Built_Rats_Nest.jpg

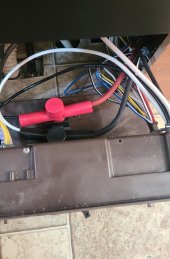
I mounted a Blue Sea Dual PowerPost Cable Connector on top of the back side of the WFCO 8950. Here the 4 AWG cables terminate, and from there 8 AWG wire runs into the DC fuse panel.
15-And_Into_DC_Fuse_Panel.jpg

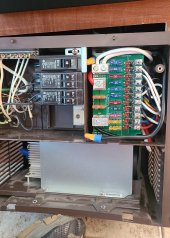
In this next picture, the as-built 12V feed from the trailer tongue (batteries and 7-pin) has been disconnected from the 12V DC fuse panel and given a wire nut. The 12V feed from the converter section of the WFCO 8950 is also disconnected and given a wire nut. Then the 8 AWG run from the Blue Sea Dual PowerPost is connected to the DC fuse panel instead.
16-New_DC_Connections.jpg

NOTE: the 120V to 12V converter section of the WFCO8950 is completely disconnected (both 120V AC in & 12V DC out) and no longer used (it is left in place only as an emergency backup if the AC1260 charger fails). So now, all 12V power always comes from the LiFePo batteries.


Details aside, the big question is how does this setup work when we are out on the road?

In one word: Excellent! Starting a trip fully charged, the two 105AH batteries will last at least 4 days until needing to be recharged. And recharging is fast (3-5 hours) due to the AC1260 being a 60A charger. Also, I am pleasantly surprised by the effectiveness of the Lion Energy 100W portable solar panel. On a sunny day, being repositioned just twice during the day, it returned 2/3 or so of the power used on a given day. As a result, I am considering taking further advantage of free power by adding a 300-400W panel on the roof in the future.

The bottom line is our outing duration is no longer limited by electrical power. Now our limiting factor is the trailer’s 30-gallon freshwater tank.

The next obvious question would be how, when out on the road, do we find 120v power for the AC1260 charger to recharge the batteries? One option is spending the night at an RV park every 3-4 days, another would be a portable generator, or a combination of these two.

We chose a third option and purchased a 2021 F150 Hybrid with the Pro Power (PPoB) on Board 7.2 Kw option.

PPoB uses the hybrid battery to power a 7200 Watt inverter and has 120V outlets positioned at the rear of the truck bed. One of those outlets happens to be 30 Amp, which means the truck can power our trailer the same as if we were plugged into AC at an RV park. The PPoB uses the hybrid battery to power the outlets. When it is nearly drained the engine automatically starts and recharges the hybrid battery (in under a minute) and the engine shuts off again! It is simple to use, fully automatic, and much quieter than a portable generator.

Wherever we go, we always have 120V 30A power for the trailer (as long as the truck has gas). This means at any time we can power the AC1260 to recharge the batteries or run the trailer air conditioning – or both at the same time!

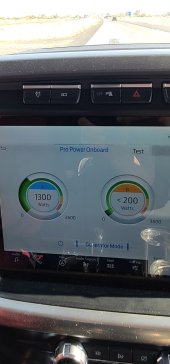
Here we are running down the road with the PPoB powering 1300W to both the RV's refrigerator and the AC1260 charger!
20211018_132806.jpg

If anyone is curious, this link provides more information on how I connect the F150’s PPoB to power the trailer (even while driving):


Please reply if you have questions, thoughts, or constructive criticism.

Regards,

-Eric
 
Last edited:
How did you deal with the emergency breakaway switch?
 
That is a nice job!

The automatic charging startup on that truck impresses me. That is a departure from modern thought and creatively solves a consumer ‘problem.’ That is brilliant.

The refrigerator power: is that an ‘emulsion’ aka absorption fridge? (Those are watt hogs) I can see that being your next chassis upgrade.

On the solar panel upgrade comment: there are many advantages to one, big, solar panel. Usually. In your case there may be a good argument to spend a little more and do 400- or 600W in two series strings to spread your solar input over more hours of daylight. For example two pairs of 150W panels on adjustable tilts so that you face SE with one pair and SW with the other; that will reduce your peak midday solar input but your sum solar input for one sun-day will usually be higher Wh than single direction panel(s).

Where is your 30 gallon water tank positioned? Under the bed, along a wheel well, or under the bed? Compared to some 1970s and fewer 1980s campers, the modern RVs seem to not have much thought put into freshwater storage, imho. My favorite two criticisms are:
-the vulnerable underbelly mounted tanks, small, and often damaged on the road; or
-the seemingly tiny 20-30gal tanks positioned under the bed. There’s usually plenty of room for more water storage there and in other “dead air spaces” more centered over the axles. (Water at 8#/gal is a weight distribution concern)
If your axle(s) are not “just-barely” rated for the GVWR with no room for payload (better campers often have heavier tire/axle ratings) you could probably add two 20 gallon tanks to extend your stays. (Blackwater must be properly, legally, safely dumped, but gray water can just be run onto the ground most places.

I think what you’ve done is perfect execution for a small solar RV plant. Very nicely done.
 
That is a nice build, and expandable too. If you ever needed more power, looks like you could add two more 100 watt portable panels.
 
@EricR nice job.
I suspect that others will use this build as a reference.
Was a pleasure to contribute.
 
Swap the toilet out for something like the C Head https://www.c-head.com/ or recapture your grey water and use that to flush the toilet. This will extend your time out. All of our drinking water is bottled, we refill bottles when on the road when getting fuel or using a rest area. You can always carry some extra water in jerry cans or collapsible bladders. Again, recycling grey water will help extend your stay or convert over to a C Head and use the old black water tank for grey water holding.

I added a 2200w Giandel inverter in my back seat area of my truck. The back seat is removed and I have a Dometic CFX95 refrig/freezer in it's place on a platform. I mounted the inverter just behind it. I have a 30 amp RV receptacle at the back bumper so I can plug in the Growatt to charge the batteries driving down the road if wanted or backup power just in case. Works great, was plenty of work running 2/0 cable to it (didn't have room under the hood) but once it is done, it is done.

Nice setup, glad I could help. Enjoy the boondocking life, I find it so much more enjoyable than staying in rv parks.
 
Also, I am pleasantly surprised by the effectiveness of the Lion Energy 100W portable solar panel. On a sunny day, being repositioned just twice during the day, it returned 2/3 or so of the power used on a given day. As a result, I am considering taking further advantage of free power by adding a 300-400W panel on the roof in the future.
I use the Lion Energy 100 watt portable panels. They seem to perform above specs. During cloudy days, I tend to get about 1 amp of charging power to the battery and in sunny days 6 or even 7 amps of charging power to the battery. The cheapest I’ve found them at are from WalMart.com.

If you get the roof panels, you may never even have to take out the portable panels.
 
That's some nice work.

I've not heard of the KISAE brand of battery chargers before. I'd be interested of hearing some more feedback on these chargers. I like the idea of the adjustable voltage output for LiFePO4 batteries, something other than just a fixed 14.6v.

Am I getting it right that you set the amperage level desired for charging? And then also set the cutoff amperage to terminate charging? Any idea what the voltage differential is to resume charging?

So, if bank 1 is reserved for lithium battery, but is also the only bank programmable for "Power Supply Mode, are you stuck running battery power when plugged in to shore power when charging terminates?
 
How did you deal with the emergency breakaway switch?
Great question, Whinny. I meant to include this in the write-up.

Originally, I was going to power the breakaway switch with the house batteries in the new build. However, both @smoothJoey & @12VoltInstalls ganged up on me helped me see the wisdom of having a dedicated breakaway battery (or "ken and barbie battery" as 12Voltinstalls calls them :LOL:).

Here is what I installed. It's a small breakaway battery and case from Hopkins, with press-to-test feature on Amazon for just $15 (it's under $10 today - link below). It's not a complete kit - you need to use your existing breakaway switch and find your own mounting hardware.

The 7-pin from the truck now feeds the breakaway battery to keep it charged. Wiring up this breakaway battery was easier than running 12V from the new build to the breakaway switch.

Hopkins 20109 Engager SM Boxed Less Switch

-Eric
 
Last edited:
That is a nice job!

The automatic charging startup on that truck impresses me. That is a departure from modern thought and creatively solves a consumer ‘problem.’ That is brilliant.

The refrigerator power: is that an ‘emulsion’ aka absorption fridge? (Those are watt hogs) I can see that being your next chassis upgrade.

On the solar panel upgrade comment: there are many advantages to one, big, solar panel. Usually. In your case there may be a good argument to spend a little more and do 400- or 600W in two series strings to spread your solar input over more hours of daylight. For example two pairs of 150W panels on adjustable tilts so that you face SE with one pair and SW with the other; that will reduce your peak midday solar input but your sum solar input for one sun-day will usually be higher Wh than single direction panel(s).

Where is your 30 gallon water tank positioned? Under the bed, along a wheel well, or under the bed? Compared to some 1970s and fewer 1980s campers, the modern RVs seem to not have much thought put into freshwater storage, imho. My favorite two criticisms are:
-the vulnerable underbelly mounted tanks, small, and often damaged on the road; or
-the seemingly tiny 20-30gal tanks positioned under the bed. There’s usually plenty of room for more water storage there and in other “dead air spaces” more centered over the axles. (Water at 8#/gal is a weight distribution concern)
If your axle(s) are not “just-barely” rated for the GVWR with no room for payload (better campers often have heavier tire/axle ratings) you could probably add two 20 gallon tanks to extend your stays. (Blackwater must be properly, legally, safely dumped, but gray water can just be run onto the ground most places.

I think what you’ve done is perfect execution for a small solar RV plant. Very nicely done.

Yes, the Pro Power on Board feature is really well executed. Also, the 3.5L twin turbo and hybrid electric motor combine to deliver 430 horsepower and 570 lb.-ft. of torque. The difference between this and our 2008 Dodge Ram Laramie with the 5.7 Hemi is dramatic. Powerboost is Ford's name for the Hybrid F150 - I've taken to calling it PowerBeast! ?

While being fairly new to us, the trailer is 10 years old, so no fancy new technology. The refrigerator runs on either 120V or propane. We are not comfortable having the propane on when towing, so the 120V 30A service from the truck's PPoB allows us to run the refrigerator while driving. What is an ‘emulsion’ aka absorption fridge?

The twin, counter-facing roof-top panels is a great idea! Thanks.

The freshwater tank is right over the two axles, with the gray water back of that, and the black tank aft of the gray water. Cat scales say we run around 4500 ready to go, but w/o water on board. The trailer GVWR is 6000 so we have payload for more water. Do you have any insight as to brands/manufacturers of "20 gallon tanks to extend your stays"?

Thanks for the feedback and ideas!

-Eric
 
Swap the toilet out for something like the C Head https://www.c-head.com/ or recapture your grey water and use that to flush the toilet. This will extend your time out. All of our drinking water is bottled, we refill bottles when on the road when getting fuel or using a rest area. You can always carry some extra water in jerry cans or collapsible bladders. Again, recycling grey water will help extend your stay or convert over to a C Head and use the old black water tank for grey water holding.

I added a 2200w Giandel inverter in my back seat area of my truck. The back seat is removed and I have a Dometic CFX95 refrig/freezer in it's place on a platform. I mounted the inverter just behind it. I have a 30 amp RV receptacle at the back bumper so I can plug in the Growatt to charge the batteries driving down the road if wanted or backup power just in case. Works great, was plenty of work running 2/0 cable to it (didn't have room under the hood) but once it is done, it is done.

Nice setup, glad I could help. Enjoy the boondocking life, I find it so much more enjoyable than staying in rv parks.
Thanks for the further input! The C-Head (that name cracks me up!) is very intriguing - I've bookmarked that link. Our grey tank would probably be the next limiting factor if we started onboarding more fresh water, and this would help in that regard.

-Eric
 
That's some nice work.

I've not heard of the KISAE brand of battery chargers before. I'd be interested of hearing some more feedback on these chargers. I like the idea of the adjustable voltage output for LiFePO4 batteries, something other than just a fixed 14.6v.

Am I getting it right that you set the amperage level desired for charging? And then also set the cutoff amperage to terminate charging? Any idea what the voltage differential is to resume charging?

So, if bank 1 is reserved for lithium battery, but is also the only bank programmable for "Power Supply Mode, are you stuck running battery power when plugged in to shore power when charging terminates?

The KISAE AC-to-DC and DC-to-DC chargers aren't nearly as programable as Growatt or Victron products. Maybe another way of saying it is this: a Victron or similar has programmability, while the KISAE units have flexible settings. However, they seem to have enough settings to get the basic job done in an easy & straightforward way.

Yes, it's nice to adjust the charge voltage and other settings to your specific application. For example, based on information from the manufacturer of my batteries I set charging to 14.4V. The available settings are 13.9 – 14.4V in .1V increments.

Regarding amperage, the AC1260 I used is a 60A charger. You can program it for less, but then maybe save some money and buy an AC1220 (20A) or AC1240 (40A) instead. Charge termination current for the AC1260 is selectable at 3A, 6A, or 12A. As to when charging initiates again, per the user manual, "The charger will automatically restart the full charging cycle if it senses anyone of the battery bank is discharged to lower than 12.5V for 12V model, 25.0V for 24V model".

The 3 different "banks" these units support (IIUC) are for marine applications. My setup only uses bank 1, and I can't think of a RV setup that would use bank 2 or 3. I set bank 1 to "Lithium", not "power Supply Mode". IIRC, post-charging with the AC1260 powered, the Victron BMV-712 showed a consistent 13.5V even while we were drawing some load - so my thinking was the AC1260 is helping with the 12V demand once charging is completed.

Speaking of the Victron BMV-712, it seemed to validate the stated values/specifications of the AC1260.

In addition to 12V units, KISAE also has 24V units.

Let me know if I've misunderstood or you have additional questions.

-Eric
 
What is an ‘emulsion’ aka absorption fridge?
What you have now
you have any insight as to brands/manufacturers of "20 gallon tanks to extend your stays"?
Class A Customs, Barker, and AA all claim bpa free. I’ve used Class A tanks for a couple of things including upfitting a horse trailer when I worked for a utility trailer dealer. They have an array of odd sizes so there’s usually something you can stick somewhere, or use two smaller ones to fit. A lot of RV oem tanks I saw dripped at fittings and/or were surprisingly thin walled. The Class A stuff has molded/welded threaded pipe thread fittings built in instead of expanding fittings or bulkhead fittings that some had. So less likely to leak. I don’t know if Class A Customs is the best or if even they make their own rotomolded tanks but they seem to be decent.
Our grey tank would probably be the next limiting factor if we started onboarding more fresh water, and this would help in that regard.
If you don’t dump greasy stuff down the kitchen sink OR hold graywater (which develops an odor quickly) then shower / sink water can simply be run on the ground. Some ‘jurisdictions’ don’t allow wastewater on the ground but DO allow use of an outdoor shower (probably due to holding tank bacteria concerns)
In most places dish washing water from a dishpan can just be dumped on the ground.
So basically either a hose takeoff from the graywater setup with the valve left open, outdoor shower, and dishpanning kitchen cleanup pretty much eliminates graywater holding volume concerns.

To do direct runout you can heavily bleach your gray holding tank at home and as long as you don’t hold any graywater the runout won’t have an odor. (I recommend getting a graduated syringe and ‘treating’ your freshwater with bleach to keep those tanks from getting slimy when temps are above 60F)
 
What you have now

Class A Customs, Barker, and AA all claim bpa free. I’ve used Class A tanks for a couple of things including upfitting a horse trailer when I worked for a utility trailer dealer. They have an array of odd sizes so there’s usually something you can stick somewhere, or use two smaller ones to fit. A lot of RV oem tanks I saw dripped at fittings and/or were surprisingly thin walled. The Class A stuff has molded/welded threaded pipe thread fittings built in instead of expanding fittings or bulkhead fittings that some had. So less likely to leak. I don’t know if Class A Customs is the best or if even they make their own rotomolded tanks but they seem to be decent.

If you don’t dump greasy stuff down the kitchen sink OR hold graywater (which develops an odor quickly) then shower / sink water can simply be run on the ground. Some ‘jurisdictions’ don’t allow wastewater on the ground but DO allow use of an outdoor shower (probably due to holding tank bacteria concerns)
In most places dish washing water from a dishpan can just be dumped on the ground.
So basically either a hose takeoff from the graywater setup with the valve left open, outdoor shower, and dishpanning kitchen cleanup pretty much eliminates graywater holding volume concerns.

To do direct runout you can heavily bleach your gray holding tank at home and as long as you don’t hold any graywater the runout won’t have an odor. (I recommend getting a graduated syringe and ‘treating’ your freshwater with bleach to keep those tanks from getting slimy when temps are above 60F)

12Volt,

More of good information! Thank you!

-Eric
 
There is a company local to me that makes water/holding tanks from scratch. They have a set of defined shapes,, but I understand that they'll also do custom builds. I've bought fiberglass sheets and aluminum molding from them over the past three years. They had molding that nobody else in town had.

 
Class A Customs
Just an FYI on Class A Customs water tanks. I bought two for my cargo trailer camper and got rid of both. First, their claimed sizes are, shall I say, "optimistic". When you actually get the tank and measure it and then take into account the wall thickness, the inside volume will be several gallons less than advertised. I also ordered mine with specifically placed and sized fittings for inlet, outlet, and air vent. The first tank came with the wrong sized fittings. Between that and being undersized I called them about the issues and they sent me a 2nd tank. The size of the second tank was also undersized. But worse, they put two of the fittings too close together and melted plastic from one got all in the threads of the other making it unusable.

One other issue I hadn't considered (and this applies to some other tanks, not just Class A Customs) is the outlet fitting position. Depending on how the outlet fitting is added to the tank, the bottom of the fitting will be 1/2"-3/4" above the bottom of the tank meaning you can't get all of the water out. So keep that in mind when ordering a tank for a needed usable volume.

The only thing going for Class A Customs is they are cheap, including the shipping. Just be sure to order a tank that's at least 15% bigger than the usable volume you actually need. This was my experience with them about 20 months ago. I have no idea how they are now. If you order a stock tank with preinstalled fittings and the size works for you then their tanks are worth considering.
 
Back
Top