The Renogy Rover 40 only has settings for 12 volt systems. For 24 volt systems double the values to get the actual settings. Example for a 28 volt boost setting set the controller for 14 volt boost.
I find the Rover 40 can be off by 0.1 or 0.2 volts or more and this is common with this solar charge controller. So if boost set for 14 (28) volts it may go to 28.1 or 28.2 volts. Keep this in mind when making settings especially boost & float.
Sounds like your BMS is cutting off the battery around 27.5 or 27.6 Volts. Probably because the cells are not top balanced very well. As was suggested set your boost to 27.4 to 27.6 Volts to start. Once several charge cycles have taken place the cells should be in better top balance and boost voltage can probably be slowly increased to 28 volts.
Note: With a balancing current of only 35ma it will probably take some time and a number of charge cycles to top balance the cells good. Also the BMS will only balance cells when they are above 3.4 volts or 8 x 3.4 = 27.2 volts. So Boost needs to be above 27.2 volts to even start the top balancing process.
Your BMS in your battery will (or should) shut down your battery before any damage to the cells with overvoltage or undervoltage protection, but you don't want to use this feature to run your solar system since it is a failsafe. You need to program the Rover 40 Boost Voltage to a voltage below your BMS overvoltage and you need to turn off your loads before the battery BMS goes into undervoltage.
Min voltage for LiFePO4 Cells is usually 2.5v or 8x 2.5 = 20 Volts and Max voltage for LiFePO4 Cells is usually 3.65v or 8x 3.65 = 29.2 Volts
Your BMS may cut out before the Min or Max Voltage depending on how it is programmed and how well the cells are top balanced, but you don't want to exceed the Min or Max and really keep a buffer above the min and below the max.
The Rover 40 is not a precise SCC, but given its price point and the BT and ability to program and monitor on your phone it is a good value for entry/small solar systems. After some time (going on my 3rd year) I have learned to use it well. Just have to know its limitations...
I use the Renogy BT-1 Bluetooth Module that plugs in the Rover-40 Rs232 port.
www.amazon.com/Renogy-Bluetooth-Module-Communication-Controllers/dp/B0894SDTSL
With that Module I use the Renogy BT App loaded on my phone to program the settings and monitor the Rover-40 and is free. The app allows many parameters to be set in USR battery setting. See the attached manual.
APP for solar charge controller operation in smart PV power system. It's for solar charge controller working parameter setting and reading. All data can be displayed in a diagram. Meet the Renogy BT. a convenient way to manage and monitor your solar power system all in the palm of your hand...
apps.apple.com
a convenient way to manage and monitor your solar power system

play.google.com
To program the Rover 40 with the Renogy BT app select Settings at bottom of the screen. Once in Settings ensure Battery button is selected (not Load) & click the Read button to display the current Rover settings. Next click the Set button and then click Confirm and input default password which should be 135790123 and click Confirm. Now change the desired settings and then click the Set button. The changes should now be made. Check the settings were changed by clicking the Read button.
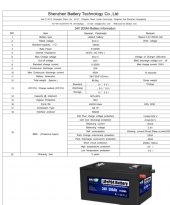
I am using the the following USR settings. The Rover LI settings are to aggressive for Lifepo4 Batteries.
Set to USR & set:
Note: For 24 volt systems values will be doubled automatically when SCC running program.
High Voltage Disconnect 14.5v
Charge Limit Voltage14.1v Note: Set to 13.8 or 13.9 to start.
Equalization Charge Voltage 14.0v
Boost Charge Voltage 14.0v (also called Absorption) Note: Set to 13.7 or 13.8 to start and slowly increase after several charge cycles.
Float Charge Volt 13.6v -Set to 13.4 to start-
Boost Char Return Volt 13.2v
Over Disc Return Volt 11.0v
Low voltage Alarm 10.9v
Over Discharge Volt 10.5v
Discharge Limit Volt 10v
Over Disc Delay Time 5s
Equalization Charge Time 0 Min
Boost Time 10 Min Note: Set to 60 min or more to get cells to top balance to start and decrease to 10 min once cells are well top balanced.
Equalize Charge Interval 185 (Note this value cannot be 0 because controller will get stuck in boost mode)
Temp Comp 0A
Unplug temp sensor from the Renogy-40 amp Solar Charge Controller. It is used for lead acid batteries.
These settings should get you started. You can adjust from there. Over time you will find the best settings for your system
See the attached manuals.
Hope this helps...