diy solar

diy solar

IntegraRack: Ground Mount with Epoxy Ground Stakes and Ballast Options

This is a timely thread for me as I'm trying to do a new ground mount. While looking into ways to do it I bumped into several versions of the below kit. An angled single slope option would be really nice but I didn't find any.
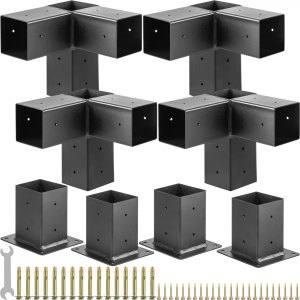
Very nice! And simple.

I wish someone had these corner brackets with different angles so we could have a 30 degree wooden solar mount! How cool would that be. Would take minutes to throw that together.
 
I've been googling like crazy to find other ground mount solar array options for diy systems, and the selection is abysmal. I knew that going in, but I am amazed more companies are not jumping at this market.

I saw a lot of plastic bin ones at the solar conference, but that's about it. And it seems like people do not like the plastic bin one going by sales.
That’s what I was getting at page 1. Those bins are upwards of 75-85 a piece. These are much nicer for not much more
 
I would guess that most people commenting here would feel confident enough to figure out different ways to mount the solar panels, people who have only just started thinking about solar would be shy to comment. Having said that I would be interested in an overview video with pro's and con's of each of the various commercial and or home made options. And of course the in depth video's of the easier, better and more affordable solutions.

As an idea for other video's, I would be interested in (destruction) testing of DC circuit breakers, including programmable solid state? DC circuit breakers and solid state relays as well as fuses.

I am also interested in massive over-panelling for cloudy days in an of-grid situation and different panel types to understand the marketing hype.

Thanks for making those video's Will and every one commenting here trying to help out beginners like me. I know enough to build my own system, but there is still a lot more to learn.
 
I am also interested in massive over-panelling for cloudy days in an of-grid situation and different panel types to understand the marketing hype.
THIS
It seems to me that I would need over 5X the panels on a winters cloudy day than a on a typical sunny day in summer for the same output.
 
I mounted my brightmounts with 6x6 posts 3' in ground. No concrete and they work just fine. 2 6x6x8 at $30 each plus lag screws can be cut in half for 2 systems. 1st Brightmount took an hour the second one less than 30 minutes.
 
If there is something specific that you guys want me to look for this year with the racks I am going to review, let me know
Solar Pergolas, I can't speak for anyone else but they seem like the ideal solution for smaller lots and getting them high enough that the lawnmower and weedwacker aren't going to be throwing things at the panels. Plus it gets you a dual use area where you can still have a patio set in the shade while the panels are getting good sun.
 
Solar Pergolas, I can't speak for anyone else but they seem like the ideal solution for smaller lots and getting them high enough that the lawnmower and weedwacker aren't going to be throwing things at the panels. Plus it gets you a dual use area where you can still have a patio set in the shade while the panels are getting good sun.
The chiko carports look nice. Just wish supplies were cheaper
 
My understanding that latest code requires PV wires to be protected behind some type of barrier/conduit. The issue with all these ground-mount kits is that none of them provide this basic feature.
 
My understanding that latest code requires PV wires to be protected behind some type of barrier/conduit. The issue with all these ground-mount kits is that none of them provide this basic feature.
Do you have a reference to the article that requires this? I did a quick search in my book but can't find anything that pertains to pv conductors that are on a ground mount.
 
I mounted my brightmounts with 6x6 posts 3' in ground. No concrete and they work just fine. 2 6x6x8 at $30 each plus lag screws can be cut in half for 2 systems. 1st Brightmount took an hour the second one less than 30 minutes.
Any photo?
 
My understanding that latest code requires PV wires to be protected behind some type of barrier/conduit. The issue with all these ground-mount kits is that none of them provide this basic feature.
It's a shame this wouldn't suffice
Screenshot_20240421-131824.jpg

It's really not that hard to run EMT if you keep bends simple. If you can put together a ground mount you could run the EMT.
 
Do you have a reference to the article that requires this? I did a quick search in my book but can't find anything that pertains to pv conductors that are on a ground mount.
690.31(A): "Where PV source and output circuits operating at voltages greater than 30 volts are installed in readily accessible locations, circuit conductors shall be guarded or installed in Type MC cable or in raceway."
 
Sure, but if you know how to bend some EMT then you also know how to put together some 4x4 to make your own mount.
I used 4x6s, laminated 2x6s and some unistrut 😉
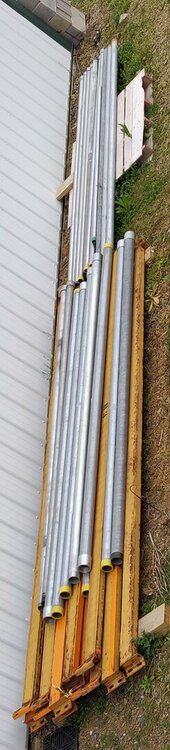
. It was my second time working with EMT ( the first being the roof arrays) and my first time really working with strut (it's pretty simple).
 
Did you look at Iron Ridge or these?
I used Hollaender connectors when I built our 2 inch galvanized steel schedule 40 pipe based ground arrays. And you get a rock solid array. The procedure is simple: dig a hole, insert your vertical pipe, pour the concrete and plumb the pipe. Do this for the 4 corners of the array. next, run a string between the pipes for each row of the array. If 2 rows, then 2 strings, one for the front row, one for the back row. Then dig the holes for the vertical support pipes between the ends of a row and put the pipe in, pour the concrete and plumb it using the string for alignment with the row end vertical pipes.

After all the verticals are set, run a string from the front row pipe to the back row pipe, using the string and an angle finder to set the array's angle front to back. Mark the posts and cut them off front row is shorter and back row the tallest to create your tilt angle. The pipe cuts like butter with a portable band saw. Next use Hollaender connectors to run your pipes across the tops of the posts in a row. Then use steel strut across the top pipes for your panels to be fastened on to. Ground everything and away you go.

Just a wrench, a level, a portable band saw, tape measure, shovel and cement and a hex wrench set.
Really debating going this route vs my original tilting plan with old pallet racking for the next array. It's mainly for winter and will be SW facing. The Hollaender will add cost but I have the majority of the piping and could make better use of the racking for a 75-100kWh battery shelf...

Thanks for the review and feedback, seems easy enough.

I'm looking forward to new off the shelf solutions as well as Wills opinion of them, they could be very useful for a somewhat portable system to deploy at an alternative location.
 

Attachments

  • IMG_20240421_135904__01.jpg
    IMG_20240421_135904__01.jpg
    79.1 KB · Views: 26
690.31(A): "Where PV source and output circuits operating at voltages greater than 30 volts are installed in readily accessible locations, circuit conductors shall be guarded or installed in Type MC cable or in raceway."
Good find!!!

First thought that comes to mind to make things simple is the solar racking rails that have space inside for the wiring. I think the brand was K2 systems...if you ran a rail right inline with the module junction boxes, I think that could count as guarding...

1713728506740.png

I'm wondering if these revisions I'm seeing in 2023 NEC help here. At least now the rule only applies if the conductors are not guarded. This revision opens pandora's box when it comes to what can be used to guard the conductors, as it does not say what the guards have to be made of. Also now that they added "unqualified persons" - I suppose a fence/gate with a lock around a solar field meets the requirement... I wonder if a barb wire fence counts, those are pretty budget friendly!
 
I used Hollaender connectors when I built our 2 inch galvanized steel schedule 40 pipe based ground arrays. And you get a rock solid array. The procedure is simple: dig a hole, insert your vertical pipe, pour the concrete and plumb the pipe. Do this for the 4 corners of the array. next, run a string between the pipes for each row of the array. If 2 rows, then 2 strings, one for the front row, one for the back row. Then dig the holes for the vertical support pipes between the ends of a row and put the pipe in, pour the concrete and plumb it using the string for alignment with the row end vertical pipes.

After all the verticals are set, run a string from the front row pipe to the back row pipe, using the string and an angle finder to set the array's angle front to back. Mark the posts and cut them off front row is shorter and back row the tallest to create your tilt angle. The pipe cuts like butter with a portable band saw. Next use Hollaender connectors to run your pipes across the tops of the posts in a row. Then use steel strut across the top pipes for your panels to be fastened on to. Ground everything and away you go.

Just a wrench, a level, a portable band saw, tape measure, shovel and cement and a hex wrench set.
DId you have an approved engineering drawing with snow load, and wind speed listed? My local inspector wants the initial plan to have engineering approval stamps, how did you obtain those for your install?
 

diy solar

diy solar
Back
Top