diy solar

diy solar

Starting Construction My New System- Rural Calgary, Alberta Canada

Skythings

New Member
Joined
Apr 25, 2024
Messages
10
Location
Calgary, Alberta
So - Let the games begin. I have been spending the last year or so reading all your posts and watching Will Prowse YouTube video's educating myself about solar power. So far I know nothing....... but every day I add a few grains of sand into my reservoir of knowledge. Pretty steep learning curve.

As a newbie I have been and will continue to be pretty naive about pulling this off. My first discovery is most of the information available on-line is USA based and not always applicable here in Canada. The rules vary between the two countries, between States & Provinces and even local municipalities. So be careful when you think you have things nailed. Likely you don't & I know I'm due for many future surprises. Next I learned most of the self appointed professionals in the solar business I have encountered so far are actually salespeople first and have a high distain for DIYer's and not too keen to share their industry knowledge. I have read here on this site it mentioned a few times that Calgary seems to be a difficult place for credible help in the solar field.

I live on a farm and my goal is to have reliable power and emergency backup as I envision a declining & less reliable electrical grid in the future. I will not be selling back to the provider. The self appointed pro's just can't seem to get their heads around the fact I'm not interested in saving money on my power bill. I am completing the project in three stages. My first stage is to set up an inverter with 25 Kwh of battery storage with one string of solar panels. My end goal is to achieve 3 strings or solar panels and 75 Kwh of battery storage.

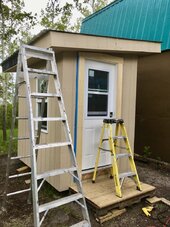
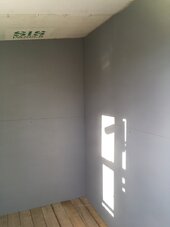
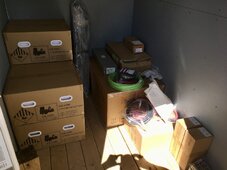
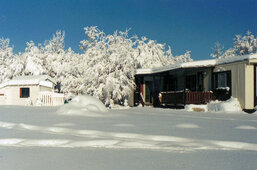
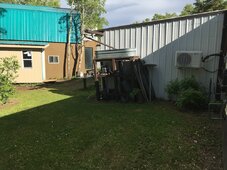
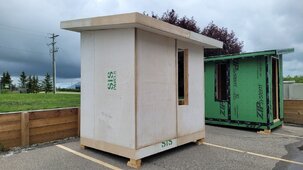
Because in Canada there are some strict rules regarding battery storage I decided to go with a dedicated solar shed for the inverter & batteries. The shed is 75 feet away from my house and is insulated and will have a small direct vent heater for our Canadian winters to maintain battery operating temps. This will allow me up to 80 Kwh of battery storage based on the Canadian fire code rules for battery storage. I am just putting the finishing touches on it now and the inside is currently an Electricians blank canvas. See the pictures.

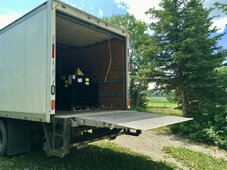
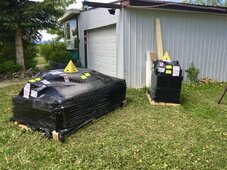
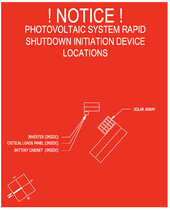
I decided to go with the Sol-Ark 15K-2P-N inverter with five rack mounted SOK SK48V100 batteries with 10 LONGI 540W panels mounted on my carport roof. That's stage one. I just received a call today and the truck is scheduled for delivering the equipment tomorrow. My electrician is finalizing the approvals with the power company and I hope to get things going in the next couple of weeks.

I just wanted to thank many of the folks on this forum and your posts which have been very helpful for me on this journey thus far. I will continue to read your posts and learn from your experiences also. I will be looking for advice and trouble shooting help as the installation and commissioning commences. I will post some updates & pictures also. Please feel free to send me any advice you might think will be applicable to my setup.
 

Attachments

  • IMG_7169.JPG
    IMG_7169.JPG
    339 KB · Views: 14
  • IMG_7199.JPG
    IMG_7199.JPG
    100.3 KB · Views: 14
Sounds like a great plan. Have you considered more panels per inverter/stage to better utilize the 15kpv potential during winter conditions?
 
Absolutely Bruce. More panels will come next year as I plan to install a ground array with about 9000W. About 45 - 30 ft tree's to clear before then. Sadly my carport roof for the first 10 panels is pretty flat & tight so the designer has squeezed 10 panels on with only a 15 degree tilt to avoid shading from the other panels. I'm not expecting much performance from these panels in the winter months with low tilt angle and there typically is snow up there for longer durations in the winter and not suitable for clearing the snow. See picture (shading tree's have been removed). I will monitor the performance and may down the road remove a couple of panels and increase the tilt angle on the others to see if I can improve overall output if needed. I wanted to start with something and will be watching it closely and will be looking to install the next string of properly angled panels.

My plan is to eventually utilize all the features of the Sol-Ark but in stages as my pocket book allows. Down the road I will add a small gasoline generator to charge the batteries or run loads through the inverter in those long emergency outages with limited sun.
 

Attachments

  • IMG_3294.JPG
    IMG_3294.JPG
    383.9 KB · Views: 13
Last edited:
Had a visitor today. Going to bed with a stiff back. Those batteries are heavy.
 

Attachments

  • IMG_7219.JPG
    IMG_7219.JPG
    198.7 KB · Views: 15
  • IMG_7222.JPG
    IMG_7222.JPG
    255 KB · Views: 16
  • IMG_7244.JPG
    IMG_7244.JPG
    113.2 KB · Views: 15
remove a couple of panels and increase the tilt angle on the others to see if I can improve overall output if needed.
I’m not convinced that angle is all that important, I’d lay them flat to the roof and be content in the knowledge that I’m capturing all the sunlight that falls on the roof. I mean, it’s the cos(theta) so at 15 degrees off axis you still get 97% of your output.
 
I’m not convinced that angle is all that important, I’d lay them flat to the roof and be content in the knowledge that I’m capturing all the sunlight that falls on the roof. I mean, it’s the cos(theta) so at 15 degrees off axis you still get 97% of your output.
unlit you consider his ideal angle for winter will be 78 degrees...and in Calgary area the low angle panels will (often) be buried in snow!

with 10 LONGI 540W panels mounted on my carport
Will you be installing a RSD (rapid shut down) system, and AFDD (arc fault detection disconnect) for the car port panels?
 
Welcome to Forum,

Below are the Solar Angles chart for Calgary. Winter is a royal PITA !
39 Degrees for "Average" Annual Production works fine in Springg-Summer-Fall and "so-so" in winter and I will tell you that even at 45 Degrees the snow will not shed easily ! The aluminum & gaps hold it for longer. I have to go out & clear my panels in winter whenever a heavy wet snow lands. My panels are at 45 Deg - and am near Algonquin Park Ontario, so as you know we get a lot of it. ( I use a FOAM Scrapper only, never anything else)

Here's the gotcha, in Summer we are getting 12+ hrs at mid point and from spring through fall generation is easy (provided you have littel shade etc) Winter generation drops to just 4 hrs +/- and THAT sucks ! Putting it another way, in Summer I usually reach FLOAT around lunch time, in winter, well, if I have clear sunny days everyday and I only discharge 1 days worth, that will recharge & hit Float in 1 day "maybe", but 1 day of Sun in winter cannot replace much more than 1 day of my usage (ATM). SO I have a 2nd array going up with it's own SCC (100A) which will be optimized for Mid-Winter generation and that will make a big difference. That array will not be as productive in Mid Summer but it will still easily provide over 30-40% of it's full capability and that will only result in charging my bank that much faster. My Solar is aimed directly south, do not have the option of an East-West set of arrays (in the Boreal Forest & not cutting). East-West arays also provide some options depending on your property layout and yor intentions.

BTW: I also have a Powerhouse 16'x6', hyper insulated with FPSF Slab Foundation with Radiant Pex in it. At this time I am using an newish RV LPG Furnace to keep temps at 15C in winter because of my LFP Bank but also because my Water Pressure Tank is in the pumphouse side. 15C is the lowest "comfortable" working temp for LFP, below that temp they do start to deviate more internally. I have the same Temp Ranges as you, from -35 to +40 and we hafta do it ;-). TIP: You want some air exchange especially in Summer because the Inverter etc do make a lot of heat and it can get quite toasty in there. A small 12V air changer can be setup with minimal effort & cost to do the trick, it can be a very simple add-on. EXTRA !!! You may not have considered the Interaction with your equipment which can be done with Bluetooth/Wifi or Ethernet (pends on your kit). I ran 2 CAT-6 Ethernet in conuit from my powerhouse to my comms closet in the house. Wifi/BT are fine but they can be flaky, escpecially through walls & EMF noise from the gear. I do strongly suggest you do wire some Ethernet (sheilded) cable from your powerhouse into your house, wire works!

PITA SAVER TIPS !
A BIGGY ! Battery Pack Temps is a big issue for us. Battery Packs do NOT like being at different temps. LFP is happiest at 25C and generally good humoured from 12C to 35C but outside of that zone, they get finickety and once below 7C or above 40C crankiness starts. Below 0C you DO NOT CHARGE but can continue to discharge till -20C. Several years at this and doing various tests including Threash tests pushing stuff to the "limits" several lessons have been learned.
1) KEEP Batteries OFF the floor, it is a Heat Sink ad will pull the temps down. The closer to the floor the cooler they will be.
2) Try to keep all packs at identical or close temp. Simply put them so they are at least 60cm off the ground. Make sure that airflow can around the packs so they stay pretty even.
3) NOTE that even 2C Temp difference between packs will cause a noticeable difference in how they charge/discharge... The larger the temp difference the greater the differential. (this also applies to other chemistries to varyng degrees)

A personal Safety Extra:
I made a choice a while ago that was Extremely Worth It. A few laugh but... Get out to Peavy Mart or so and get 4'x6' Rubber Horse Stall Matts and cover the floor of your powerhouse with it, BEFORE Installing anything. You can cut it with a 80T Circ Saw (it's not easy & messy oi). Not only as an "insulator" but it's a little easier on your feet, plus if something falls, it hits rubber. You might chuckle at the notion but seriously, it is a very worthy extra whic you'll appreciate later. I'm not kidding. Peavy / Tractor Supply just had a sale $65 a piece for 3/4" thick. ALSO: Put a door porch matt or solid pad (pavers work good) at the outside of your door with a boot scraper !
Have a Portable Worklight on the wall by the door AND a Good ABC or BC Chemical Fire Extinguisher on the wall as well (better to have it than not just in case). and Last but Not Least a Dual Mode Smoke Detector. BTW: IF/When the insurance co wants to inspect and they see the precautions they will appreciate that. It's also cheap piece of mind somewhat.

Hope it helps, Good Luck

1718448331546.png
 
unlit you consider his ideal angle for winter will be 78 degrees...and in Calgary area the low angle panels will (often) be buried in snow!
Sure, but the sunlight impinging on the roof surface is the same, so if he's covered the roof it doesn't matter if his panels are parallel to the roof or parallel to the incoming sunlight. The snow thing is an issue. Cover the walls of the carport with vertical panels!
 
Last edited:
Sure, but the sunlight impinging on the roof surface is the same, so if he's covered the roof it doesn't matter if his panels are parallel to the roof or parallel to the incoming sunlight. The show thing is an issue. Cover the walls of the carport!
When was the last time you dug out from 40cm of snow in -35C temps ?
Seriously, he is 3500+ Miles NORTH OF YOU ! Angles & Direction are a HUGE difference to us up here NOT like where you are in the Turks & Caico's.
 
When was the last time you dug out from 40cm of snow in -35C temps ?
Seriously, he is 3500+ Miles NORTH OF YOU ! Angles & Direction are a HUGE difference to us up here NOT like where you are in the Turks & Caico's.
I get it, used to live in the Frozen North. My point is that trying to angle the panels at a different angle from the roof won't capture more power, there's only so much sunlight falling on the roof at whatever the current angle is, and if you change the angle to match the incoming sunlight you'll be more perpendicular to the incoming sunlight, but will have a smaller panel area to capture with.
 
Interesting posts. I would only add that December and January test how awesome your setup is.
In my case, I have roughly 19KW in panels and it is still no where near enough for winter to run my heater and the rest of the home. If you can, plan good for winter's bad production.
 
I get it, used to live in the Frozen North. My point is that trying to angle the panels at a different angle from the roof won't capture more power, there's only so much sunlight falling on the roof at whatever the current angle is, and if you change the angle to match the incoming sunlight you'll be more perpendicular to the incoming sunlight, but will have a smaller panel area to capture with.
yes I see what you mean now, although tilting up the panels (My panels all tilt up for winter) means the same area of PV is catching more sun than just the roof would recieve in winter.
Honestly though, if I didn't have snow, I wouldn't bother to tilt up the panels.
 
I’m not convinced that angle is all that important, I’d lay them flat to the roof and be content in the knowledge that I’m capturing all the sunlight that falls on the roof. I mean, it’s the cos(theta) so at 15 degrees off axis you still get 97% of your output.
As I mentioned earlier, my expectations of these panels during the winter is minimal right from the start. The cost of the 15 degree angle brackets was minimal and done simply as a function to get some elevation and get the maximum panels for the roof surface available without shading the other panels. I also had read somewhere on this forum that panels with some angle prevent rain from leaving water spots on the panels compared to flat. Also I am up on a hill and we get some pretty strong winds and having the panels elevated some should help the wind blow the dry snow away easier. We also get these phenomena in the dead of winter called a "Chinook" where warm strong winds from the west coast blows across the Rocky Mountains and descend into our area. The temperatures will go form -30F to 65F in a mater of 2-3 hours and significant melting happens for a day or so.

Here is a picture of my place a few years back showing what it looks like after a typical winter snow accumulation in the winter.
 

Attachments

  • Winter.jpg
    Winter.jpg
    122.6 KB · Views: 13
unlit you consider his ideal angle for winter will be 78 degrees...and in Calgary area the low angle panels will (often) be buried in snow!


Will you be installing a RSD (rapid shut down) system, and AFDD (arc fault detection disconnect) for the car port panels?
As mentioned earlier - my expectations for these 10 panels during the winter are minimal right out of the gate. I decided to start there to give me something to work with. Next year I will be building a large ground array with properly angled panels elevated off the ground with enough room for shedding snow below which will eventually be the strength of the system. Then year three I may be adding a third string on the roof of my workshop just across from the carport (see picture of green two storey building). There's room for up to 12 more panels up there if needed however the orientation is not the best and many more tree's will have to be cut down. Once I see the performance of phase one & two, I will decide what to do down the road.

Yes I have a RSD with AFDD for these panels. That is required for Canadian code.
 

Attachments

  • IMG_7217.JPG
    IMG_7217.JPG
    309.2 KB · Views: 7
  • Rapid Shutdown.jpg
    Rapid Shutdown.jpg
    119.9 KB · Views: 6
Welcome to Forum,

Below are the Solar Angles chart for Calgary. Winter is a royal PITA !
39 Degrees for "Average" Annual Production works fine in Springg-Summer-Fall and "so-so" in winter and I will tell you that even at 45 Degrees the snow will not shed easily ! The aluminum & gaps hold it for longer. I have to go out & clear my panels in winter whenever a heavy wet snow lands. My panels are at 45 Deg - and am near Algonquin Park Ontario, so as you know we get a lot of it. ( I use a FOAM Scrapper only, never anything else)

Here's the gotcha, in Summer we are getting 12+ hrs at mid point and from spring through fall generation is easy (provided you have littel shade etc) Winter generation drops to just 4 hrs +/- and THAT sucks ! Putting it another way, in Summer I usually reach FLOAT around lunch time, in winter, well, if I have clear sunny days everyday and I only discharge 1 days worth, that will recharge & hit Float in 1 day "maybe", but 1 day of Sun in winter cannot replace much more than 1 day of my usage (ATM). SO I have a 2nd array going up with it's own SCC (100A) which will be optimized for Mid-Winter generation and that will make a big difference. That array will not be as productive in Mid Summer but it will still easily provide over 30-40% of it's full capability and that will only result in charging my bank that much faster. My Solar is aimed directly south, do not have the option of an East-West set of arrays (in the Boreal Forest & not cutting). East-West arays also provide some options depending on your property layout and yor intentions.

BTW: I also have a Powerhouse 16'x6', hyper insulated with FPSF Slab Foundation with Radiant Pex in it. At this time I am using an newish RV LPG Furnace to keep temps at 15C in winter because of my LFP Bank but also because my Water Pressure Tank is in the pumphouse side. 15C is the lowest "comfortable" working temp for LFP, below that temp they do start to deviate more internally. I have the same Temp Ranges as you, from -35 to +40 and we hafta do it ;-). TIP: You want some air exchange especially in Summer because the Inverter etc do make a lot of heat and it can get quite toasty in there. A small 12V air changer can be setup with minimal effort & cost to do the trick, it can be a very simple add-on. EXTRA !!! You may not have considered the Interaction with your equipment which can be done with Bluetooth/Wifi or Ethernet (pends on your kit). I ran 2 CAT-6 Ethernet in conuit from my powerhouse to my comms closet in the house. Wifi/BT are fine but they can be flaky, escpecially through walls & EMF noise from the gear. I do strongly suggest you do wire some Ethernet (sheilded) cable from your powerhouse into your house, wire works!

PITA SAVER TIPS !
A BIGGY ! Battery Pack Temps is a big issue for us. Battery Packs do NOT like being at different temps. LFP is happiest at 25C and generally good humoured from 12C to 35C but outside of that zone, they get finickety and once below 7C or above 40C crankiness starts. Below 0C you DO NOT CHARGE but can continue to discharge till -20C. Several years at this and doing various tests including Threash tests pushing stuff to the "limits" several lessons have been learned.
1) KEEP Batteries OFF the floor, it is a Heat Sink ad will pull the temps down. The closer to the floor the cooler they will be.
2) Try to keep all packs at identical or close temp. Simply put them so they are at least 60cm off the ground. Make sure that airflow can around the packs so they stay pretty even.
3) NOTE that even 2C Temp difference between packs will cause a noticeable difference in how they charge/discharge... The larger the temp difference the greater the differential. (this also applies to other chemistries to varyng degrees)

A personal Safety Extra:
I made a choice a while ago that was Extremely Worth It. A few laugh but... Get out to Peavy Mart or so and get 4'x6' Rubber Horse Stall Matts and cover the floor of your powerhouse with it, BEFORE Installing anything. You can cut it with a 80T Circ Saw (it's not easy & messy oi). Not only as an "insulator" but it's a little easier on your feet, plus if something falls, it hits rubber. You might chuckle at the notion but seriously, it is a very worthy extra whic you'll appreciate later. I'm not kidding. Peavy / Tractor Supply just had a sale $65 a piece for 3/4" thick. ALSO: Put a door porch matt or solid pad (pavers work good) at the outside of your door with a boot scraper !
Have a Portable Worklight on the wall by the door AND a Good ABC or BC Chemical Fire Extinguisher on the wall as well (better to have it than not just in case). and Last but Not Least a Dual Mode Smoke Detector. BTW: IF/When the insurance co wants to inspect and they see the precautions they will appreciate that. It's also cheap piece of mind somewhat.

Hope it helps, Good Luck

View attachment 222205
Hello Steve. Lots of great advice in your post. Thank you.

My shed was actually a trade show demonstrator for a company that manufactures building panels made from 2 hour fire rated magnesium oxide outer panels that sandwich R15 foam insulation in the walls and R24 for the floor & roof. I picked it up on Marketplace for a bargain which included the delivery to my place and retrofitted it to suit my purpose. I am adding a direct vent heater for the sake of the batteries in the winter as you mentioned. The shed is pretty small at 8x6 ft so the heater should not have to work too hard. I also have a vented window in the door and sliding window one side of the shed for summer airflow. I will monitor that for heat in the summer and can add an air exchanger down the road if needed. So far this year the insulation is keeping it nice and cool inside without the inverter installed. I will monitor this.

The shed will have its own feed panel and will have a good light and a couple of electrical plugs inside. It will also have a security camera, smoke detector and fire extinguisher. I am also running two CAT-6 cables from my house wifi router to the shed for the inverter. One for a spare inside the conduit if ever needed 10 years down the road. I fully agree with you not to rely on router signals from the house to the shed. Your right- wire works best.

I was interested in your comments regarding the east/west orientation of panels. Down the road on phase 3 of this project I want to add panels on the roof of my two storey workshop. The front of the building faces SW. One rooftop orientates towards the SE good for morning sun and the other side orientates NW which I'm told would be a waste of time. I see both rooftops receiving fairly good mid day sun but one side taking advantage of the morning sun and the other side taking advantage of the evening sun. Your thoughts?

Initially my system is a grid tied emergency backup system. As I add more panels it will become more of my power generation system with the grid as a backup. My intentions from the beginning of this project is to protect myself from possible future grid instability and energy independence will be an added bonus.
 

Attachments

  • 424950210_7589225934463121_4113267394157676668_n copy.jpg
    424950210_7589225934463121_4113267394157676668_n copy.jpg
    82.7 KB · Views: 6
Sure, but the sunlight impinging on the roof surface is the same, so if he's covered the roof it doesn't matter if his panels are parallel to the roof or parallel to the incoming sunlight. The snow thing is an issue. Cover the walls of the carport with vertical panels!
No walls for panels. The south facing wall has a moving garage door, the north facing wall is in the dark and the east facing wall would hold about 6 panels in the shade most of the day. The west wall is my house.

You're right - the snow is an issue I am aware of and will simply have to live with. Next year when I add the ground mount things will be different.
 
Interesting posts. I would only add that December and January test how awesome your setup is.
In my case, I have roughly 19KW in panels and it is still no where near enough for winter to run my heater and the rest of the home. If you can, plan good for winter's bad production.
Initially my system is a grid tied emergency backup system especially during the winter when I know these panels are not much more than snow catchers. Next year when I add my ground mount to the fray my system will become more of my power generation system with the grid as a backup. You're correct, the true strength of any system in Canada is December -February. We shall see.
 
I know the region, had a house @ 8th & 8th SE right at the Bow & Elbow. ;)
That structure is PERFECT ! I always suggest Mag-O as opposed to cement fireboard, so much better for ohh so many reasons. You will NOT have critter issues nor moisture problems + it's pretty much a Fire Safe now because of it. Great Score !! Double Ethernet - Same as what I did... (heck with pulling cable after the fact LOL, leave pull strings in the conduit regardless... )

TIP for the Solar Arrays. There are GASKETS available that fit between the panels to get rid of that wee gap. They are an EDPM rubber type of compound which does two things, stops water/snow/ice from getting between the pannels but also makes snow shedding MUCH easier. I am retrofitting such on my existing array & installing with my new array. It's roughly $350 for a 100' long coil (CAD price).

East/West arrays work when you have the right conditions / layout. There are different approaches that do work. For example a "Fence" with Bi-Facials set 3' off ground surface. Example if you have 10 Bi-Facial panels, set 5 with primary side east and the other 5 facing west gives a more balanced input in Morning & Afternoon with the LOW generation at mid-day. This does give more early & late generation so there is a trade-off relative your usage etc... There has to be some serious number crunching but can be advantageous and no issues with snow shedding (as long as it doesn't pile up along the bottom). E-W setups extend the solar generation period available from 1st Sun to Last.

Myself, I use a Ground Mount @ 45 Degrees (presently) and that gives me optimal generation in Mar-Sep but in winter it can still hold the snow and isn't great... 2nd array will be tweaked for Winter generation (steeper angle). I am also on a south facing ridge 1700' above the valley below, so it works better for me to go this route. I am working on a solution that will allow for me to change the angle "manually" but not stressfully (I'm a geezer - so creeky bones).

Here is a Tool Set you will want to have handy. If you are messing with roofs and trying to work out angles to degrees (and lots more) this particular tool is handy - lot of handy calculators & planning aids here: https://www.blocklayer.com/pitchangle

Now a Uniqueness in my setup which kind of changes the picture when comparing. I built my home to a Hyper-Efficient spec using passive methods and as such my energy usage is Very Low (year round) comparatively. Also due to my remoteness, I can be snowed in for a few days before the roads are clear, so with the factors in play, my Energy Storage is set to handle 10 days in "scrimp" mode with buffer. Grid Power is $80K away and staying right there. Whenever I look at a solar install, I usually think on the "Entirely Independent" types of systems.

Take your time, think things out, sit & ponder it and revisit and be certain to get Sanity Check from others who are in SIMILAR conditions as yourself. Do NOT rush decisions & choices and keep your mind open to ideas / plans & designs which may seem unusual at first.

Have Fun the Adventure has Begun !
 
Next year I will be building a large ground array with properly angled panels elevated off the ground with enough room for shedding snow below which will eventually be the strength of the system. Then year three I may be adding a third string on the roof of my workshop just across from the carport (see picture of green two storey building). There's room for up to 12 more panels up there if needed however the orientation is not the best and many more tree's will have to be cut down. Once I see the performance of phase one & two, I will decide what to do down the road.
I think you have an excellent - flexible - plan over a long enough period of time to learn from the first set up, which will inform your later steps. (y)
I did this as well, and it really helped me to learn what the system can (and can't) do, and how to deal with snow in my area.

Not that this applies well for your location, but in my set up, I made all the panels tilt, 35 degrees for summer, 72 degrees for winter. My current project is a new barn, and I am using 35 degrees and 72 degrees for the two roof pitches, and a tilting rack will mount at the change of pitch. This allows the barn roof to support a lot of panels, and the structure behind will block much of the wind ( wind in my area comes 90% of the time from NNW). I wish we had the Chinook's like you have, although "Winter" 2023/24 was so mild I call it 'the year without winter'. :ROFLMAO:


Edit: One thing I would suggest you look at: a Chargeverter - to allow simple battery charging during those winter months. The best thing about the chargeverter (in my opinion) is it allows topping up the batteries while the rest of the inverter/battery system just runs normally, and if a generator is required due to a utility outage, the chargeverters allow cheap non-inverter genny use. Something to consider.
 
Last edited:
I think you have an excellent - flexible - plan over a long enough period of time to learn from the first set up, which will inform your later steps. (y)
I did this as well, and it really helped me to learn what the system can (and can't) do, and how to deal with snow in my area.

Not that this applies well for your location, but in my set up, I made all the panels tilt, 35 degrees for summer, 72 degrees for winter. My current project is a new barn, and I am using 35 degrees and 72 degrees for the two roof pitches, and a tilting rack will mount at the change of pitch. This allows the barn roof to support a lot of panels, and the structure behind will block much of the wind ( wind in my area comes 90% of the time from NNW). I wish we had the Chinook's like you have, although "Winter" 2023/24 was so mild I call it 'the year without winter'. :ROFLMAO:


Edit: One thing I would suggest you look at: a Chargeverter - to allow simple battery charging during those winter months. The best thing about the chargeverter (in my opinion) is it allows topping up the batteries while the rest of the inverter/battery system just runs normally, and if a generator is required due to a utility outage, the chargeverters allow cheap non-inverter genny use. Something to consider.

Simple battery charging can be accomplished with the solark 15k. He can decide whether any PV will go to loads first or to batteries first or selling to the grid (he indicated he isn't interested in selling to the grid).

OP, please read this thread as there are multiple ways to wire in your inverter. I am guessing you want to go from your power meter > then the solark > then your electrical panel. But each setup is different and has pros/cons. But I think that method will be best long term especially if you are going to be increasing your battery banks AND don't want to make a critical loads panel. You'll eventually get to the point with your battery bank that you can run your whole house for X days and you don't want to only be able to power just the critical loads during grid outages.

https://diysolarforum.com/threads/s...working-for-peak-coverage-on-solark-15k.85227
Thank you both for the comments. You are correct I am planning to go from the meter to the Sol-Ark with a shut off switch and by-pass installed between the grid and inverter. I have attached a diagram of my plan thus far.

In my plan there is no critical loads panel proper as part of the new system. I am installing a new panel in the shed for lights and plugs for the shed and this new panel will feed my main panel inside the carport. The carport panel was installed a couple years back to expand power to my workshop & add a ductless mini split air conditioner the old house panel would not accommodate. That panel now feeds the old house panel which now becomes my manual critical loads panel. In a long term outage I will just use my brain to decide what loads are essential and use the breakers as required.
 

Attachments

  • Solar Plan Diagram.jpg
    Solar Plan Diagram.jpg
    208.6 KB · Views: 5

diy solar

diy solar
Back
Top