diy solar

diy solar

Compress or not, flexible busbar or not

I tried to find the fiberglass sheets like you see in the kits and they were too expensive.
Same experience when looking for pre-cut pieces. Finally, I found a local PCB manufacturer. They forwarded me to another local company that was making the materials they use. And I ended up ordering 2sq.m rolls and cutting them myself. For 3 16S batteries, the material cost was less than $50. The sheets can be cut with a utility knife.

Folks, talking about springs and Poron foam - which one is cheaper?
 
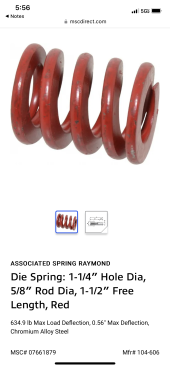
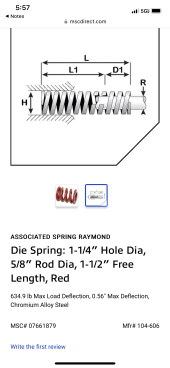
I won’t get into what’s better. Spring are $11 but I wouldn’t use it on more than 8 cells so you set up 3/16” less than max deflection so WHEN the cells grow you are still safe but had plenty of push to start with. The pusher should be made from two 3/4 ply glued together for a 1-1/2” approx total thickness. Fixed ends same. What’s the best? Foam or spring, I got no clue. 89CDD786-80C5-48F3-BF5E-30F1B7BD2B6A.png1BC6AD86-AED6-437D-A160-D9239BACE12B.pngBF22EF2A-AF1F-4F15-B38A-0FC10FFE60F6.png
 
For more cells Longer springs = more deflection. Many different things can be used for the end plates. I used 1/4” steel plates
 
Found my Material List

Eight Cell Compression Module
(lithium "Squeeze Box")
Fits most 272/320 Ah Prismatic LiFePO4 cells with allowance for .045" silicone or insulator.
spacers sheets on wide battery surfaces (9 places).
Home Depot 2' X 4' plywood Sheets, Radiata Pine 1/2"(.480) & 3/4"(.725) thick:
1pc Bottom 3/4" X 7" X 29-1/8"*
2pcs Sides 1/2" X 9" X 29-1/8"*
4pcs Ends 3/4" X 7"* X 8-5/16" (2per end)
2pcs Thrust plate 3/4"X 6-15/16" X 8-1/8"*
*Denotes surface grain direction. Doubled thrust plate has the only vertical grain.
Ends sit on bottom and between sides. 1pc Spring, 634.6 LB @ .56" deflection
from MSC (mscdirect.com) PN 07661879.
1pc 3/8-16 four pronged Flange nut
1pc 3/8-16 X 3" Bolt, zinc plate (not stainless! it may bend)
1pc 3/8 fender washer, 2pcs 3/8-16 nuts
Grease for threads and washer surface.
Teks sharp point lath screws #8x1-1/4" to align while gluing.
Clamp up assembly squarely before gluing for test fit and fasteners. Drill tight clearance holes through first side
and pre-drill small hole for threads. Disassemble and glue up & screw tight.
Titebond 3 glue, re-coat edges after a few minutes soak in before assembly.
When done, protect with Minwax Helmsman Urethane 3 coats.
 
Ofcourse they aren’t concerned about over compression or allowing for any expansion. They state X amount of cycles for a fixed compression and as long as the cells reach those cycles they are in the clear.
Allowing for expansion is a must imo. Mistakes happen. Overcharging, over discharging etc. allowing room for mistakes is good insurance. Also as we discussed before there is the possible extra pressure towards the end of cells life. allowing for this extra expansion/pressure could be a good idea.
My take on the specification is that it is the manufacturer's statement of best practice. They have put a lot of effort into figuring out what works best, yet we continue to second guess. I do understand that the Chinese is not incredibly clear to most of us, but the instructions on how to make the rigid fixture are pretty clear.
 
The crazy thing is that the batteries are so expensive yet they usually don’t even include information pamphlets or links to specs like torque, compression charge rates, etc.
 
I think they just give the minimal amount of info. All they have to do is lead us to the specified amount of cycles. If we over charge/over discharge they don’t care if there’s to much pressure. That would be our own fault or bms problems. Having springs or poron foam is cheap insurance
 
Last edited:
This should put all these questions to rest...very detailed video from a German battery expert.

 
Anybody that doesn't speak German can turn on auto translate sub titles, or can watch the below video and see Andy's interpretation.

Agreed. But I'm curious why Andy did not mention terminal stress. In his 1st video about his swelling several days ago, his swelling appeared to be putting stress on his terminals.

I would think if nothing else a compression frame would help keep the expanding and contracting of the cells from placing stress on the terminals.
 
Just kinda wondering what’s going on inside some of the server racks after year. Welded on busses, snug placement and a supporting structure not designed for cell expansion restraint. Should prove interesting one way or another.
 
Agreed. But I'm curious why Andy did not mention terminal stress. In his 1st video about his swelling several days ago, his swelling appeared to be putting stress on his terminals.

I would think if nothing else a compression frame would help keep the expanding and contracting of the cells from placing stress on the terminals.
exactly my thought, and hence i will keep fixation.
the whole "more cycles" never had any bearing on that to begin with.
common sense tells me that expanding and contracting puts stress on terminals and busbars.
 
The way I see it, you either compress or leave space, like full end of buss bar slots kinda space. There is no in between. I however will continue to follow the manufacturer’s recommendations. In a few years we’ll know after many cycles how the rubbing of internal layers pans out.
 
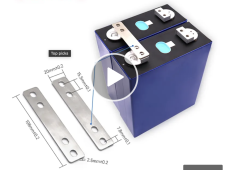
The problem is is the pre-made bus bars for these cells are designed for the cells to be kept in a fixture because they do not allow you to give enough room between cells to prevent them from touching and then putting stress on the terminals. You would need to make your own busbars or the premade ones would have to have an additional hole. Use 2nd hole if cells are in fixture and can't move or 3rd hole which would be further out if you are allowing the appropriate amount of space between cells and therefore need to have more room. You can see in pic below there simply isn't even room to add additional hole since the busbar is too short:
Screenshot 2023-04-19 at 5.19.02 PM.png
 
Last edited:
Do you differentiate between true cell compression and what would be more of a fixture frame that presses the cells together for mobile and RV applications. Or would those b essentially 1 in the same from a design, concept and execution point of view.
Is it a good take that for a fixed inverter size, one is better with two or three battery strings, rather than just one. Less current in each string of cells.
Easier with 3 banks to always stay under 0.5 C in and out.
 
Is it a good take that for a fixed inverter size, one is better with two or three battery strings, rather than just one. Less current in each string of cells.
Easier with 3 banks to always stay under 0.5 C in and out.
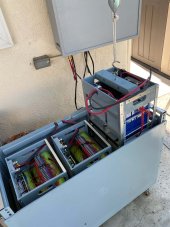
That is what I did, started with 2 banks 16S S168 and then added a third S16 EVE F105.
There is .08" rubberized sheet between each EVE cells and end plates. The threaded rod nuts are torqued low just to hold everything together.
3 Racks.jpg
 
Last edited:
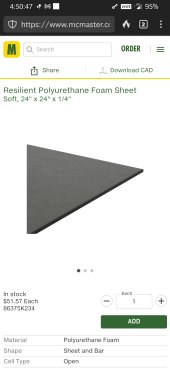
What damn outfit won't even let you view product without a login. Easy way to lose business. Idiots will never learn.
Are you talking about McMaster? I just tried the link and it worked fine with no login.
 
I don't understand your post. The product shows up just fine for me in the first link.

They do require you to log in to make an order. Alternatively, I think you can call them and place an order by phone.

Do you have a specific question about Poron foam?
Just consider that McMaster has already compromised your p.c. with a cookie. If I don't allow them to do that with my making an account they won't allow me to even shop. You must have an account with them from the past. This corporate mentality deserves to be punished. I don't wish to offend you of course.
 
Just consider that McMaster has already compromised your p.c. with a cookie. If I don't allow them to do that with my making an account they won't allow me to even shop. You must have an account with them from the past. This corporate mentality deserves to be punished. I don't wish to offend you of course.
I'm confused.
I run a private browser and a VPN, I have no issues opening the link above.

Edit - disabled all cookies, not just 3rd party and the page won't load...
 

Attachments

  • Screenshot_20230725-165047.jpg
    Screenshot_20230725-165047.jpg
    116 KB · Views: 3

diy solar

diy solar
Back
Top