diy solar

diy solar

New construction

hautions11

New Member
Joined
Mar 9, 2022
Messages
59
Location
Western Indiana Terre Haute
Hey I started posting in the general solar area, but it looks like residential is a better fit. A quick summary, on grid house, not selling power back to Duke, geothermal spray foamed tight house, Solark 15K installed.

I am working on batteries now and then solar panels on the standing seam roof.

image_123927839 (1).JPG
Waiting for cables from signature solar, Thursday delivery.
 
Just curious: do you get snow?

I’m a total fan of ground mount in the snow belt. Then again I’m offgrid and will continue offgrid at new property with a utility pole 30’ away…

Ground mount facilitates seasonal tilt adjustments.
 
Southern Indiana, so just a little snow, some years there isn't any. I am going to do some ground mount as well as roof mount. While there is no drywall, I want to route all my roof stuff. I still have some grading to do in the back yard, so ground mounts are later. On the South and slightly southwest roofs, I am probably limited to 7000 watts of panels. I have a lot of shading, so I have to be careful on my locations.
 
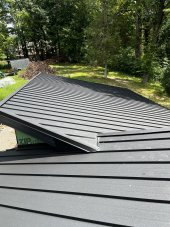
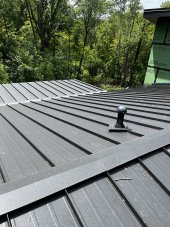
OK everyone, the house has kept me busy, but I am seriously looking at panels for the roof and I would love some input. The pics below are the two roof areas for my panels. The first picture is the garage and the sunny area you see is 18 wide and 25' long and faces due south. This picture is at 10 AM. I am fighting some shading on this roof, but at 3 in the afternoon it is in 100% sun. I want to use the smaller area for 15 panels. 3 rows of 5 panels. My first thought is put the 5 panels in a row in series and parallel 2 rows together to stay around a 20 amp 200 volt string. The bottom row will be a 200 volt 10 amp string. My Solark can take 2 strings in one input point if it stays under 500 volts and 26 amps. The second roof is 17' wide and 15' long and faces mostly south and slightly west. 10 panels could easily fit in this area, 5 in series and parallel the two rows. very little shading except for the chimney on the right, west side, after 7 PM.

I am looking at Santan Solar. They have a 380 watt panel and a no shipping 26 panel pallet $133 a panel. SSB series grade B for cosmetic issues, but they are new panels and get the 30% tax credit.

Please fire away here on thoughts and suggestions. Thanks for any input.


IMG-1704.jpgIMG-1706.jpg
 
I believe NEC will require wiring from your panels to be in metal conduit although I’m no expert on NEC rules.

Better get that part sorted before drywall.
 
For DC circuits:
Under the arrays PV is ok for DC (and one other wire type I can’t remember); and TC-ER is OK for AC.

PVC is ok (subject to local code amendments) outside the building structure. Inside it needs to be metal conduit. Can be flex inside but there are extra protection rules.

Flex outside the building will have a rough time with the lower temperature rating than rigid conduit. Usually EMT is the way to go because it is easier to bend with regular tools.

For AC circuits— requirements significantly relaxed.

Easiest is to get some plans professionally drafted and they will write down for you the most standard conduit and wiring method choices. And then you can just mechanically follow that to simplify your life (well, good to get the plans approved by AHJ to decrease the chance of getting messed up by local amendments).
 
Sorry Joe, I misread your post, I thought you were talking about my inverter and panels inside. I actually have decent attic access in that area between the garage and the house. that elevation change lets me get in to the attic and from there I have a conduit straight down to the mechanical room.
 
Sorry Joe, I misread your post, I thought you were talking about my inverter and panels inside. I actually have decent attic access in that area between the garage and the house. that elevation change lets me get in to the attic and from there I have a conduit straight down to the mechanical room.

No problem. I just wanted to point out that your PV runs, inside the house, likely need to be in metal conduit. And that would be MUCH easier to do before drywall is installed ?. Conduit runs in the attic are not fun in August around here, but doable.

@zanydroid did a good job of covering PV wiring requirements from start to end.

I chose to run my PV wires outside the house as much as possible to save on conduit hassles.

Great looking house and install BTW.
 
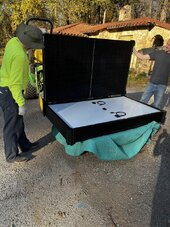
Wow, trying to get all my finish work done, not much solar progress. I have been watching San Tan solar for quite a while. I finally found a great sale and shipping deal on a 26 pallet " grade B " panels. The palet had frame scratches only. After receiving the panels I was very pleased as even the frames looked great. Including shipping, I got 380 watt panels for a little under a $120 each. I am using mini rails that clamp directly to our standing seam roof. I'll send some pictures as I begin the install.
 
So panels showed up and look great! Signature solar was out of there small 4" mini rails, but I finally got a ship notice this Week. Maybe some installation next week when we get home from Colorado.
IMG_2064.jpg
 
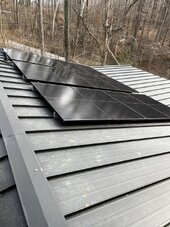
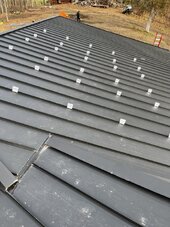
Starting my panel install, this is 12 of my 24 roof panels. I like the mini rail mounting system. I will run this as 6 in series and run both strings to the sol ark independently. I believe this acts like you put the groups of 6 in parallel up on the roof, since there are two inputs for each group in the inverter. I need some clarification on that detail from Sol ark. It is easier to put the brackets down and then attach the panels. I am short some mid clamps, finish next week!!


IMG_2240.jpegIMG_2241.jpeg
 
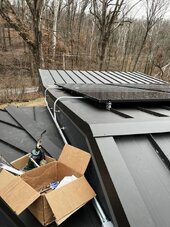
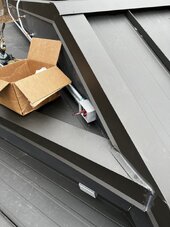
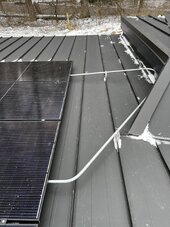
Conduit install and pulling wires today. We had a high of 37 and spitting snow, but the install went pretty well. This is the kitchen roof 12 panel array, the garage roof 12 panel array is just on the left. A few pics

IMG_2247.jpegIMG_2246.jpeg
 
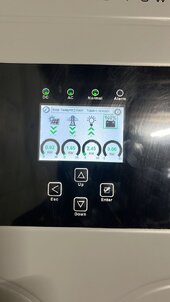
The garage roof panels(12) are all in place, conduit is complete. I am ready to actually fire up the system.IMG_2253.jpegHere is the Sol-Ark screen. The panels are almost completely covered with snow, but I’m making a KW of solar. I know pretty weak, but I’m pretty excited.fb4f65b1-d31d-4afa-abf7-2d8537004fdd.jpeg
 
Nice setup.

A lot of work when combined with a new build. Good for you for taking that on. Did you get any good sun to really test the system yet?
 
I wanted to comment on a few assembly details. I had all kinds of trouble with CT sensors. When I used the arrows on the sensor towards the meter, it didn’t work. The Solark showed selling power rather than using it. I flipped the sensors opposite of the instructions and it worked fine. Anyone else have this issue?????
 
We didn't seem to have a problem. But how are you determining they showed selling power? Just the HM readings on the LCD? I'm just going by memory, but when I called sol-ark about it, it seems the readings on those will depend on the mode you have it set up in. Just a heads up. May be worth a call if you are still fighting it or unsure if it is right.

You need them for grid tie, limited to home (different than limited to load), and multi system installs as far as I know. I use limited to Load, but still wired them in for when I eventually grid tie.
 
I am using limited to home. It shows backwards as the arrows are pointing towards the grid. In this condition the load info is wrong, the battery charge does not function, etc. I do have it sorted now. My other issue was the position I clipped the sensors to N1 and N2. My first attempt had the sensors on the main panel. I moved the closer to the meter and away from the inverter and they worked great!
 
Awesome. Glad you got it rolling. Limited to home is an interesting mode. I ended up using limited to load and powered the whole main panel. I still have an off-peak panel that is just entirely unrelated to the whole setup.
 
I have done the same. 400 amp service. 200 amp main panel runs 90% of the house. 2nd panel is dryer, 220 wood shop tools, emergency heat for the geothermal, garage mini split, future EV charger.

I’m not sure, but I may use some time of use in the future.
 
I guess I do not fully understand the limited to home versus the limited to load functions.

Maybe a big ice storm tonight, Im trying to figure out how to force charging the batteries from the grid to make sure im at 100% on my battery charge. It is bouncing between 50-70% with my limited solar input and tiny loads from the house. I swear I read a thread from someone trying to do that, cant find it now.
 
Hi, I'll try to explain it as I understand it, not using the manual as a reference.

Limited to home means you can power your panel connected to the LOAD input, but also supply some of the power to the panel in front of the device. That could look like this.

Meter --> Main Panel --> Sol-Ark --> Load Panel off of the Sol-Ark load output.

---------------------------------------------------------------

Limited to load, is where you power only the load side of the Sol-Ark and don't attempt to off-set the usage on the "main" panel. That could look like this.

Meter --> Disconnect --> Sol-Ark --> Load Panel off of the Sol-Ark


You can have different physical configurations. For example, you could still have a main panel, but not attempt to offset the usage on it. You need the CT's installed for limited to home because it is attempting to offset usage on a panel that doesn't pass through the load terminal of the Sol-Ark. It senses the power usage going to the panel that is not on the LOAD side of your Sol-Ark and can supply power to offset that panel as well. I have mine set up on limited to Load, since the 15k is hooked up to the main panel directly, and there is no emergency loads sub panel.

Definitely refer to the manual too, but I took a crack at an explanation in case it helps.
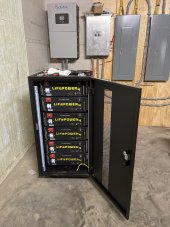
 
Thanks guys, That makes more sense to me. My secondary panel is on its own 200 amp service, so I think Im good. I did figure out the forced charge issue. In the time of use page, there is an area to force the grid to charge the batteries in a specific time of day. I simply put a check in the "Charge" box at the afternoon time frame and set the SOC at 100%. worked great. At 5000 watts I took the battery bank from 50% to almost 90 in a few hours.
 

diy solar

diy solar
Back
Top