Checkthisout
Solar Wizard
- Joined
- Nov 14, 2021
- Messages
- 4,817
you are the first person I have met from the US that knows about Sikaflex! that stuff is the cats friggin meow!
Generally used to fill expansion joints


you are the first person I have met from the US that knows about Sikaflex! that stuff is the cats friggin meow!
they have 3 different formulas they sell here in japan. two are construction grade, the last one is specific for glueing in windshields of vehicles. its some bad ass stuff.Generally used to fill expansion joints
i can get it any time you want it... just let me know you want one of the construction grades or the one for glueing the windshields in with? they also have the activator and the adhesive promoter for it in liquid brush on form.That's where I learned about it too. Unfortunately, much like Coroseal, it became really hard to find because it worked too well.

 After 5 or 6 years, dozens of projects, 4 or 5 camp trips, and miles and miles of wire run through it, it finally went Pop, Pop, POP SMOKE! this morning. Sigh....


Well, I got to start on the electrical system today. Any time someone tells you "That thar made in Chyna stuff is krap! Go for Made in 'Murica if you want quality!" Please refer them to the following photo of some quality "Made in 'Murica" wiring work:
View attachment 194588
Every 12v connection in this place uses those blue splice clamps on it, even to add in 3in of wire that was too short. Qualitay!!
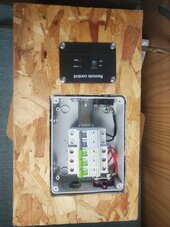
The new breaker box is significantly smaller than the old converter so I made up an adapter board and got that all put together.
View attachment 194590
Since black is hot on AC and red is "hot" on DC, a pair of small blocks worked out perfectly. I'll bring everything into the box hopefully tomorrow and get the inverter installed.
Got the shunt display and some extra USB charging ports on the tail end, some USB and a dedicated line for the water pump along with an external 12v socket outside for a portable fill pump are mounted up near the tongue end.
View attachment 194591
Tomorrow hopefully I'll get all the breakers connected, the inverter in, and all the wires cleaned up... hopefully...


It's an Ionic 2kw AIO low frequency AIO. The 3Kw was overkill for my needs, but the 1012-LV was too small.What inverter is that? Looks like Ampinvt only with mppt.


10ohm 36w. So just wait longer or do I need a different resistor?What is the resistance of your precharge resistor?
Yes, I believe low frequency transformer inverters tend to have more capacitors.
First one, then the other10ohm 36w. So just wait longer or do I need a different resistor?