• Have you tried out dark mode?! Scroll to the bottom of any page to find a sun or moon icon to turn dark mode on or off!

diy solar

diy solar

Pimp my Pop-Up, system check?

Why not just run the batteries together instead of separate runs? Pos on one to the neg of other so all power flows through it, ditch the 4awg and put in 2/0 then everything's limited to same wiring and fuses. Which 200a for 2/0 is very high and if you're upping to 250a you should be running 4/0.
The box there in the diagram will be where all the batteries come together and is hopefully only a foot or less from the batteries thenselves, so basically the same thing. Everything "south" of that box will be the fatter wire runs.

The wires from the batteries out to the control box will have to be 4awg because that's the size of the terminal holes on the breaker I'm planning to use. Stupid physics.

Positive to negative would give me 24v and that would make my 12v stuff very angry.
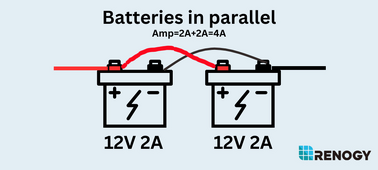
Positive on one battery then negative on the other battery with cables connecting the batteries in parallel still. This keeps the power distributed equally between them both. Your way works as long as cables are same length, I just worry when you're pushing the limits of the wiring and breakers if everything isn't perfect it'll drain one more than the other then more likely to blow the breakers.

1704743080817.png
 
And here I was thinking "200a of 12v is 2400w, that's plenty of overhead for a 2000w max inverter" but yeah, I'll step everything up a notch.

I already have a pair of 150a JBD's in stock, I was planning on using those. My power audit told me that 1Kw would be plenty for my expected needs, but the options for 12v AIO's are extremely limited.
Usually, I take the approach of making the system design as invulnerable to user mistakes/design flaws as possible and utilizing the maximum of the individual components while aiming for equilibrium across the system.

With that said, that's probably more of a blank-paper approach so to speak, with the assumption that the component purchases haven't been made yet.

If your system is specifically intended to power two particular devices with little to no flexibility in mind, and with a known power requirement of 1kW AC combined, you could go with 200A fuse with no problem. Especially if you already have the cables and the fuses.

That aside,
since you already have the 150A JBD, I'd go with that. For a combined 1kW AC load, 150A is good enough and with enough headroom. Maybe, use a 150A fuse instead of 100A., It's there to protect the wire, but there's no reason I can see why limit the battery output. As long as the fuse rating is a good match for the cable ampacity. Bigger cable?

I'm set on using an AIO because of space. Pop-up campers, especially these smaller older guys, don't have the luxuries of things like battery compartments or utility spaces in them, only what's under the few bench seats inside. Finding space for the ATS, the AC charger, the inverter, the SCC, all the wires and fuses between those components, plates, pans, bowls, cups, linens, pots, cleaning stuffs, axe, hatchet, cordless chainsaw, spices, lighters, cordless drill for the supports, and so on and so on.... well every inch counts and you can't beat the compactness of an AIO.
Makes sense. Plus, I'd imagine AIO is a lot less of a hassle to install, and having everything insulated within the box in a tight space is so much nicer.

Btw, this looks like a really cool and fun project, definitely subbed and hoping you'll share some pictures when it's done. :)
 
Last edited:
Unless you have those panels that can use light on top and reflected light on bottom there is no need to put mylar under the panels. Useless! The shade the panel gives keeps the roof cool. IF you are thinking this would add insulation, then good thought, but not worth the mess.

Put the unistrut side to side so that will block the air when driving.
Use the low-profile Unistrut which is about 1 inch tall.

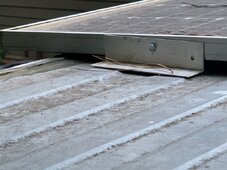
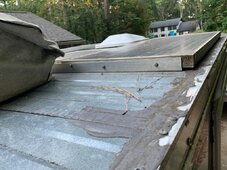
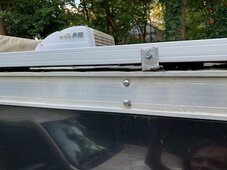
Unistrut will work, but will be way over-kill. Using VHB tape on a good surface that tape will stick to you really do not need that much contact area. See pics below, the sides have two 4 inch angle pieces, taped to roof then screwed to panel and the front has angle piece that goes all the way across. The air gap is small.

I notice in the camper the ceiling area under the roof is way more cool than the part open to the sun, so was wanting to add more solar just to shade the roof more.

I have a panel at the very front but ust do not have that photo handy, the rear panel facing forward has the aluminum angle iron gong side to side.

These have been on the roof for at least 4 years now. Yes the last pic show only a 1 inch angle piece holding the side of the panel, Seems to be all it needs, never had issues ever - it is taped to roof, then bent a little to clear the trim on trailer. People get way over zealous with the mounts.
good luck

IMG_3954.jpg
IMG_3955.jpg
IMG_3952.jpg
 
Unless you have those panels that can use light on top and reflected light on bottom there is no need to put mylar under the panels. Useless! The shade the panel gives keeps the roof cool. IF you are thinking this would add insulation, then good thought, but not worth the mess.

Put the unistrut side to side so that will block the air when driving.
Use the low-profile Unistrut which is about 1 inch tall.

Unistrut will work, but will be way over-kill. Using VHB tape on a good surface that tape will stick to you really do not need that much contact area. See pics below, the sides have two 4 inch angle pieces, taped to roof then screwed to panel and the front has angle piece that goes all the way across. The air gap is small.

I notice in the camper the ceiling area under the roof is way more cool than the part open to the sun, so was wanting to add more solar just to shade the roof more.

I have a panel at the very front but ust do not have that photo handy, the rear panel facing forward has the aluminum angle iron gong side to side.

These have been on the roof for at least 4 years now. Yes the last pic show only a 1 inch angle piece holding the side of the panel, Seems to be all it needs, never had issues ever - it is taped to roof, then bent a little to clear the trim on trailer. People get way over zealous with the mounts.
good luck

View attachment 187638
View attachment 187639
View attachment 187641
I thought panels heat up from the sun which is why lots of flexible ones break and we need some sort of air gap to help cool between.

I did the half size unistruts on my cargotrailer and it looks good. I'm with you and VHB properly applied would work though
 
Yes, air gap. You must have misread something. Everyone says air gap. The size of the gap is discussed with the most crazy ones having a foot or more gap. Dont be the crazy one.

I have had to remove VHB before so gained confidence in it from that, it involved a 1500 degree heat gun and a lot of work to get it unstuck.
 
Positive on one battery then negative on the other battery with cables connecting the batteries in parallel still. This keeps the power distributed equally between them both. Your way works as long as cables are same length, I just worry when you're pushing the limits of the wiring and breakers if everything isn't perfect it'll drain one more than the other then more likely to blow the breakers.
Aaahhh, I thought that was clear in the sketch. Yes, the batteries are in parallel coming in through the now 125a breaker to the positive bus bar. The negatives come in and join up at the shunt, then out the shunt to the chassis. I'll consider jumpers if I have spare cables and lugs handy.


Unless you have those panels that can use light on top and reflected light on bottom there is no need to put mylar under the panels
Yup, I'm looking at 200w bifacials, hence the mylar underneath.

Put the unistrut side to side so that will block the air when driving.
Use the low-profile Unistrut which is about 1 inch tall
My plan is to go fore & aft as a 10ft length is the perfect size for the panel orientation. Having the ability to loosen a couple T nuts and slide the panels in and out makes life easier for mounting and maintenance/replacement. I already have a design for a sloped wall along the front to prevent air getting underneath while driving.

The height of the Unistrut used will be dependant on what the metal shop has in stock next summer when it's dry enough to do the install and I'm home from sea. 1in is prefrable but sometimes you shop for what you want, and sometimes you shop for what they have.


I thought panels heat up from the sun which is why lots of flexible ones break and we need some sort of air gap to help cool between.
Yes, which is one of the reasons I'm using the normal bifacials, that and the cost of the panels. $650 for 800w of bifacials is WAY cheaper and more durable than 800w of CIGS panels. Between the Z-brackets and 1in Unistrut that's a good 1.5in of air space under there and open on 3 sides.


So I'll plan to kick up the amperages of the main breaker to 125a each, the Class-T to 250a, and 4/0 from the bus bar to the inverter. The current 12v system only has 15a of fuse involved so my plan of 10AWG should be plenty for that end. All my cables on hand are the high temp silicone pure copper wires, the label on the 4AWG bag says 150a so it should be plenty for the foot or so between the terminals to the bus bar. Same with the 40a rated 10AWG in the bin. Hopefully the only wire and lugs I'll have to buy is the 4/0.
 
Since it's winter the panels will have to wait a bit. At this point I'm just shooting to get the neglected maintenance and greasing done, get the propane system running, clear and bleach the water tank, make window inserts, and the electrical system in place... if it stops raining and snowing enough.

Next summer when I'm shore side again will be the panel install, axle flip, and electrification of the crank up mechanism. Rumor has it that there's a drop in module to motorize the Whiffle Tree underneath, I'm just starting to track that down.

The inverter should be here in a week or so, cells for the first battery sometime today and I'll order another set tonight after work, then I'll finalize my parts list and order the breakers, fuses, shunt, wire, lugs, bus bars, terminals, DIN box, etc.

Typing out both those replies on my phone has killed my lunch break so more tonight after I get home. :giggle:
 
shop for what you want. You have til summer to get what you want. Order the stuff or have them order it.
Get aluminum unistrut too. Lighter, no rust.
a 10 foot length will be way overkill, but will work.
 
shop for what you want. You have til summer to get what you want. Order the stuff or have them order it.
Get aluminum unistrut too. Lighter, no rust.
a 10 foot length will be way overkill, but will work.
That's the general plan. So how much track per Z-bracket would you recommend? 6in? 12in?
 
That's the general plan. So how much track per Z-bracket would you recommend? 6in? 12in?
What I have is about a foot on the front (short side of panel) and a 4 inch section on the back of the long side, and a 1 inch section across from that.
The other panels not pictured are just a foot (or the width of the short side of panel) on each short side, nothing on the long side. My roof is corrugated, but on the front and rear the tape makes full contact since the corrugations are side to side.
I have on other camper roofs used 4 four-inch pieces on the sides, and removing them was a chore, so they were plenty strong.
There is really not a lot of forces acting on the panels that I can tell. They are not at the leading edge of the roof, and the roof is not aerodynamic such as a sports car would be. The air is turbulent, so I bet you could velcro them on and it would stay.
On my truck rear bumper I can put a leaf and it will stay there on long drives.
 
Hmmmm.... after seeing the brochure I'm worried about the weight of the 4 panels I'm wanting to throw up there...

Roof Weight.jpg

Good thing I didn't have to crank THAT up by hand!!

The converter isn't putting voltage to the battery when on AC, I'm glad I'm re-vamping the entire electrical system in there. Also found out that the electric brakes are the emergency pin pull, so that's a wire I'll have to run to the battery. No biggie. Fortunately there's JJUUUSSSTTT enough space between the spare tire on the back and the license plate for both battery boxes and the Apache case holding all the fuses and breakers and shunt and such.

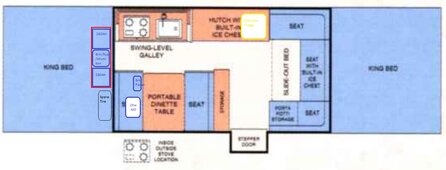
The general layout plan will look something like this:

layout.jpg

Batteries and box off the back, DIN breaker panel where the converter used to be, 2Kw AIO right nest to that under the seat. 800w of bifacial panels on the roof, should have power for days.
 
Last edited:
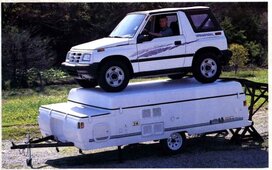
So I'm hoping to pick up a new-to-me 1999 Coleman pop-up trailer on Tuesday and I've already started thinking about how I'm going to pimp it out so I can just grab & go when I'm on this side of the mountains. I've already got on the To-Do list:

Flip the axle so I have ground clearance
Build 2 12v 280Ah batteries with heaters
Replace the propane/12v fridge with a dorm fridge
Cut bubble-wrap-mylar insulation inserts for all the windows
Replace the roof lights with LED's
Add in some USB-C PD and 2.1a outlets

But for here, I'd like a sanity check and some input on the new electrical and solar system:

View attachment 187369

4x 10BB 200w Bi-Facial panels
2x 280Ah homemade batteries (EVE cells, JBD BMS)
Ionic 2Kw 12v AIO Solar Inverter
4p Combiner Box
LNEX Shunt
Bus Bar
AC and DC DIN rail breakers to replace the existing power center
200a Class-T for inverter
MEGA fuses for lift motor and DC bus (need to get to the data plate on the lift motor to size the fuse)

All my wire is the silicone wrapped high temp wire so I'm pretty sure all my gauges are correct.

So, a couple questions for y'all:

1: Does anyone see any glaring errors?
2: Is there any reason I can't connect the inverter Negative to the chassis?
3: While I'm mounting the panels on the roof with VHB tape and aluminum unistrut, is there any reason NOT to put down the mylar reflective coating under them? They'll be a couple-three inches off the roof.

Photo log to come (weather and Tuesday permitting)!
Something else to be aware of.?.that year had roof design problems that were under a recall. I think the fix was support across the width inside near the vent a/c.
We went thru 3 sets of tires in 2010 due to a bent axle. Tire place said it was overloaded but scales said not.
 
Something else to be aware of.?.that year had roof design problems that were under a recall. I think the fix was support across the width inside near the vent a/c.
We went thru 3 sets of tires in 2010 due to a bent axle. Tire place said it was overloaded but scales said not.
I looked into that, looks like my model is in the clear.

Just ordered the steel for the battery bussel, probably going to have to move the pin that holds the bed up and cut the pipe diwn to fit. Fortunately, if the 250a fuse holder is the same size as my 160a fuse, everything should just fit into the apache case with some creative mounting. I'll have to get a little creative to change the PV breaker and precharge box from an OR to an AND, but MacGuyver ain't my patron saint for nothing!

I suspect at 20F outside my welder is gonna be REALLY angry trying to drop those beads. ?
 
Last edited:
Preliminary build done on the 2 batteries, but it's about 20F in the garage and I can't feel my fingers so I'm gonna have to go thaw before I continue...

20240116_122243.jpg
 
So does anyone know how the heater on these JBD 4s BMS units? I've got a jack with a red and a black wire and no instructions anywhere in the box or on the internet including JBD's site.

Red to heater positive, heater negative to.... ?? Black wire? P-?

Anyone??
 
Sigh... just figured out I screwed up placement on my breaker box, so I gotta get a new one and start over. ?

Also, not having the right size lugs is making the battery build a real PITA...

20240118_133459.jpg

The 3/8" lugs eat up a LOT more space in that box than I'm used to. That little Y cable has to be EXACTLY the right size and shape, and new lugs each time I try.

4awg × 3/8" lugs are on the way... ?
 
get a european caravan (camper) heater. they suck in from below the body, and exhaust through a stack at the top, they use no fans, and are freaking screwing hot.

In my camper (a netherlands "windmill 445 " the heater at its lowest setting int he middle of -15 c weather is OK. any warmer and I have to open the top vent of the camper to keep it from getting too hot.
\
Popup so cloth or plastic sides with no insulation? (sorry not up to speed on US campers) either way lots of air leaks I am sure compared to a hard side. it seems to me one of the European heaters would be the cats meow. no electricity needed! its all convection and even the sparker is a piezo striker so no batteries needed to even light it off.

just a thought.

BTW I made friends in england with a dude who strips caravans out for parts... just a thought.
 
I'm told it works, but I'd like my stuff to get cold BEFORE we get to the camp site, not a week AFTER we get home. ? Those absorption fridges are just so worthless and it's not like I won't have the power to spare to feed a real fridge for a couple days.
then it isn't working right, any adsorption fridge I have had (8 in the last 40 years) will freeze your pop overnight if you set it too low. I think you will be surprised at how much power thoes bar fridges actually take to run. I have 480 watts of solar and 235AH of usable battery power (yes I know you will have over double that but in 24 hours running nothing else but the odd light when I tried to run the bar fridge in my outdoor kitchen as a test I had to turn it off so the solar could recharge the batteries that were getting very low. leave the absorption fridge in place and learn how to use them properly and save your power for the other things you want to use. Sometimes you may need to add a little fan to them to make them even more efficient.
 
get a european caravan (camper) heater. they suck in from below the body, and exhaust through a stack at the top, they use no fans, and are freaking screwing hot.
OK, I need everyone to sit down. Calm yourself. Maybe fix a stiff drink. I have something shocking to tell you...

Yes, I'm as sane as normal...

No, I'm not being held at gun point...

Yes, I've thought about it a lot and I've decided...

I'm NOT going to install a Diesel heater.

It's OK, it's OK, relax. I know nobody here would ever expect those words to come out of my keyboard, but it's true. The one that's in there is rated for 36,000BTU and works just fine so I'm going to leave it alone other than a tune-up and replacing the thermostat just because I hate the little power switch that's on it.

Really, I'm fine. ?

then it isn't working right, any adsorption fridge I have had (8 in the last 40 years) will freeze your pop overnight if you set it too low.
I've had many absorption fridges in my life and while they will get cold, they never get cold quick. When I was a kid we had one that we'd take camping and we'd have to start it a couple days before we left and it would be OK, but every time you opened the door it was another hour or two before it got back to temp. The old fridge at my camp we'd fire up Thursday night when we got there but wouldn't hit temp until Saturday afternoon. Maybe the 5 or 6 I've dealt with in my life have all been bad, but they've all been bad so a mini-fridge just seems to be the best way to go. Besides, a full size fridge is about 1Kwh/day so this little guy should be significantly less than that.
 

diy solar

diy solar
Back
Top