diy solar

diy solar

2nd JK BMS dead

hardtop

New Member
Joined
Sep 13, 2020
Messages
199
Location
Las Vegas, NV
I had the JK 200A 1A BMS working while overlanding but when I got home the BMS won't turn on. I might have disconnected one red wire from the last positive end and reconnected it. Would that kill the entire BMS? I tried disconnecting and reconnecting the wire plugs, pushing the power button, scanning the Bluetooth app and it is dead. Any ideas?
 
I tried disconnecting and reconnecting the wire plugs,
The wire plugs? The balance wires?

I would disconnect B- an P- too. Then connect just the balance leads.

Any bluetooth light or sign of life?
1) Disconnect bluetooth dong if possible and reconnect.

2) Touch B- and P- together.

I might have disconnected one red wire from the last positive end and reconnected it.
Shouldn't be a problem, it just shows as zero volts on the last cell.

Happen to have a pic? 4S?
 
Last edited:
I had tried disconnecting the balance wire plug as well as the power switch wire plug.

Also tried disconnecting the B- and then connected the balance leads then hit the power button and no lights or sounds at all. Also tried touching a wire to B- and P- and turning it on. I checked the voltage and it has 13.1V.

Its a 3S-8S 200A 1A active balancer
DEcQSob.jpg
 
I checked the voltage and it has 13.1V.
Thats voltage at P- ?

Did you disconnect bluetooth or is that built in? If you have same voltage at B- and P- the BMS is alive, and all cell voltages within range (balance leads good).

Possibly bad bluetooth.

Thats all i got.
 
Thats voltage at P- ?

Did you disconnect bluetooth or is that built in? If you have same voltage at B- and P- the BMS is alive, and all cell voltages within range (balance leads good).

Possibly bad bluetooth.

Thats all i got.
That was voltage at the cells only. I tried measuring the voltage at B- and it reads 13.1V. The measurement at P- shows 6.7V so it sounds like the BMS is stuck off or broken?
 
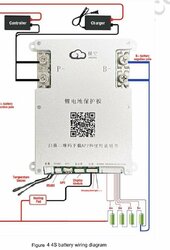
With B- (double BMS terminal) connected to the battery’s most negative ( same as the little black wire) and all appropriate balance leads connected, the bms should be ready to start. With the battery NOT in circuit ( open/no load, breaker open or fuse out ) you can start the bms with a multi meter set to diode test. Touch red test lead to bms double terminal B- and black test lead to double terminal P-. You should hear the beeps as it starts.IMG_1291.jpeg
 
I am not familiar with this "specific" model but:
1) If cells (any) are below 2.50, the BMS will not start up as it is below LVD.
2) If it disconnected because of LVD you will need a Charge going to the battery 1st to boot it. Put a charger on there with at least 12.0V
3) I am not sure if this model requires the old 9V Battery Boot to wake it like some of the other models. Maybe someone with THIS MODEL can verify that.

BOOT BMS with 9V This applies to JK-BMS Standard Models with 1A or 2A Active Balancing.
TOUCH the POSitive side of the 9 volt to the B- Terminal of the BMS. Then TOUCH the NEGative side of the 9 volt battery to the P- lead of the BMS.
It only requires a quick touch to initiate. Less than 2 seconds.. Hense the word TOUCH !
 
No problem, you’re not the first and won’t be the last with that trap. 😉
Sorry op, you were lucky, please be careful! I don't know how there aren't more battery disasters on here when people don't even look at the manuals or diagrams before wiring together and trying to turn high current capable battery banks on and off! RTFM no? 🤷‍♂️
 
Sorry op, you were lucky, please be careful! I don't know how there aren't more battery disasters on here when people don't even look at the manuals or diagrams before wiring together and trying to turn high current capable battery banks on and off! RTFM no? 🤷‍♂️
Yes, I am lucky. I cheated death and I'm grateful to be here to talk about it.
 
Where are your ring lugs for the balance leads?

You had this working then lost one of the two leads under cell 4 that provided power to the BMS

Get ring lugs for the balance leads otherwise bad thing will happen.

Also this hardly looks “overland” rated, I’d keep it in your tent until you obtain a better case to minimize any more stray wires getting yanked out.
 
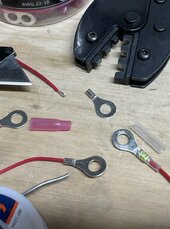
I think op was in a hurry just to see the thing work😉and hopefully go back and do it right after proving out. The one thing to remember is on these small lugs is to get a good crimp. They have a surprisingly high failure rate. I removed the heat shrink or buy non insulated to get a good crimp. I fold the wire over to get a tighter fit. After crimping, a dab of 60/40 solder to plug the barrel opposite of where the wire exits to keep moisture out because the heat shrink can’t quite seal the end. IMG_1292.jpeg
 
Its a V1 DIY pack and I'm on the 3rd BMS I've had for it. I did have proper connectors/terminators, but they went back with the wire when I returned the last JBD BMS.

I'm going to re-design the box so that the inverter can be mounted to it vertically as well as mounting 12V cigarette lighter sockets and anderson connectors to a) connect another DIY pack to increase 12V capacity and b) quck connect a charger. The plastic turned out to be too weak too. I also need to install cell seperators.
 
I think op was in a hurry just to see the thing work😉and hopefully go back and do it right after proving out. The one thing to remember is on these small lugs is to get a good crimp. They have a surprisingly high failure rate. I removed the heat shrink or buy non insulated to get a good crimp. I fold the wire over to get a tighter fit. After crimping, a dab of 60/40 solder to plug the barrel opposite of where the wire exits to keep moisture out because the heat shrink can’t quite seal the end. View attachment 197252
And here I am thinking I was being obsessive when I also folded over the strands over to get a decent crimp. Well done!
 
And here I am thinking I was being obsessive when I also folded over the strands over to get a decent crimp. Well done!
All it takes is that one early failure and vow I’ll never do that again. Now I’m OCD when it comes to terminals.
 
Back
Top