diy solar

diy solar

Another Cargo Trailer setup.

jasonhc73

Cat herder, and dog toy tosser.
Joined
Oct 1, 2019
Messages
1,921
Location
Wichita, Kansas
This is now officially a legitimate sickness.

My 4th off-grid system:
The players:
2021-01-31 (3).png
This setup is actually cheaper than going with a PWM Hybrid all in one unit 48V unit. I have AC input to charge the 48V batteries with shore power. (The 21.99 charger) A way more than I will use MPPT battery charger, and a 48V inverter, again far more output than I have any intention of using.
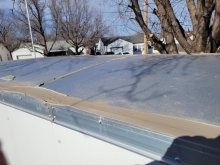
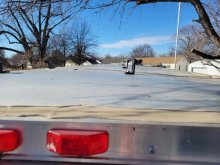
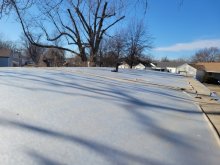
The panels:
4 of these:

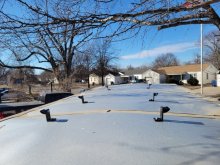
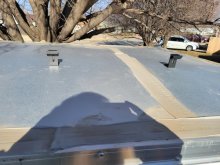
The roof-mounted hardware;
Very similar to steel unistrut, but lightweight aluminum and heavy-duty. All in one kit.

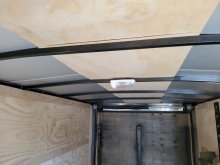
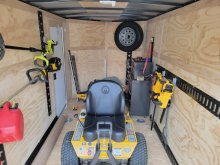
The 6x12 enclosed trailer:
2021-01-31 (2).png
And the batteries:
IMG_20191211_201914903.jpg

The #1 priority of this entire setup is to trickle charge the lawnmower battery that lives in the trailer. Next is to power two LED overhead shop lights, and lastly to charge all my DeWalt batteries. I have an electric weed whacker(DeWalt 40V), an electric edger (Ryobi with Dewalt Adapter), a hedge trimmer, chainsaw, and pole chainsaw, all Dewalt 20V.

This year (summer 2021) if the stars line up right and all goes as planned I'll probably have an electric ZTR in there instead of my Walker B19.

I once had a Hustler Zeon, ZTR. It was a great mower, but the technology was still lead-acid and it ate the batteries like candy.
 
Last edited:
Step 74 of 36,000 done.


I chose to go with the Tamarack Solar rail system. This complete kit except for the bolts that hold to the roof has all the parts in one nice package.

PS - The EGO Z6 is getting released for near mortals to buy next week. I have a hole in my pocket about to burst into flames for it. The reviews of this EV mower are very high.
 

Attachments

  • 20210224_154655.jpg
    20210224_154655.jpg
    119.2 KB · Views: 67
  • 20210224_154153.jpg
    20210224_154153.jpg
    86.5 KB · Views: 60
  • 20210224_151309.jpg
    20210224_151309.jpg
    57.6 KB · Views: 59
  • 20210224_154151.jpg
    20210224_154151.jpg
    83.4 KB · Views: 56
  • 20210224_154652.jpg
    20210224_154652.jpg
    84.2 KB · Views: 58
  • 20210224_154601.jpg
    20210224_154601.jpg
    77.4 KB · Views: 62
Looking good !

I’ve been looking at that Tamarack system for a project.

How bad was the shipping cost?
 
Looking good !

I’ve been looking at that Tamarack system for a project.

How bad was the shipping cost?
About $50 from where ever they drop shipped it from. It took quite a while to get here. Solaris-Shop is in Colorado and I'm in Kansas. It took 9 days for delivery. Had they actually had it in stock and shipped the next business day, 2 days max.
 
Rails installed.

Kind of a bummer they sent the black ones, but I didn't specify and the price was right.

I tell ya, any purpose-built rail kit is worth it for its integration and the time it saves you. These things went together with zero fuss and practically no thinking. I've done the electrician unistrut/superstrut and it works fine, but you really have to make it work sometimes. This stuff has absolutely zero issues and since it's aluminum it is super easy to cut and itis lighter.

This particular kit is a 4-panel kit, it has 4 seven-foot-long beams and an internal splice. Shown in my photos are 14 feet. My panels are 39" wide which is 13.1 feet with the panels touching, add about 1.5 inches for the panel clamps in between. I will have a little bit of overhang on each end of the trailer. This kit has hidden clamps for the ends that clamp the panels from the underside and super easy to tighten down from the end of the rail.
2021-02-26 (1).png2021-02-26.png
I'll probably be mounting the inverter and MPPT controller inside the trailer this weekend. As long as I can find a nice "Round2it".?

PS - I have decided on the Cub Cadet ZT1 42E over the EGO Z6.
#1 the Cub Cadet has a 60AH battery, the Z6 comes with 40AH.
#2 the Cub has a local dealer that I am buying from, instead of the big box store.
#3 The Cub Cadet is $500 less, but if you count the battery size and add $800 to the EGO to make it have 60AH, then the Cub is actually $1300 less.

I really do like the EGO line of battery-powered stuff, but I already have a complete line of Dewalt battery-powered stuff. Being able to use the EGO battery in any EGO tool is a great value if you have EGO tools. I can use my Dewalt batteries in Ryobi tools with the 20v/18v adapter, which I do with the Ryobi edger, it's a great edger!
 
Last edited:
I just was in Lowes today, they still do not have the EGO Z6, BUT the sign where the thing is going to sit on the floor is there!
(I am still leaning towards the Cub 42E)
 
About $50 from where ever they drop shipped it from. It took quite a while to get here. Solaris-Shop is in Colorado and I'm in Kansas. It took 9 days for delivery. Had they actually had it in stock and shipped the next business day, 2 days max.

I contacted that retailer quite a few months ago when I was trying to figure out my options for installing panels on my RV roof. Despite them being local to me, none of the stuff that I wanted was actually local. :(
 
Today I rearranged all my stuff in the trailer.
The next step is to mount the electronics.
See the spot to the left of the spare wheel to the left, that is where all the electronics are going.
 

Attachments

  • 20210304_153618.jpg
    20210304_153618.jpg
    89.7 KB · Views: 61
I just received the last two parts for my trailer build, another battery balancer, and the MOWER! ? Never mind the Cub Cadet, it won't be out for at least 2 more months.


20210329_192102.jpg
 
Last edited:
Batteries installed, balancers balancing, and part of the inverter temporarily installed. (The inverter looks weird in the picture, but it shows to the eye 49.9VDC and 123VAC
20210401_174148.jpg20210401_172832.jpg20210401_172808.jpg20210401_172724.jpg20210401_172709.jpg
 
What do you think?

The left side will be the (+) and the right the (-).

The left has the circuit breakers and the main dc switch (top left).

The right has the shunt box and meters. (bottom right)

Still waiting for the din rails for the circuit breakers and 4 to 1 terminal blocks.

20210403_163553.jpg

48v setup, 2 48v batteries, I won't ever see more than 18 amps per battery. The EGO mower has a 1600 W charger.
 
Looks good now. Just wait until the wires go in, then it won't.
smile.gif


What are the details on those breakers?
 
Expanding foam ='s perfect fit everytime.

20210404_154333.jpg

Put the panels on the roof then connect the wires and done!
20210404_154322.jpg20210404_154313.jpg

Panels installed;
20210404_191609.jpg20210404_191706.jpg20210404_191623.jpg20210404_191723.jpg

And wired in. (all connected with 82VOC at sunset)
I ran out of light, and all that is left is the connection to the battery from the MPPT.
20210404_201535.jpg
 
Last edited:
Done.

This MPPT charger is very simple, a little wonky to set up, but configurable enough to work with whatever battery chemistry you have. You get set the top and bottom cut off and recovery points.

These LiFePO4 batteries are very used BYD packs. Each pack has about 3.0 to 4.5 kWh and ~24V. I have four configured as 48V for roughly 8 kWh of energy. I have two 16S two amp balancers, one for each 48V battery. I do not have a BMS. The "Sunny Sky" MPPT has a temp sensor.

These batteries were last charged nearly two months ago. Their "self-discharge" was from roughly 51.5V to the 49.54V shown. As soon as I flicked on the solar panel switch the MPPT started charging the batteries.


2021-04-05 (3).png2021-04-05.png

The mower has ~2 kWh of battery. The sun can charge the trailer batteries with about 4 kWh a day. Even parked under the tree like it is, it still gets plenty of solar energy.

20210405_101821.jpg20210405_101815.jpg 2021-04-05 (1).png

The next step in this build is overhead lights and mounting the charger for the mower.
 
Well, it's already time to do version 2.0 with the inverter/charger.

Unfortunately this 2000w inverter cannot do 1600w continuously, for the mower charger.

So I'm swapping out the MPPT and inverter for a MPP Solar LV2424.

Now that I have "Solar Assistant" and get some real nice charts and graphs, remotely even. I am quite excited for the swap out.

As seen through the eye of my Wyze cam;
Screenshot_20210415-235234_Wyze.jpg
 
I barely got the light up in time for sunset.

Batteries, Balancers, Inverter/Charger,
20210417_213000.jpg

The "Panel", a 10 awg extension cord with 3 outlets from Harbor Freight. And the MPP-Solar LV2424
20210417_212944.jpg20210417_212938.jpg

The solar circuit breaker, battery switch, and battery circuit breakers. 2 AWG from the batteries and 1/0 AWG to the inverter/charger.

20210417_212928.jpg20210417_212922.jpg

4 BYDs, Plug-N-Play plug I made and four 2 amp cell balancers.
20210417_212917.jpg20210417_212855.jpg

I have to figure out a better place for the Wyze Cam.
Screenshot_20210417-223135_Wyze.jpg

I have a Raspberry Pi for the data on the inverter also. Solar-Assistant.io is great.

The next phase is to make a cabinet panel/shelf thing to basically hide the wires and cover the battery terminals.
 
This was pretty painless the second time around with Solar Assistant.

2021-04-17.png

I even put a smart switch on the light.
At idle, the LV2424 is showing ~6-8 watts load. That would be the camera, the raspberry pi, and the smart switch for the light.
With the light on, it shows ~46-49 watts!
 

Attachments

  • 2021-04-17 (1).png
    2021-04-17 (1).png
    274.3 KB · Views: 26
Looks awesome you're way ahead of me I just got my solar array up today I'm going to do more wiring the inverter and then I'll get the batteries and see what happens great job on the inverter glad you're happy have a sunny day
 
Back
Top