diy solar

diy solar

Battery box

Joined
Nov 8, 2019
Messages
145
Hello, I am doing my first build. On order are 4x280ah xuba batteries, overkill 4s bms, and I am going to use 2/0 awg battery leads inside the battery. What I would like to find is a battery case that looks professional and a recommendation on a non conductive sealant to put over the battery pack leads to prevent shorts. This unit will be in a motorhome and will get bounced a bit so I am looking for a tight fit with a height max of 9.5 inches including the battery posts. Thanks for any help I can get.
 
A "Battery Box" should be easy, if you need one other than your typical #24 or #27 box they sell at Walmart.
1.) EASY - 1x2 boards and 1/2" Plywood. Use Wood Glue and Screws to build your basic box, allowing extra space to add some cut up floor mats (Harbor Freight, LOWE's, etc.) to absorb the bumps. Upgrade to epoxy glue for more joint strength.
2.) MODERATE - 1 1/2" angle iron and POP Rivets for the frame. Will have to drill pilot holes through the angle iron to screw on the Plywood. Not sure how well the glue hold on the angle iron.
3.) HARD - Use a pattern, like an old ice chest, and grease it up good. Build up 8 - 10 layers of fiberglass/epoxy over your pattern and pull off the pattern.

The floor mats come in many different colors, so matching colors may require purchasing several packs. Use some type of solvent to clean the mats before you glue them in place.

As to sealing your electrical lines, how many times have you watched the "FLEX SEAL" commercials???
 
Hi,

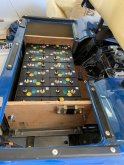
Well, I finally placed my cells into the golf cart. I put insulators over the threaded rod to avoid potential damage to the ends of the cells. These are 16X 280AH cells are replacing a set of Trojan T875 FLAs. Weight of batteries dropped by about 170 lbs. I followedIMG_1037.jpg the guidance from other members on mounting the cells including 1/8" spacers. I have a sheet of plexiglas to place over the terminals when done. I'll place the Chargery BMS16T on top of the plexiglas. Now all I have to do is all the wiring :)
 
Thanks Grump. I have plenty of flex seal in spray can and regular can along with flex tape. HAHA. Thank you for reminding me. That will be an excellent protector! I was gonna use thermabond tape but the flex seal will definately work better. I do have some foam floor mats for insulation so thats that. Thank you so much.

Tony, that setup looks really good. Making me wish I would have ordered 8 cells and not just 4, Good luck with the rest of your build. I do plan on using a piece of plexiglass for the bms myself and some tape to create space between the cells. Definately, thank you for sharing.
 
Hi,

Well, I finally placed my cells into the golf cart. I put insulators over the threaded rod to avoid potential damage to the ends of the cells. These are 16X 280AH cells are replacing a set of Trojan T875 FLAs. Weight of batteries dropped by about 170 lbs. I followedView attachment 16819 the guidance from other members on mounting the cells including 1/8" spacers. I have a sheet of plexiglas to place over the terminals when done. I'll place the Chargery BMS16T on top of the plexiglas. Now all I have to do is all the wiring :)
You will be able to line that up aside Will's Tesla and um well at least dream of blowing his doors off. LOL Looks great And I am curious as to how much more power you get vs the old batteries.
 
I also like the golf cart set-up. Plexiglas cover over the terminals is a nice touch. Only comment is to add a 1x2 strip to the plywood on either side so as to have a place to mount the plexiglas. Drill the pilot holes in the 1x2's and the plexiglas together to insure that the screws will line up.
 
Hi,

Well, I finally placed my cells into the golf cart. I put insulators over the threaded rod to avoid potential damage to the ends of the cells. These are 16X 280AH cells are replacing a set of Trojan T875 FLAs. Weight of batteries dropped by about 170 lbs. I followedView attachment 16819 the guidance from other members on mounting the cells including 1/8" spacers. I have a sheet of plexiglas to place over the terminals when done. I'll place the Chargery BMS16T on top of the plexiglas. Now all I have to do is all the wiring :)
The shunt will get quite hot at times so maybe mount it on spacers to allow a bit of air flow and prevent setting the board on fire.
 
I also like the golf cart set-up. Plexiglas cover over the terminals is a nice touch. Only comment is to add a 1x2 strip to the plywood on either side so as to have a place to mount the plexiglas. Drill the pilot holes in the 1x2's and the plexiglas together to insure that the screws will line up.
Thanks Grumpy. Good suggestion on mounting the plexiglas.
 
The shunt will get quite hot at times so maybe mount it on spacers to allow a bit of air flow and prevent setting the board on fire.
pierre, thanks for the warning. I don't think the bolts are long enough for the spacers, so I'll have to get those in addition to the spacers.
 
The quick and dirty method.

For cell compression plates. Use 2 plastic cutting boards from your favorite megamart. Cut and drill for 4x 1/4" threaded rods, clamp together. Plywood works as well, typically 3/8 works great. I suggest washers under the nut heads.

Make a plywood box out of 1/2" quality plywood. Use right angle brackets and glue the joints. Another option is pocket screws (Kreg jig) and glue. Put the clamped pack in the box. Secure with wood blocks, or with a tight strap in 2 locations.

The typical plastic boxes are too thin for metal cases cells like that (in my opinion). At least for a mobile application. If you really want to use one, I suggest using firm closed cell foam to wedge the pack in the box. Another option is 1/4" plastic or plywood inserts floating in the box.

If you have a protected area already, you can mount the clamped pack into the cabinet/compartment directly. Ensure the pack is protected from moisture/spills/spray, leaks.

Pack leads can be insulated with liquid electrical tape and heat shrink tubing. If you think there is a any risk of the pack bouncing and hitting anything (conductive or not), then your pack IS NOT secured properly. There should be no relative motion between the pack and anything around it. Even if you insulate the leads really well (which is a good idea regardless), if the pack is moving in its enclosure, then vibration damage, loose fasteners, etc, will eventually be a problem.
 
Thanks Luthj. Yeah, safety is my biggest concearn. These are going on a motorhome under step configuration so these must go in a weatherproof and solid box. I kind of like the Noco battery box but see some actual boxes on ebay. About $110 on there but are waterproof.

How about this as a crazy question. I go to the mountains and high desert areas when I get a chance to go. Winter weather can be freezing. Has anyone added heat blankets for low temp protection?
 
Keeping cells warm long term without an insulated box needs a fair bit of power. A box insulated with 1/2-1" of XPS foam doesn't need much heat.

There are RV tank heating pads which will work. Another option is a ~60W 12v heating pad. Hook that up to a 12V thermostat (Amazon for 20$).

Lithium batteries can be discharged at low temps, its the charging that gets you into trouble.
 
Thanks for the information once again Luthj. Is this heating pad something I can plug into the output terminal of my solar charge controller? I would be discharging at night and recharging during the day. If I can use the charge controller for the power then its almost a zero loss for me I think.
 
Thanks to the virus, local recycling center is shut down. Got me thinking about what to do with empty gallon milk jugs. As these are made from High Density Polyethylene, (HDPE), remembered that during WWII that HDPE was a "classified material" because of it's use for electrical (RADAR cables) insulation. HDPE is still used for some electrical wire insulation even today. Sooo... Cut up gallon milk jugs are a cheap source of insulation, but need to keep it below about 212`F. Just a quick FYI.
 
Maybe you can check on Nema boxes, for around $100 - $150USD you can get a 30x30x20CM box, wich its full metall, Ip65 (weatherproof) and have enough space for 4x280AH cells + conections and BMS.

You can even do some holes to mount an screen for a battery monitor and it would look quite nice.

3D Model:
1594746588307.png
 
Thanks to the virus, local recycling center is shut down. Got me thinking about what to do with empty gallon milk jugs. As these are made from High Density Polyethylene, (HDPE), remembered that during WWII that HDPE was a "classified material" because of it's use for electrical (RADAR cables) insulation. HDPE is still used for some electrical wire insulation even today. Sooo... Cut up gallon milk jugs are a cheap source of insulation, but need to keep it below about 212`F. Just a quick FYI.
Thanks Grumpy. Thats a great idea. I am probably going to use the two cans of flex seal I have and make a form covering with it. I am afraid to open the cans as they have been on my shelf for a few years.
 
Maybe you can check on Nema boxes, for around $100 - $150USD you can get a 30x30x20CM box, wich its full metall, Ip65 (weatherproof) and have enough space for 4x280AH cells + conections and BMS.

You can even do some holes to mount an screen for a battery monitor and it would look quite nice.

3D Model:
View attachment 17500
Excellent. Thank you. I will definately have a look. I have a few ideas now. My batteries are under my steps and exposed to dirt and other matter. Made it super easy when I added solar but not real efficient otherwise. I appreciate all these suggestions so much.
 
Please post pictures when you are done. Interested in seeing how your finished battery box looks. Think that many folks would also like to see the finished battery box, with details.
 
Thanks Grumpy. Good suggestion on mounting the plexiglas.
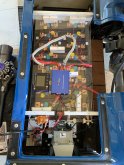
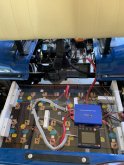
Well, I completed my golf cart battery (16 EVE 280AH.) I made a plexiglas cover and mounted the Chargery on top of it with velcro. That makes it removable and added space for air flow below. As pierre suggested, I increased the space for the shunt. The charger is an Elcon 1.8KW unit capable of up to 25 amps if using 240V. The cart can go 25 MPH and draws ~150A when going up hills. I went about 10 miles in our community today, and Chargery reports I'm still at 90%. I'll should be able to go a couple days on a charge!
 

Attachments

  • IMG_1111.jpg
    IMG_1111.jpg
    161.1 KB · Views: 119
  • IMG_1112.jpg
    IMG_1112.jpg
    145.3 KB · Views: 115
Please post pictures when you are done. Interested in seeing how your finished battery box looks. Think that many folks would also like to see the finished battery box, with details.
Well, I completed my golf cart battery (16 EVE 280AH.) I made a plexiglas cover and mounted the Chargery on top of it with velcro. That makes it removable and added space for air flow below. As pierre suggested, I increased the space for the shunt. The charger is an Elcon 1.8KW unit capable of up to 25 amps if using 240V. The cart can go 25 MPH and draws ~150A when going up hills. I went about 10 miles in our community today, and Chargery reports I'm still at 90%. I'll should be able to go a couple days on a charge!
Nice job , Tony.
 
Back
Top