Noordsolar
New Member
- Joined
- Aug 2, 2020
- Messages
- 56
Can anyone recommend a Bluetooth range extender for the JK bms ? Currently all the extenders cater for audio data and don't know if they will work with the JK BMS


 aircable.co
Any other equipment, such as an arduino or raspberry pi that could take the place of the victron cerbo? As the cerbo is about 3 times the price of the jk bms!I have a different solution - I am using dbus serial driver ( https://github.com/Louisvdw/dbus-serialbattery ) which is running on a Victron Cerbo . With this I can monitor all the cell voltages via Internet , just cannot issue any commands.
I know nothing about doing that though.. Would i need to do any programming, as the last time i did any was 20 years ago (turbo pascal and c++ lol).. Or is it just a matter of copying and pasting other peoples code? Thanks ?you can use rasbery pi. I already have a cerbo as its part of a Victron system
Oh ok thanks.. Ive seen many of his vids, not that one though.. Ill have a look.. ??copy other peoples code refer to this channel and more specically this video
Is there an app which can be installed to view the details from the phone.copy other peoples code refer to this channel and more specically this video
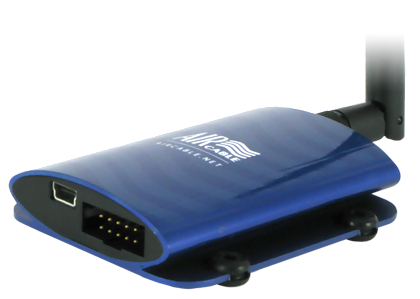
I’d want to extend Bluetooth range from jk to android cell phone. Does that $129 extender do that or is a computer neededIm now looking into this myself, of you dont mind the price, this may work:
AIRcable Bluetooth 5 Range Extender
Extend the range to existing Bluetooth devices. Boosts range for speakers, headsets, sensors, instruments and iBeacons up to10 times the usual reach.
If your ok with taking apart the bms, this will probably work? - presumably you may need a different type of antenna for ble?
My other idea was to use an old phone connected to the bms via bluetooth but also in range of wifi, then use a phone mirroring app to send the phones screen via wifi to my phone in the house.. Wont be able to actually alter the settings, but still view them. - UNLESS - another idea just popped into my head.. - if there is an android app that allows remote access, could access the phone near the bms via wifi to view and change settings...
Do you get all 4 cell voltages in VRM now?I have a different solution - I am using dbus serial driver ( https://github.com/Louisvdw/dbus-serialbattery ) which is running on a Victron Cerbo . With this I can monitor all the cell voltages via Internet , just cannot issue any commands.
that would be the victron VRM appIs there an app or something which can be installed to view the details using louis system.
Hello,Yes, got esphome reporting to mqtt. You could end it there if you were just interested in raw numbers but you can make more useful graphs by combining telegraf, influxdb, grafana. See here: https://diysolarforum.com/threads/b...-maximum-deviation-and-more.63129/post-788232
Downloads$ esphome version
Version: 2023.4.1# Modified by octal-ip to support MQTT and an external active balancer.
# Based on the excellent work of Sebastian Muszynski: https://github.com/syssi/esphome-jk-bms
substitutions:
name: jk-bms
device_description: "Monitor and control a JK-BMS via bluetooth"
mac_address: C8:47:8C:EC:xx:xx
protocol_version: JK02_32S
esphome:
name: ${name}
comment: ${device_description}
project:
name: "syssi.esphome-jk-bms"
version: 1.4.0
esp32:
  board: esp32-s3-devkitc-1
  variant: esp32s3
  framework:
    type: arduino
    #version: 2.0.3
    #platform_version: 5.1.1
    #type: esp-idf
    #platform_version: 4.4.0
    #sdkconfig_options:
        #CONFIG_BT_BLE_42_FEATURES_SUPPORTED: y
external_components:
- source: github://syssi/esphome-jk-bms@main
wifi:
ssid: !secret wifi_ssid
password: !secret wifi_password
ota:
logger:
level: DEBUG
api:
mqtt:
discovery: false
will_message:
birth_message:
broker: !secret mqtt_host
username: !secret mqtt_username
password: !secret mqtt_password
topic_prefix: !secret mqtt_topic
id: jk_bms
log_topic:
topic: !secret mqtt_topic
level: WARN
esp32_ble_tracker:
ble_client:
- mac_address: ${mac_address}
id: client0
jk_bms_ble:
- ble_client_id: client0
protocol_version: ${protocol_version}
throttle: 2s
id: bms0
#binary_sensor:
# - platform: jk_bms_ble
# balancing:
# name: "balancing"
binary_sensor:
- platform: jk_bms_ble
balancing:
name: "${name} balancing"
charging:
name: "${name} charging"
discharging:
name: "${name} discharging"
online_status:
name: "${name} online status"
button:
- platform: jk_bms_ble
retrieve_settings:
name: "${name} retrieve settings"
retrieve_device_info:
name: "${name} retrieve device info"
sensor:
- platform: jk_bms_ble
jk_bms_ble_id: bms0
min_cell_voltage:
name: "${name} min cell voltage"
max_cell_voltage:
name: "${name} max cell voltage"
min_voltage_cell:
name: "${name} min voltage cell"
max_voltage_cell:
name: "${name} max voltage cell"
delta_cell_voltage:
name: "${name} delta cell voltage"
average_cell_voltage:
name: "${name} average cell voltage"
cell_voltage_1:
name: "${name} cell voltage 1"
cell_voltage_2:
name: "${name} cell voltage 2"
cell_voltage_3:
name: "${name} cell voltage 3"
cell_voltage_4:
name: "${name} cell voltage 4"
cell_voltage_5:
name: "${name} cell voltage 5"
cell_voltage_6:
name: "${name} cell voltage 6"
cell_voltage_7:
name: "${name} cell voltage 7"
cell_voltage_8:
name: "${name} cell voltage 8"
cell_voltage_9:
name: "${name} cell voltage 9"
cell_voltage_10:
name: "${name} cell voltage 10"
cell_voltage_11:
name: "${name} cell voltage 11"
cell_voltage_12:
name: "${name} cell voltage 12"
cell_voltage_13:
name: "${name} cell voltage 13"
cell_voltage_14:
name: "${name} cell voltage 14"
cell_voltage_15:
name: "${name} cell voltage 15"
cell_voltage_16:
name: "${name} cell voltage 16"
cell_voltage_17:
name: "${name} cell voltage 17"
cell_voltage_18:
name: "${name} cell voltage 18"
cell_voltage_19:
name: "${name} cell voltage 19"
cell_voltage_20:
name: "${name} cell voltage 20"
cell_voltage_21:
name: "${name} cell voltage 21"
cell_voltage_22:
name: "${name} cell voltage 22"
cell_voltage_23:
name: "${name} cell voltage 23"
cell_voltage_24:
name: "${name} cell voltage 24"
cell_resistance_1:
name: "${name} cell resistance 1"
cell_resistance_2:
name: "${name} cell resistance 2"
cell_resistance_3:
name: "${name} cell resistance 3"
cell_resistance_4:
name: "${name} cell resistance 4"
cell_resistance_5:
name: "${name} cell resistance 5"
cell_resistance_6:
name: "${name} cell resistance 6"
cell_resistance_7:
name: "${name} cell resistance 7"
cell_resistance_8:
name: "${name} cell resistance 8"
cell_resistance_9:
name: "${name} cell resistance 9"
cell_resistance_10:
name: "${name} cell resistance 10"
cell_resistance_11:
name: "${name} cell resistance 11"
cell_resistance_12:
name: "${name} cell resistance 12"
cell_resistance_13:
name: "${name} cell resistance 13"
cell_resistance_14:
name: "${name} cell resistance 14"
cell_resistance_15:
name: "${name} cell resistance 15"
cell_resistance_16:
name: "${name} cell resistance 16"
cell_resistance_17:
name: "${name} cell resistance 17"
cell_resistance_18:
name: "${name} cell resistance 18"
cell_resistance_19:
name: "${name} cell resistance 19"
cell_resistance_20:
name: "${name} cell resistance 20"
cell_resistance_21:
name: "${name} cell resistance 21"
cell_resistance_22:
name: "${name} cell resistance 22"
cell_resistance_23:
name: "${name} cell resistance 23"
cell_resistance_24:
name: "${name} cell resistance 24"
total_voltage:
name: "${name} total voltage"
current:
name: "${name} current"
power:
name: "${name} power"
charging_power:
name: "${name} charging power"
discharging_power:
name: "${name} discharging power"
temperature_sensor_1:
name: "${name} temperature sensor 1"
temperature_sensor_2:
name: "${name} temperature sensor 2"
power_tube_temperature:
name: "${name} power tube temperature"
state_of_charge:
name: "${name} state of charge"
capacity_remaining:
name: "${name} capacity remaining"
total_battery_capacity_setting:
name: "${name} total battery capacity setting"
charging_cycles:
name: "${name} charging cycles"
total_charging_cycle_capacity:
name: "${name} total charging cycle capacity"
total_runtime:
name: "${name} total runtime"
balancing_current:
name: "${name} balancing current"
errors_bitmask:
name: "${name} errors bitmask"
text_sensor:
- platform: jk_bms_ble
errors:
name: "${name} errors"
total_runtime_formatted:
name: "${name} total runtime formatted"
#text_sensor:
# - platform: ble_scanner
# name: "BLE Devices Scanner"
switch:
- platform: jk_bms_ble
charging:
name: "${name} charging"
discharging:
name: "${name} discharging"
balancer:
name: "${name} balancer"
emergency:
name: "${name} emergency"
disable_temperature_sensors:
name: "${name} disable temperature sensors"
display_always_on:
name: "${name} display always on"
- platform: ble_client
ble_client_id: client0
name: "${name} enable bluetooth connection"
number:
- platform: jk_bms_ble
jk_bms_ble_id: bms0
balance_trigger_voltage:
name: "${name} balance trigger voltage"
cell_count:
name: "${name} cell count"
total_battery_capacity:
name: "${name} total battery capacity"
cell_voltage_overvoltage_protection:
name: "${name} cell voltage overvoltage protection"
cell_voltage_overvoltage_recovery:
name: "${name} cell voltage overvoltage recovery"
cell_voltage_undervoltage_protection:
name: "${name} cell voltage undervoltage protection"
cell_voltage_undervoltage_recovery:
name: "${name} cell voltage undervoltage recovery"
balance_starting_voltage:
name: "${name} balance starting voltage"
voltage_calibration:
name: "${name} voltage calibration"
current_calibration:
name: "${name} current calibration"
power_off_voltage:
name: "${name} power off voltage"
max_balance_current:
name: "${name} max balance current"
max_charge_current:
name: "${name} max charge current"
max_discharge_current:
name: "${name} max discharge current"esp32:
board: esp32-s3-devkitc-1
variant: esp32s3
framework:
type: arduino
#version: 2.0.3
#platform_version: 5.1.1
#type: esp-idf
#platform_version: 4.4.0
#sdkconfig_options:
#CONFIG_BT_BLE_42_FEATURES_SUPPORTED: y


Would really like to see a video of this being doneI had the need, extend Bluetooth of JK BMS to be available in HomeAssisntant easy, cheap!
HA has connected USB Bluetooth with antenna using USB extender. https://www.aliexpress.com/item/1005004243854453.html?spm=a2g0o.productlist.main.17.4843678dqEQlTA&algo_pvid=6c94c5c2-aec6-4207-95d2-69207198b0a6&algo_exp_id=6c94c5c2-aec6-4207-95d2-69207198b0a6-8&pdp_npi=4@dis!HUF!4056.85!1398.54!!!11.11!!@2103200516997204350295051e1903!12000028504817955!sea!HU!0!AB&curPageLogUid=nHKQA5B59bTy
I installed Batmon https://github.com/fl4p/batmon-ha on HA.
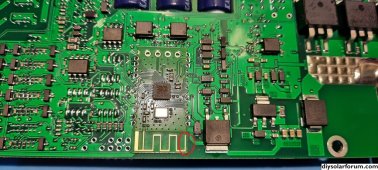
How to JK BMS
Open the JK BMs and you will see the BT. there gently clean the surface and solder ~22cm long thin cable (size does not matter ) to the end where is end of antenna, basically extend antenna to exterior. BMS case is metalic..so ..
You will notice that the BMS case has next to BT 5 small holes, so not need to drill the case, this is why you should use thin cable. For me it made the trick 3 walls.. stable BT signal, long distance.
View attachment 177181
View attachment 177189
I am building now dashboards ( I have 3 BMS 2 are Daly BMS )
View attachment 177183
you can see all details same as in JK mobile app..
View attachment 177186
You can build all kind of automation. I se it for safety smoke detector ( in HA ) is detecting smoke the I switch off BMS charge and discharge port among many other ..
Hope it helps