diy solar

diy solar

Building a PV Shedding Controller for AC Coupled Solar

wheisenburg

Independent Solar Consultant
Joined
Oct 1, 2022
Messages
307
Location
Lancaster County, Pennsylvania
Back Ground

I have an Enphase system with 35*350 watt panels. It uses the IQ8+ micro inverters at 295 watts each. So the total possible output is 10,325 watts. The actual maximum output is about 9000 watts. I have 7 panels that face east and 28 that face west. The slope of my roof is about 40 degrees so I will never have both set of panels producing the maximum amount of power at the same time.

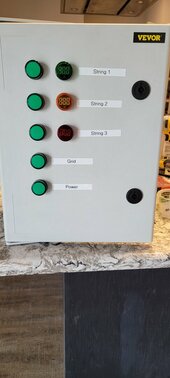
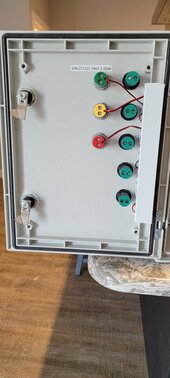
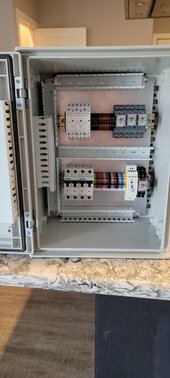
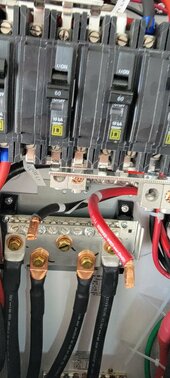
I added emergency backup capability to this system. It consists of 2 Schneider XW Pros, a PDP panel, and 3 Orient Power 5 KWH batteries. I had a main breaker installed just after the meter and before the "Main Loads Panel" at the time the Enphase system was installed. This allows me to disconnect the entire system so it can be safely worked on. I reconfigured the power flow through the system after the main breaker by adding a "Grid Panel". Currently, there are no loads installed in the Grid Panel. I do have surge protectors installed. This Grid Panel then passes through to the PDP panel. The PDP panel and the two large wiring conduits under the inverters serve as a central connection point between the incoming and out going AC, the inverters, and the batteries. The PDP panel contains circuit breakers and bus bars where everything can be wired together in one place. From there the power flows back to the Main Loads Panel. All the panel to panel wiring is 2/0 copper and is enclosed in 6 inch wire gutters.

The Schneider inverters are low frequency inverters. They have tremendous surge capability. They can put out a combined 24,000 watts. That's 480 DC amps. I am planning to eventually add 3 more batteries to my system, but right now the batteries are limited to about 300 amps. The DC system consists of dual 4/0 cables that connect to 600 amp bus bars. The individual batteries are wired with 2 #4 cables from the bus bars to the batter terminals. I ran the second cable mainly to be able to cover up the second set of terminals on the battery. Immediately after the positive DC bus each cable is routed through a class T fuse. There are 250 amp DC circuit breakers for each inverter and 100 amp circuit breakers for each battery. I was doing some load testing prior to installing the Easy Start on my A/C unit and the batteries faulted before the inverters as would be expected.

While these AC coupled systems work very well when they are connected to the grid, they are not really the best solution for Off Grid or Emergency Back up operation. A typical DC coupled system has the panels connected to charge controllers. Once the batteries are full, the charge controllers are designed to ramp down and only produce as much current as is needed to supply the current load. Micro inverters as well as other types of grid coupled inverters are designed to pump the maximum amount of power back into the grid. When these AC coupled PV inverters are running full blast that power has to go somewhere when you are off grid. So the inverter will direct that power into the batteries. Once the batteries start to become full, the inverter can raise its frequency which will cause the Grid Tied PV Inverters to ramp down their production.

This all sounds good. The problem occurs when a large load like a dryer, oven or AC system suddenly stops. It takes time to ramp down the production from the PV inverters. During that time the power will need to be pushed into the batteries. If the batteries are nearly full you could get voltage spikes in the system. Sol Ark and EG4 get around this by connecting the AC coupled Solar to the Generator input. This input has a relay that can be used to disconnect the PV when operating at a high SOC. Because of these issues manufactures make recommendations to limit the ratio of PV to inverter power, and PV to battery capacity. In some cases they even suggest that the maximum AC coupled PV be less than the DC coupled PV.
 
Last edited:
PV Shedding Controller

My solution to the problem was to build a PV shedding control panel.
Since my Schneider system doesn't use the Gen input, it cannot just disconnect the PV when the Battery SOC is high. I was able to accomplish the same thing by building myself a small control panel and driving the logic from the Aux relay ports on the Schneider. Each inverter has one Aux Relay port so I can program them separately. I use a 240 volt relay tied to the grid for an additional signal.

So basically when the grid is on run all the strings.
When the grid is off and SOC > x1, strings 1 and 2 turn off
When the grid is off and SOC > x2 string 3 turns off

For now, I am planning on x1 ~= 90% and x2 ~= 95%

The relay settings on the Schneider are a little more complicated than just raw SOC. They are sticky. So I can trigger at say 91% and release at 89%. This just keeps the systems from short cycling too much. I have 15 KWHs of storage so 2% is about 18,000 Watt minutes. If I am charging at 3000 watts it should take about 6 minutes to raise the charge level by 2%. After that it takes another 5 minutes for the micro inverter to requalify the AC.

The basic layout starting at the upper left and going clockwise is this:

  1. Three 25 amp NC contactors with 12 volt coils. The wiring going to each PV string is routed through the contactors. Energizing the NC contactor will open the connection and turn the PV string off.
  2. DC terminal blocks. These have buses for common, power on, grid on, and grid off.
  3. 12 volt Logic relays. When these relays are energized one pole of the relay will pass power through to the corresponding contactor causing it to shed to PV string. When not energized the other pole will pass power through to the indicator light on the front panel.
  4. 240 volt relay. This relay will sense that the grid is on. When energized it will pass power through to the "grid on" DC bus. When not energized it will pass power through to the "Grid Off" DC bus. The second pole of this relay is used to control the common for the logic relays. When energized the common is disconnected and none of the logic relays can be energized. When not energized the common will be connected allowing the PV shedding relays to work. The "Common" here originates in the aux output of the Schneider inverters. It is kept separated from the "Local" common.
  5. 12 Volt power supply. Goes to Local Common and Power On DC bus.
  6. Input terminal blocks. Power in, Grid in, and Aux Relays in.
  7. 1 amp AC circuit breakers for Power in, and Grid in.

It's not done yet. I have it further along than in this picture. It has indicator lights on the front panel and I even added a current monitor for each string. This should keep the AC coupled PV from over powering the system.
 

Attachments

  • 20240308_143258.jpg
    20240308_143258.jpg
    70.4 KB · Views: 17
  • 20240308_143316.jpg
    20240308_143316.jpg
    82.7 KB · Views: 17
  • 20240308_143321.jpg
    20240308_143321.jpg
    102.7 KB · Views: 17
Last edited:
are you concerned with contact arcing in the DC relay upon disconnect ? if so, how would you mitigate it.

I was bench testing AC coupling with an old M215 micro, with an AIO as grid-forming and a variable resistive (heater) load. With the 48vdc battery on the AIO reaching full capacity, it was surprising that the microinverter simply stop AC generation when the AC demand diminished and tapered to zero. Granted it the load was gradually lowered as opposed to a sudden switch-off. My guess is the AC voltage rised outside the micro's spec; but I plan to scope it out to confirm. Also, this test was done with just 1x M215; I am hoping it's representative with a string of them. I've heard of one user who accomplished with his entire roof top micro string
The relays in here are only used to activate the contactors and to power the LED indicators on the from panel. No I'm not worrying about them arcing.

In the case of the relays 12 volts is the spec for the coil. It is also being used as the control signals that are switched on and off. The contactors are what control the actual PV strings. A contactor as opposed to a relay is designed to handle higher current loads and voltages. Contactors are used in industrial applications to start and stop large motors. The actual contacts on the contactors I am using are rated for 25 amps and 240 volts. The 12 volts is the spec for the control coils that turns the contactors on and off. The actual load on the contactor is the 240 volt PV circuit. So we are using a small 12 volt control relay to turn the 240 volt PV circuit on and off. Typically industrial control panels will work with 24 volts, but my inverters only supply 12 volt DC output. So rather than having a mix of control voltages, I just went with 12 volts DC across the board. The "Grid On" relay being the exception has a 240 volt coil. The actual 240 volt grid signal turns the relay on and off. The signal being switched is 12volts DC that is passed on the other relays and the indicator lights. There are some relays, such as the ones for an air conditioner that use 24 volt AC to control the coils. These are cheap and will handle heavy loads, but in my case I wanted all DIN rail mountable components and I wanted 12volts DV as the control voltage
 
The contactors are what control the actual PV strings. A contactor as opposed to a relay is designed to handle higher current loads and voltages. Contactors are used in industrial applications to start and stop large motors.
link to contactor source ?
 
This all sounds good. The problem occurs when a large load like a dryer, oven or AC system suddenly stops. It takes time to ramp down the production from the PV inverters. During that time the power will need to be pushed into the batteries. If the batteries are nearly full you could get voltage spikes in the system.
Just curious, what's the worst voltage spikes you have seen in your system?
 
More progress. The box is on the wall. I use toggle bolts from home depot that have a 1/4 inch screw. They are rated for 137 lbs each.

1. Removed all the incoming wires from the Enphase combiner. These wires will now go through the load shedder first.
2. The L-Box has been moved to a shortened conduit. I carefully positioned the box so that the L-box and the pre-drilled hole line up. I left the distance just a little long since you don't need to bottom out the conduit. This should allow a small amount of adjustment.
3. I turned my house power off and disconnected the PV before starting work.
4. The hole in the side of the box.

For the wires between the shedder box and the combiner, I plan to just go from the top of the combiner into the bottom of the shedder. There are more wire runs to bring in the signals from the inverter and the "Grid On" from my Grid Panel. I need a source off non-backed up power to sense when the grid is down.

Using a relay to detect Grid-On and Grid-Off is less than perfect. The inverter uses a complex algorithm to determine when there is "Good AC". So I can detect complete power failures. If the inverter disconnects for some other reason, I can't detect that. Unfortunately, I am not aware of a better way to detect this. Maybe I could figure out where the signal to the AC1 relay is and use that. The thing is I'm trying to do something that does require any actual mods to the inverter.
 

Attachments

  • 20240316_153554.jpg
    20240316_153554.jpg
    57.5 KB · Views: 12
  • 20240316_153245.jpg
    20240316_153245.jpg
    138 KB · Views: 12
  • 20240316_153229.jpg
    20240316_153229.jpg
    49.7 KB · Views: 12
  • 20240316_153220.jpg
    20240316_153220.jpg
    72.7 KB · Views: 10
When the grid is off and SOC > x1, strings 1 and 2 turn off
When the grid is off and SOC > x2 string 3 turns off

For now, I am planning on x1 ~= 90% and x2 ~= 95%

  1. Three 25 amp NC contactors with 12 volt coils. The wiring going to each PV string is routed through the contactors. Energizing the NC contactor will open the connection and turn the PV string off.
  2. DC terminal blocks. These have buses for common, power on, grid on, and grid off.
  3. 12 volt Logic relays. When these relays are energized one pole of the relay will pass power through to the corresponding contactor causing it to shed to PV string. When not energized the other pole will pass power through to the indicator light on the front panel
it sounds like DC switching of different PV strings ?
 
Have you had issues with your BMS disconnecting due to cell high voltage?

I think you have a good solution, but haven’t actually seen anyone else with your problem.

With my BMS, when the first cell reaches balancing voltage, the current is already limited so the AC coupled frequency has started to ramp charging down. This allows headspace for removal of large AC loads etc.

When your battery is at fully charged (“float”) voltage, there is plenty of time to ramp down AC coupled inverters.

I haven't actually had any issues. We don't have power failures very often here. It is just when I have read information about the recommended ratio of AC coupled PV vs the battery capacity, I have a lot of PV on my system. This should allow me to make sure that the actual that is being used will not be too much when the batteries are nearly full.
 
I haven't actually had any issues. We don't have power failures very often here. It is just when I have read information about the recommended ratio of AC coupled PV vs the battery capacity, I have a lot of PV on my system. This should allow me to make sure that the actual that is being used will not be too much when the batteries are nearly full.
I think you are solving a problem that doesn’t exist. It is a cool solution though.
 
I think you are solving a problem that doesn’t exist. It is a cool solution though.
Perhaps, but I have more confidence that if I have a power failure in the middle of summer with the Air Conditioner cycling on and off, I'm not going to have any issues. I could have added 3 more batteries, but that's around $4500.00.
 
The Control Panel is now installed.

Notice the SOC is being maintained between 93% and 97%. Next I am going to turn off the PV and allow a deeper discharge to occur. Then I will turn it back on and make sure that all three strings will fire back up and quickly top the batteries back to 90%. I have it programmed to turn off strings 1 and 2 at 90% SOC. I am not seeing any effect of Freq/Watts modulation in this data. It appears that the panels are running at 100% when they are turned on. I had problems with the SOC recharge settings, so I just went with voltage based charging cycles. Because of that the inverters apparently target a voltage level vs SOC for the AC Coupled charging. This is true even though SOC is hitting 97% and my AC Coupled charging is set to 95%.

I have noticed that SOC of 100% does not actually mean the batteries are full. When I launch a charging cycle, the batteries come up to 100% SOC fairly quickly. Then in absorption mode they still accept a fair amount of additional current. Yet when discharging, a small amount of discharge will bring the SOC down to 99%. So obviously this SOC number is not exactly precise. That is part of my worry about allowing the AC coupled charging to regulate all this. I know that at 97% SOC, my batteries can accept the full current being produced by string 3. At 90% SOC they should be able to accept the current from all three strings. The max on my system is around 9000 watts on a perfect day. I have approximately 500 watts of "Always on" load. So I should see around 163 amps of charging on a prefect day. That's pretty close to a 0.5 C charging rate. On paper this works, but at what SOC would the Freq/Watts kick in and would the batteries still accept 163 amps up to that point? Well I am going to cut all PV now and let the system drain the battery for a while. Maybe I will start my drier on a timed cycle.

String_3_Cycling.png20240320_165157.jpg
 
Last edited:
In the 1/4 of this graph, I was running my dryer and a small oven. The inverters cranked out 8-9 KW with no problems. This drained the battery down fairly quickly. So I turned the dryer off. By this time SOC was down to 75%. My controller correctly called for all 3 strings to run. So the second 1/4 of the graph is showing positive spikes where all the Micro PV came on and started charging the batteries. The third 1/4 of the graph shows a single string charging the batteries. Notice the low charging current and very gradual increase in SOC from 72 to 75. In the last 1/4 there are two spikes from trying to charge using two strings. These both kicked off all the the Micro PV. Finally the last section of graph is the start of a standard AC charging cycle from the grid. All strings are now on and producing power. I have noticed that my amp meters are indicating a fraction of an amp of current on each string when the PV string is active (connected to AC), but not producing power. Now 0.8 amps at 240 volts would normally be around 200 watts each. I'm not sure what is going on with that either.

This is where I have a problem.

With a single string the system is running perfectly. As soon as I try to add a second string or third string, all the solar clicks off and it won't start again until I power cycle the inverters on that string. So why does this happen? I am not completely certain. I am operating my system in voltage mode rather than SOC because I ran into issues trying to use the SOC. When using voltage the freq / watts function that curtains PV production is driven by battery voltage. So maybe the DC voltage is going too high causing the inverters to cut off. I am not seeing this in the information that the Schneider is logging. Perhaps the resolution is too low. I am also wondering if the "Maximum Rate of Charge" is getting enforced and PV is curtailed to prevent that. Now during on grid operation, I am fine with just slowly charging the batteries up. I have noticed that when these PV inverters turn on, it seems like they used to slowly ramp up over a period of a minute or so. Now they click on all at once. Maybe that is part of the recent firmware upgrade.

I can try setting the charging voltage up while doing the same test. If this works, maybe I will try to make the SOC recharging work. Schneider does recommend using SOC control when AC coupling. I can also try to adjust the maximum charge rate.running_dryer_solar_quits.png
 
Last edited:
I think you are solving a problem that doesn’t exist. It is a cool solution though.

SMA recommends 100 Ah (at 48V) of battery per 1kW of AC coupled PV.
They also recommend minimum 100 Ah per 6kW battery inverter.

If AC coupled PV is supplying a load that suddenly shuts off, battery inverter has to shove that power into battery for a couple seconds, causing battery voltage to rise. For a lithium battery, don't want BMS to disconnect. Therefore a capacity vs. PV ratio seems reasonable.

I have AGM, and about 1/3 or 1/4 of recommended Ah vs. PV kW. AGM accepts high charge current, also I don't have large load dump.
I’ve set up dozens of systems with SMA that have between 2 and 4 kw PV / 100ah of LiFePO4. There have been zero issues to date. The way the REC-BMS works with the Sunny Island means that there cannot be a scenario where the battery is full AND fully charging, the Sunnyboys are well ramped down before the battery is full.

I know Pylontech and BYD batteries also have the same characteristics. I think using the BMS to control this issue is simpler than what the OP is doing.

Each to their own, I was posting as comment on the situation as I have heard concern from others about effects of ramp down speed at full charge. It seems to be a theoretical issue rather than a practical issue. I’m keen to hear if anyone has had BMS high voltage disconnects due to this issue as I’ve not heard of it actually happening.
 
Back
Top