rin67630
Solar Enthusiast
My project Victron_VE_on_Steroids gets more and more functions.
It started as an alternative logger for the Victron VE interface (MPPT Chargers and Smart Shunts)

It can now be configured as a very low-cost vendor agnostic Smart Shunt.

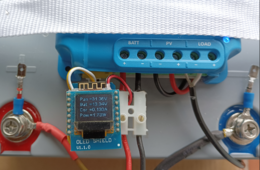
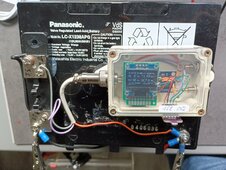
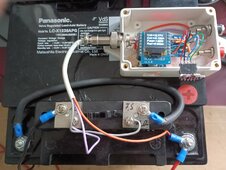
The Smart-Shunt hardware is extremely limited:
- a shunt (that you probably already have, any shunt up to 75mV can be configured)
- an ESP 8266 microcontroller (~4$) (Wemos-D1 recommended but others do as well)
- an INA226 off-rail power interface (~5$)
- a 8-35V to 5V micro buck converter. (~2$)
- a few wires and some prototype case
Optionally
- a snap-on OLED shield 64x48 pixels for the Wemos D1 (~5$)
- or a 128*64 I2C OLED display (~5$) much better, needs a few more wires soldered.
The software is completely free and open source, highly configurable and is always current on GitHub.
Everything is self-contained. The communication occurs over WLAN and is completely wireless. (no ground loops to be feared).
No additional computer or gateway required for permanent operation !
From your computer, you can access the device over Telnet, e.g. :
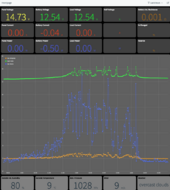
Over Internet, using a permanently free account at thinger.io for up to two devices, you get a gorgeous dashboard to monitor your data.

And the project permanently evolves and gets new functions...
(I live in a condominium and cannot use a full blown solar installation, so the shown Voltage / Current values in my examples are limited, but everything is scalable)
Of course it has also some limitations:
If your maximum battery voltage can exceed 36V, you will need to chose carefully the small DC buck converter for a model that supports higher voltages, unless you can tap the middle of you battery.
If you have e.g 48V batteries done with 2x24V batteries, there is an option to run on the lower battery and monitor the higher battery.
Enjoy the discussion on:

 diysolarforum.com
It started as an alternative logger for the Victron VE interface (MPPT Chargers and Smart Shunts)

It can now be configured as a very low-cost vendor agnostic Smart Shunt.

The Smart-Shunt hardware is extremely limited:
- a shunt (that you probably already have, any shunt up to 75mV can be configured)
- an ESP 8266 microcontroller (~4$) (Wemos-D1 recommended but others do as well)
- an INA226 off-rail power interface (~5$)
- a 8-35V to 5V micro buck converter. (~2$)
- a few wires and some prototype case
Optionally
- a snap-on OLED shield 64x48 pixels for the Wemos D1 (~5$)
- or a 128*64 I2C OLED display (~5$) much better, needs a few more wires soldered.
The software is completely free and open source, highly configurable and is always current on GitHub.
Everything is self-contained. The communication occurs over WLAN and is completely wireless. (no ground loops to be feared).
No additional computer or gateway required for permanent operation !
From your computer, you can access the device over Telnet, e.g. :
Code:
$ telnet 192.168.188.27
Trying 192.168.188.27...
Connected to steroids.fritz.box.
Escape character is '^]'.

Waiting for input
B
 Battery Stats
 Hour   |  00   |  01   |  02   |  03   |  04   |  05   |  06   |  07   |  08   |  09   |  10   |  11   |
 Bat Ah | 12.63 | 00.00 | 00.00 | 00.00 | 00.00 | 00.00 | 00.00 | 00.00 | -0.00 | -0.02 | 00.01 | 00.06 |
 Bat V  | 12.46 | 12.45 | 12.43 | 12.43 | 12.43 | 12.42 | 12.42 | 12.41 | 12.41 | 12.43 | 12.45 | 12.61 |
 Hour   |  12   |  13   |  14   |  15   |  16   |  17   |  18   |  19   |  20   |  21   |  22   |  23   |
 Bat Ah | 00.36 | 00.52 | 00.36 | 00.06 | 00.46 | 00.02 | 00.00 | 00.00 | 00.00 | 00.00 | 00.00 | 00.00 |
 Bat V  | 13.28 | 13.95 | 12.96 | 12.57 | 12.79 | 12.56 | 12.51 | 12.50 | 12.48 | 12.47 | 12.47 | 12.46 |

V
Values Report
BatV:12.56 BatI:-0.03 BatW: -0.38 PanV: 17.52 PanI: 00.00 PanW: 00.00 LoadI: 00.00 LoadW: 00.00 IOhm: 0.0008
BatV:12.56 BatI:-0.03 BatW: -0.38 PanV: 15.27 PanI: 00.00 PanW: 00.00 LoadI: 00.00 LoadW: 00.00 IOhm: 0.0008
BatV:12.56 BatI:-0.04 BatW: -0.50 PanV: 15.23 PanI: 00.00 PanW: 00.00 LoadI: 00.00 LoadW: 00.00 IOhm: 0.0008
BatV:12.56 BatI:-0.04 BatW: -0.50 PanV: 14.75 PanI: 00.00 PanW: 00.00 LoadI: 00.00 LoadW: 00.00 IOhm: 0.0008
BatV:12.56 BatI:-0.04 BatW: -0.50 PanV: 14.58 PanI: 00.00 PanW: 00.00 LoadI: 00.00 LoadW: 00.00 IOhm: 0.0008
BatV:12.56 BatI:-0.02 BatW: -0.25 PanV: 14.43 PanI: 00.00 PanW: 00.00 LoadI: 00.00 LoadW: 00.00 IOhm: 0.0008

Waiting for input
W
Weather list :
Temp: 8.9°C Hum: 80.0% Press: 1028mBAR WindSpeed: 8.8m/s Direction: 230°N Clouds: 100% Summary: overcast clouds
Over Internet, using a permanently free account at thinger.io for up to two devices, you get a gorgeous dashboard to monitor your data.

And the project permanently evolves and gets new functions...
(I live in a condominium and cannot use a full blown solar installation, so the shown Voltage / Current values in my examples are limited, but everything is scalable)
Of course it has also some limitations:
If your maximum battery voltage can exceed 36V, you will need to chose carefully the small DC buck converter for a model that supports higher voltages, unless you can tap the middle of you battery.
If you have e.g 48V batteries done with 2x24V batteries, there is an option to run on the lower battery and monitor the higher battery.
Enjoy the discussion on:

DIY Vendor agnostic Smart Shunt & Victron Smart Solar MPPT data logger based on ESP8266
(Original old post replaced with something more representative of the current situation of my project) I will maintain that first post current to give a first impression of the project at a glance. My project Victron_VE_on_Steroids gets more and more functions. It started an alternative logger...
Attachments
Last edited:


