diy solar

diy solar

Inspired by the channel - 6.6kWH 48V LiFePO4 powerbank

AdamSmith73

New Member
Joined
Mar 11, 2020
Messages
10
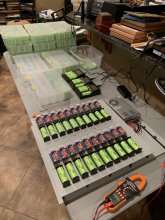
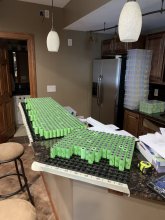
I really enjoy Will's education and leadership in the DIY solar and battery community. I have a small off-grid solar system (800w) powering my amateur radio shack, but before finding Will's YouTube channel, I didn't realize how mismatched and inadequate my 12v Pb-acid AGM 200AH battery bank was. So after watching his and others' videos - I decided to jump in with both feet and I am in the process of assembling two 3.3kWH 48v LiFePO4 battery packs that will be paralleled and charged by my Morningstar TS-MPPT-45 charge controller. I am still waiting on many of the critical parts (like the BMSs) to arrive from Aliexpress.com with the COVID-19 delays, but things are shaping up well. I am using A123 LiFePO4 cells harvested from the NEC battery packs BatteryHookup.com has been selling for some time.

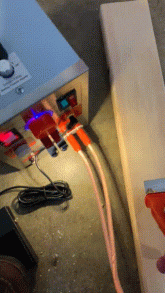
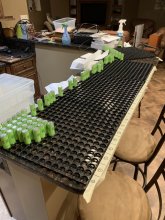
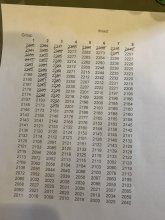
I have learned a ton and am still learning every day as I work through new design and troubleshooting challenges as I built these batteries from scratch - using Will's book and great videos! Here are some pics of the project in progress... The two Gator cases will each hold a 3.3kWH 48v pack.

I will post updates as I slowly put things together and test.image (3).jpgimage.jpgimage (1).jpgimage (2).jpg
 
What a set of lovely pictures for a DIY guy to look at... geez, it's a tease ! LMAO
All those cells ! Ohhh Myyyy.

What are those "Gator" cases ? links, info etc ? They look like they'd made good battery cases.
 
They are Gator cases - the 4U, 19" deep molded version (G-PRO-4U-19) - I found a really good deal on Amazon for them. I selected this case as a battery holder because 1) I wanted something "portable" that I could move with by hand (or with a hand truck) if I needed the power somewhere other than my communications room; 2) they provided a nice balance between capacity and weight for my chosen 16s60p LiFePO4 A123 26650 cell-based power bank (split into two paralleled 16s30p 3.3KWH packs); and 3) they will just look really cool - especially once I install the Anderson Power SPEC-PAK Heavy Duty power connectors and a minimal set of appropriate "fuel level" battery status gauges.

Attached is a diagram (pdf file) of how the batteries will fit into a larger resilient power system - Inspired by Will's RV setup where commercial power is the backup to his primary solar source. This pic shows the 960 cells (16s60p) as they will be configured into two parallel 16s30p packs (one two-layer pack in each Gator case).
image (4).jpg

I have a long way to go, primarily because I have to wait for several critical components to arrive from AliExpress - which are being further delayed by the COVID-19 pandemic. Oh well, 1st world problems, right?

Before I spot weld the nickel connections and add all the bus bars and fusing, I will be testing each cell for capacity and internal resistance so I can group them into 32 similar 30 cell "s" units. Each 3.3KWH pack/case will each have the Bluetooth capable 100A LiFePO4 Smart BMS that Will recommends on his site and those will be paralleled together. Since my designed current draw / charging limitation is 45A at 48V, and most of the time it will be much less than that when being charged by my Morningstar TS-MPPT-45 or discharged by my communications equipment, it should be ok. A pic of the "load" referred to in the attached pdf can be seen here:

1584665128152.png

I am looking forward to providing updates here as I make progress - this has been fun and I can't wait for Will's next video and feedback from the group!

Here are some links to some of the key components:


BtW, here is the aging 1.2KWH (<500WH useful capacity) battery I am replacing (12V, 200AH AGM) :)

backup battery 200AH_new (2).jpeg
 

Attachments

  • power system layout.pdf
    64.6 KB · Views: 36
They are Gator cases - the 4U, 19" deep molded version (G-PRO-4U-19) - I found a really good deal on Amazon for them. I selected this case as a battery holder because 1) I wanted something "portable" that I could move with by hand (or with a hand truck) if I needed the power somewhere other than my communications room; 2) they provided a nice balance between capacity and weight for my chosen 16s60p LiFePO4 A123 26650 cell-based power bank (split into two paralleled 16s30p 3.3KWH packs); and 3) they will just look really cool - especially once I install the Anderson Power SPEC-PAK Heavy Duty power connectors and a minimal set of appropriate "fuel level" battery status gauges.

Attached is a diagram (pdf file) of how the batteries will fit into a larger resilient power system - Inspired by Will's RV setup where commercial power is the backup to his primary solar source. This pic shows the 960 cells (16s60p) as they will be configured into two parallel 16s30p packs (one two-layer pack in each Gator case).
View attachment 9303

I have a long way to go, primarily because I have to wait for several critical components to arrive from AliExpress - which are being further delayed by the COVID-19 pandemic. Oh well, 1st world problems, right?

Before I spot weld the nickel connections and add all the bus bars and fusing, I will be testing each cell for capacity and internal resistance so I can group them into 32 similar 30 cell "s" units. Each 3.3KWH pack/case will each have the Bluetooth capable 100A LiFePO4 Smart BMS that Will recommends on his site and those will be paralleled together. Since my designed current draw / charging limitation is 45A at 48V, and most of the time it will be much less than that when being charged by my Morningstar TS-MPPT-45 or discharged by my communications equipment, it should be ok. A pic of the "load" referred to in the attached pdf can be seen here:

View attachment 9308

I am looking forward to providing updates here as I make progress - this has been fun and I can't wait for Will's next video and feedback from the group!

Here are some links to some of the key components:


BtW, here is the aging 1.2KWH (<500WH useful capacity) battery I am replacing (12V, 200AH AGM) :)

View attachment 9309
The rolling rigid case is what I used for my 16S prismatic 60Ah cell generator assembly... heavy...
 
never seen those "Anderson Power SPEC-PAK" connectors was fearing the price but it's not that bad $10-25. Thanks!
 
another update - I just ordered 12 ea SunPower 250W mono panels and an Outback FLEXMax60 MPPT charge controller to replace my 12V 800w array with a 48v 3000w array :)

looking forward to getting that setup to pair up with my 6.6kWH LiFePO4 power bank - I ended up getting the (used) panels delivered for about $0.50/watt - I will need to buy some 10 gauge solar wire and MC4 connectors to connect everything, but for that price, I don't mind...

I am researching which racking system to use, and will have to find a contractor buddy to source some lengths of Schedule 80 3" galvanized pipe for the main structural elements. Any recommendations on racking would be appreciated - thanks in advance!

Neil


I am currently processing the same type of cells. They are version A however and most likely more used than your. I will also be capacity and resistance testing everyone of the them.

I am shooting for a 128P8S setup.

What is your strategy for spot welding them together?
How about the fuses?
What are you using to create the bus bars?

I am very curious since I am constantly flipping from one solution to another.

I am not sure I want to invest in a spot welder yet vs just soldering them with an iron
 

Attachments

  • 9161D4ED-EB37-411F-9A51-D7C2B70543A1.jpeg
    9161D4ED-EB37-411F-9A51-D7C2B70543A1.jpeg
    95.1 KB · Views: 10
  • B63BCE0C-3288-4DAC-BE2F-BF88FA049234.jpeg
    B63BCE0C-3288-4DAC-BE2F-BF88FA049234.jpeg
    77.7 KB · Views: 10
Last edited:
Where did you get the battery holders from ?

I have been looking at some bulk deals on Aliexpress but they seem expensive still... About 200$ CAD (140 USD) for 2000 holders that support 1000 cells.

I have been looking at spring battery holders instead... The cost will be much more (650 $ for 1000 cells) but It will be much easier to swap the individual cels over time. When you factor in the purchase of a spot welder... The total cost for my pack using either approach is pretty close.
1590145801558.png
 
Where did you get the battery holders from ?

I have been looking at some bulk deals on Aliexpress but they seem expensive still... About 200$ CAD (140 USD) for 2000 holders that support 1000 cells.

I have been looking at spring battery holders instead... The cost will be much more (650 $ for 1000 cells) but It will be much easier to swap the individual cels over time. When you factor in the purchase of a spot welder... The total cost for my pack using either approach is pretty close.
View attachment 13678

this is the solution I went with - comes out to about $0.20/cell (for top and bottom) shipped.

I finally got my bulk (parallel) tester built so I am able to .2C capacity test 20 26650s at a time which means I can capacity test about 60 cells per day - so only about 18 straight days (assuming 10% overtesting required) of testing batteries before I am ready to sort into the 32 packs of 30 cells to make my two 16s30p LiFePO4 paralleled batteries (each with their own BMS, of course).

the pic below also shows a charging board and switch, but I botched the circuit for that side, so only the testers work at the moment.

Also shown below is the 220V two prong (China) to 220V three prong (US) conversion I did on my aliexpress spot welder. Turned out to be an easy and relatively affordable project - for some reason the 220V Chinese variant was much cheaper than the equivalent 220V US version - doing comparison research showed there was no difference in internal components, in fact, my "fuse both hot legs" upgrade turned out better than the "only fuse one hot leg" solution the manufacturer provided for the very expensive 220V US variant.


Attachments

  • 63760445142__02CCA99D-BE92-40AE-9EE5-5DBAAB607ECE.jpg
    63760445142__02CCA99D-BE92-40AE-9EE5-5DBAAB607ECE.jpg
    164 KB · Views: 16
  • IMG_1832.jpg
    IMG_1832.jpg
    116.1 KB · Views: 13
  • IMG_1833.jpg
    IMG_1833.jpg
    112.2 KB · Views: 14
  • IMG_1834.jpg
    IMG_1834.jpg
    99 KB · Views: 13
  • IMG_1835.gif
    IMG_1835.gif
    8.2 MB · Views: 13
Last edited:
I am currently processing the same type of cells. They are version A however and most likely more used than your. I will also be capacity and resistance testing everyone of the them.

I am shooting for a 128P8S setup.

What is your strategy for spot welding them together?
How about the fuses?
What are you using to create the bus bars?

I am very curious since I am constantly flipping from one solution to another.

I am not sure I want to invest in a spot welder yet vs just soldering them with an iron
I am using a hybrid approach - I am soldering a copper bar to a 2p nickel strip and spot welding that assembly to my 15x2 cell packs to make the 30p groups. I will series connect 8 of 30p groups with copper bus bars on each pack using bolts and short lengths of copper bar and use a 4ga length of wire to series connect the two 8s layers (for both positive and negative sides). I went with this approach to reduce the risk of damaging the cells with the heat from soldering.


I am using a 125VDC 100A circuit breaker on the main battery positive. I am not using individual cell fusing as the LiFePO4 chemistry doesn't really warrant that level of caution (i.e. low/no risk of thermal runaway).
 
Next update in the journey! I used the repackr site to group my 960 A123 26650 LiFePO4 cells (32ea 3.2v 65AH matched packs of 30 cells) to make 2ea 48v 65AH batteries - paralleled together to make 6.24 kWH of 2nd life LiFePO4 powerbank goodness!

Working now on cutting the 32ea 17.25" copper bus bars that will be soldered onto cut-to-length pieces of 2P 26650 nickel strip. The series groups will be connected via these 3/8"x1/8" 110 Copper bus bars (pics coming!)

Stay tuned - pushing to finish assembly and begin testing by the end of the month...
 

Attachments

  • 63910298362__C8B938C6-D71A-4DCA-A7D1-87036063E03D.jpg
    63910298362__C8B938C6-D71A-4DCA-A7D1-87036063E03D.jpg
    168 KB · Views: 14
  • 63910300429__394C942E-8DAD-43AE-A110-2E24F430168D.jpg
    63910300429__394C942E-8DAD-43AE-A110-2E24F430168D.jpg
    125.5 KB · Views: 13
  • 63917844580__45CA1CDE-1556-495B-86BC-DFC44F15B799.jpg
    63917844580__45CA1CDE-1556-495B-86BC-DFC44F15B799.jpg
    132.2 KB · Views: 14
  • 63919619373__929353F2-729C-45C4-AB29-AF2D2A80A9D8.jpg
    63919619373__929353F2-729C-45C4-AB29-AF2D2A80A9D8.jpg
    196.1 KB · Views: 14
Next update in the journey! I used the repackr site to group my 960 A123 26650 LiFePO4 cells (32ea 3.2v 65AH matched packs of 30 cells) to make 2ea 48v 65AH batteries - paralleled together to make 6.24 kWH of 2nd life LiFePO4 powerbank goodness!

Working now on cutting the 32ea 17.25" copper bus bars that will be soldered onto cut-to-length pieces of 2P 26650 nickel strip. The series groups will be connected via these 3/8"x1/8" 110 Copper bus bars (pics coming!)

Stay tuned - pushing to finish assembly and begin testing by the end of the month...
one minor edit - since I will need 64 copper bus bars (not 32 - darn maths), I had to order more copper 110 bar stock. For each battery's main positive and main negative, I opted to use 1/8" by 3/4" copper bar (vice 1/8" x 3/8") to give my main battery terminals more "meat" to which to connect my cable lugs. I finally received the 2P 26650 nickel strip with the correct intercell spacing (28mm vs 27.5mm) so once I get all of my bus bars cut to the correct length, I can begin soldering the bus bars to the lengths of nickel strip and then spot welding those assemblies to form my 32 groups of 30 parallel cells (already sorted and arranged into 4 "layers" of 240 cells) - 2 ea of these layers will be all connected together in series, stacked & strapped together and mounted in the two gator cases. I just need to figure out the mounting interface to "hang" the packs from the 19" rackmount ears in the gator case... more coming soon!
 
Last edited:
Back
Top