diy solar

diy solar

Latest & Greatest BMS for Used BYD Modules???

JSTABUM

lots to learn!
Joined
May 23, 2020
Messages
43
Location
North Ogden, UT
I scored a couple of BYD battery modules for my play at home erector set.....on the cheap!!!

I do know how to search, but I'm still not quite done with the YouTube University DIY Solar program. Few more beers! ?

I've watched a lot of videos. Top balance. Bottom balance. This BMS is the best! This BMS is now burnt out, now it sucks. Use the 'built-in board' wires. Don't use the 'built-in board' wires. Do this, don't do that, can't you read the sign.....?

Now I'm confuzzled!

What I think;
1) I don't want to use existing wiring board. (The BYD BMS will go up dust collection science project)
2) I don't want to remove the fan and install a BMS and a volt meter
3) I don't mind buying 2, so I can have a actual monitor for each battery
4) ...........?
 
Last edited:
You can't use the included BMS - it doesnt work by itself. I believe Tech Direct has a BMS that will plug in directly to the old plug.

Having said that, I VERY VERY STRONGLY recommend you do an initial top balance using a product that will charge each cell independently (like the ISDT 8S) and then do a discharge test. I can absolutely guarantee there will be one cell that is at least 10-20AH lower in capacity than the others, most likely there will be two under capacity cells. You can tell because the undercapacity cells voltages will take a nosedive to 2.9V while the good ones are still around 3.15v or so.

You will need to add capacity to the weak cells or you won't be able to get anything near the capacity of the packs. You can add capacity by adding a 15AH or so cell and wire it directly to the cells interconnect bars. Even though you dont want to dig into the modules you're going to have to. There's a reason you got them so cheap.

Since you got two packs you can also parallel them at the cell level and (assuming they dont both have the same undercapicity cells in the same location) they'll average out the crappy cells and you'll get more effective capacity out of the packs. Its not a very good solution though, this really only works when you have 5-6 packs to parallel. Adding capacity to the weak cells is a better solution.

I did a test comparing using an active balancer vs adding capacity and it wasnt even close. In my test adding capacity to the weakest two cells (16AH to the worst, 8AH to the second worst) brought up the pack capacity from 3.1kwh to 3.7kwh even though it was only a 70 watt hour capacity increase.

I've got 19 of these packs and they're all shitty, some of them were so shitty I ended up cutting out the bad cell and splicing in one from a doner module and even then I had to add capacity to two cells so they'd charge/discharge somewhat evenly. I just spent another 400 bucks in a bunch of 15AH cells to un-shitty each module.
 
I have found my power wall of 24 byd's to be very stable after interconnecting the cells, I added headways to the runners.. I would not charge them past 27. 2v for any length of time, they can float at 26.9v all day..
 
Seeing I have zero knowledge about these BYD modules, I would assume a good top & bottom balance, and capacity test would be prudent?

From a class at the YouTube University DIY Solar Program, running both a separate cell balancer and BMS is useless(?)
 
Bottom balance the packs and then charge, add capacity to the runner cells. Keep doing this until the packs become stable.. I like the headway batteries, as you can add 8ah at a time.. Run the packs between 2.8v-3.45v, it takes 4-6ah to push a cell at 3.45v to 3.6v... This has been my experience with these packs, I have been cycling them daily for 8 months now.
I am running 2-8s qnbbm balancers and a 1amp jkbms for monitoring... Took about a month to really settle out any imbalances.. The other day the packs were 4mv at 60% soc..
 
Last edited:
Bottom balance the packs and then charge, add capacity to the runner cells. Keep doing this until the packs become stable.. I like the headway batteries, as you can add 8ah at a time.. Run the packs between 2.8v-3.45v, it takes 4-6ah to push a cell at 3.45v to 3.6v... This has been my experience with these packs, I have been cycling them daily for 8 months now.
Heh, I've been doing it exactly opposite - top balance to 3.45/cell then discharge and add cells to the cells that take a nosedive.

I've been considering charging to 3.4/cell and then charging the pack and then add capacity to the runaway cells. It'd be quicker and burn less energy than doing a full discharge.
 
So far I've ordered ISDT Q8.

I want to do all the wiring and testing before I install them in my self-conjured battery rack.

I can't do these types of projects the easy way! :unsure:

 
Every one of your cells will be a slightly (or a LOT) different capacity so no matter what you will need some sort of balancer, an considering they have about 125AH per cell remaining capacity that balancer will need to be robust - at least 2A.

I decent BMS will also have a balance function but you can separate out the safety over/under/temperature disconnect if you want.

Personally I went with active balancers as I want to keep them balanced at the top AND bottom of the charge/discharge cycle and a 6A active balancer can make up for about 3AH of capacity difference in most charge/discharge scenarios as long as it stays under a 30A overall. I'm using the QNBBMs but they're spendy.

As far as the safety disconnects I'm using a Chargery BMS with the balancing turned off but there are a million different ones out there.
 
I don't have those BYD Battery Packs but during my search for an Active Balancer, I came across this video below. Based on this and a few other vids, as well as some write ups from buyers I went ahead and got 4 QNBBM-8S units for my packs, and so far so good. The units on my used 175AH cell based packs levelled them right up and is keeping the cells within 10mv. I just put them on my new 280AH cell packs but they are not in production till end of today so I can't say how much difference it will do to those packs which varied by as much as 300mv.


BTW, there are quite a few video's for QNBBM as well as the Heltec Active Balancers.
If Interested:
and NOTE: Heltec has Passive & 3 types of Active Balancer. Devil is in the details.


Li-Ion BMS - White Paper - Dissipative vs. nondissipative balancing (a.k.a.: Passive vs. Active balancing)
Did you order them through Alibaba? I need to get an 4s for mine still. How long did it take for you to get yours?
 
Did you order them through Alibaba? I need to get an 4s for mine still. How long did it take for you to get yours?
I got mine in a round about way and they were here "very fast" (air express).
DeliGreen bought the company producing the QNBBM's and other stuff but others do resell them, some are rebranded to them like R&J.
There are different ways to install these, I chose a simpler route which "may" be risky a little but I don't think much risk. I noted that a couple of people have installed fuses between the balancer & the individual cell (like the fellow with the BYD packs in the video) but I dunno if it is necessary.

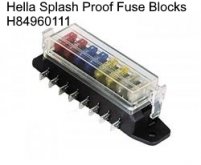
These are the connector bocks used by some, fused, unfused and how I did mine (the risky part ?) by connecting BMS harness to QNBBM which then feeds the cells via 14g wire. I am also attaching the included Instructions PDF for your reference. This is obviously the 8S model but the 4S model is similar. NOTE, it is mentioned in the docs etc but these things generate a high pitch sound which can be annoying if the batteries are within hearing range. I don't know if the Heltec's make a sound. Also, there are Lighted (led's) units and their specs are a little different.

PS: I will have a sub-thread on my battery pack assemblies within my "About My System" pages shortly, as that whole thing is up for a major revision.

Hope the info is helpful.

Hella Splash Proof Fuse Blocks H84960111.jpg
Molex-Block.jpg
BMS to Balancer wiring (sm)[4757].jpg
 

Attachments

  • QNBBM-manual.pdf
    1.1 MB · Views: 4
Oh wow Steve yes that is very helpful!! Thank you so much!
You're most welcome.

There is wee Gotcha's I should mention to watch for.
- When stripping the wires to go into slots, they have to be 1/4" stripped. More is problematic and less won't work, they have to go in all the way.
- Open the screws fully so the wires insert without getting hung up.
- If inserting the BMS wires like I did, keep the wires "up / down" like in the photo, that way you insert the thin 22g BMS wire first, slip in the thicker wire underneath, hold them and spin the screw down for the connector, the tricky part, try to have the BMS wire on top of the thicker wire, so that when the clamp comes down it presses it into the thicker wire. I had to tighten the screws down really well because I found that the thin wires can slip out easily if not. I had to do a "firm tug" tug test on each wire to make sure. As an aside, I kept the BMS wire harness long to make installing and fiddling around a bit easier because of my specific installation method. If you choose to shorten the BMS harness, that would likely be fine (keep the leads the same length though) but leave yourself reasonable "wiggle room".
- Also, I made my balance wires all the exact same length, the docs don't say you have to or not but my 3rd sense figured I should.
- Ohhh and warning, it's in the doc's but not highlighted well. Make Sure you get the right wires on the cells and the FIRST CONNECTION is B1- ! then b1+, b2+ and so on.

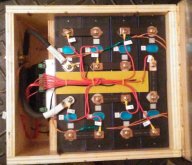
Below is a pic of one of my 24V/280AH packs, pic explains it better.
280AH-with QNBBM.jpg
 
You're most welcome.

There is wee Gotcha's I should mention to watch for.
- When stripping the wires to go into slots, they have to be 1/4" stripped. More is problematic and less won't work, they have to go in all the way.
- Open the screws fully so the wires insert without getting hung up.
- If inserting the BMS wires like I did, keep the wires "up / down" like in the photo, that way you insert the thin 22g BMS wire first, slip in the thicker wire underneath, hold them and spin the screw down for the connector, the tricky part, try to have the BMS wire on top of the thicker wire, so that when the clamp comes down it presses it into the thicker wire. I had to tighten the screws down really well because I found that the thin wires can slip out easily if not. I had to do a "firm tug" tug test on each wire to make sure. As an aside, I kept the BMS wire harness long to make installing and fiddling around a bit easier because of my specific installation method. If you choose to shorten the BMS harness, that would likely be fine (keep the leads the same length though) but leave yourself reasonable "wiggle room".
- Also, I made my balance wires all the exact same length, the docs don't say you have to or not but my 3rd sense figured I should.
- Ohhh and warning, it's in the doc's but not highlighted well. Make Sure you get the right wires on the cells and the FIRST CONNECTION is B1- ! then b1+, b2+ and so on.

Below is a pic of one of my 24V/280AH packs, pic explains it better.
View attachment 27193
Good points I might also try the same with adding the BMS wire with the active balance wire. I would strip both enough to twist together and cramp in there. I wanted to also keep the balance wires the same length but ended up cutting anyways due to the length cut was not great amount. Problem for these builds is the always tweaking and needing more. re-doing wiring, connectors etc.
 
One REALLY HUGELY IMPORTANT TIP !

Whenever doing ANYTHING with the wiring on your battery pack, UNPLUG the BMS Harness from the BMS itself ! The odds of a short or surge can fry the BMS in a blink letting out Majic Smoke. I did twist the wires together BUT you really only have 1/4" / 6.3mm length to stuff into the connector. Heck I had to use pliers to give it an extra 1/2 turn once tightened up by hand (but have issues with my hands, so you have to really do your own "Tug Test". I could have soldered the BMS Harness leads & the 14G leads prior to putting them into the connector, but the Murphy's Laws alarm in my head went off...

Ohh yeah, the QNBBM's cannot be turned off. They do not do anything below their set voltages, I assume the Heltec externals are the same BUT their BMS' with Active Balancing I believe can have the balacing disabled.

As I use Chargery BMS' with Passive Balancing built-in (pretty much useless for large capacity commodity cells) I've disabled the passive balancing.
 
I sincerely thank everybody who has responded, and for that matter, everybody else on this forum. Lots of good information from everywhere!

Steve, I do read a lot of your post.

I'm physically disabled, and a retired locomotive engineer. I've been playing with this for about 4 years now. When Donald stimulated us earlier this year, I had 3-310W Trina solar panels professionally installed on the roof right above my man cave.

So far, I have the panels, FlexMax 60, 24V, 3000W pure sine inverter, and now these 2 batteries.

I am only doing this for shits and giggles. Strictly a beer drinking old man type of thing! Maybe my man cave will be green(?)

Thanks again!!! ?
 
LOL, well you are one of the few who has the patience I think.
Hope the info has helped you along to build a bigger better & more friendly Cavern of Reflection....
My saying is, "I don't know what I'm doing, but it'll be badass when its done!".

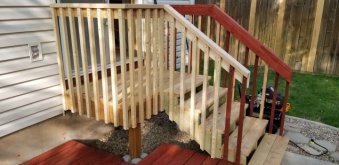
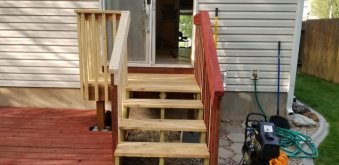
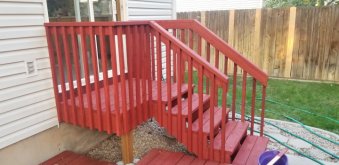
I did these stairs this summer on a house we inherited. I've never done stairs. I'm more of a 2x4 and plywood type of guy!20200914_172459.jpg20200914_172441.jpg20201005_182031.jpg

Except for the risers, I built these stairs by hand. Lots of mistakes, but I made them work!
 
Well, I hooked up my ISDT Q8, and all I get is "Abnormal Cells Voltage" warning screen. Reads 26.4 volts though!

Need to learn how to check each cell individually.
 
Back
Top