bruised-heel
New Member
- Joined
- Jan 21, 2022
- Messages
- 6
Off-Grid Container 48V System, 120/240V Well Pump on Solar
This is my first solar build. I want to thank everyone who is active on this forum, posting build threads, troubleshooting, giving advice, reviewing equipment, etc. and of course to @Will Prowse for his videos and hosting this forum. It has been a huge help, a source of knowledge and inspiration.
This was my first time working with conduit, raceways, etc and I went to school on this one. There are several things I will do differently on the next build but overall I'm very pleased with how it turned out, and feels great to now be pumping water off solar power alone instead of burning gas. Please let me know what you think, any questions, what improvements you might recommend, etc.
Purpose
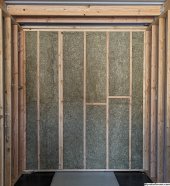
This build is 100% off-grid, and lives inside a 40ft shipping container. The primary purpose is to power a submersible 240V 2HP deep well pump and a 120V transfer pump that moves water from our 2k holding tank up to a larger 10k gallon tank that is 1000ft away on the property. Previously we've been running both on a Predator 9000 generator. This system will also power a few 15A outlets inside the container as well.
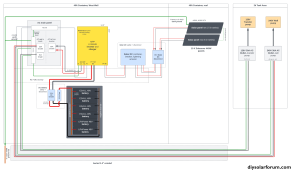
The AC output is temporarily wired up to a single 240V external outlet with an extension cord running to the pumps. The next step will be to pull wire through the buried conduit and wire up the pumps permanently. The diagram I posted varies some from the actual install in terms of where I placed the components but is largely accurate. Right now I am running only 5 panels, the plan is to build a small porch roof off the container and have 10 panels total.
Components
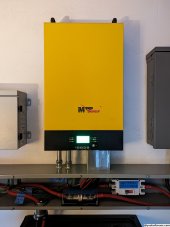
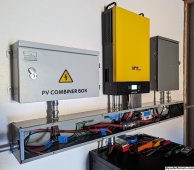
- Inverter: MPP LVX6048 120/240V output
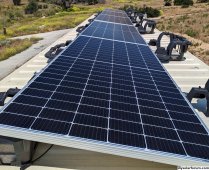
- Solar panels: 5 X Solarever 445W panels (10 planned)
- Solar mount: IronRidge BX 10 degrees chassis
- PV combiner: Watts247 4-1 combiner
- Breaker box/breakers: Square D Homeline
- Raceway: 6" x 6" x 5' raceway from McMaster-Carr
- DC breaker: 150A double pole from Watts247
- DC fuse: 300A BlueSea class T fuse and holder
- Batteries: 4 X 48V EG4-LL batteries, 2 X 48V EG4 LifePower4
- Battery cables: Temco 2/0AWG copper, crimped with Temco hammer crimper
This is my first solar build. I want to thank everyone who is active on this forum, posting build threads, troubleshooting, giving advice, reviewing equipment, etc. and of course to @Will Prowse for his videos and hosting this forum. It has been a huge help, a source of knowledge and inspiration.
This was my first time working with conduit, raceways, etc and I went to school on this one. There are several things I will do differently on the next build but overall I'm very pleased with how it turned out, and feels great to now be pumping water off solar power alone instead of burning gas. Please let me know what you think, any questions, what improvements you might recommend, etc.
Purpose
This build is 100% off-grid, and lives inside a 40ft shipping container. The primary purpose is to power a submersible 240V 2HP deep well pump and a 120V transfer pump that moves water from our 2k holding tank up to a larger 10k gallon tank that is 1000ft away on the property. Previously we've been running both on a Predator 9000 generator. This system will also power a few 15A outlets inside the container as well.
The AC output is temporarily wired up to a single 240V external outlet with an extension cord running to the pumps. The next step will be to pull wire through the buried conduit and wire up the pumps permanently. The diagram I posted varies some from the actual install in terms of where I placed the components but is largely accurate. Right now I am running only 5 panels, the plan is to build a small porch roof off the container and have 10 panels total.
Components
- Inverter: MPP LVX6048 120/240V output
- Solar panels: 5 X Solarever 445W panels (10 planned)
- Solar mount: IronRidge BX 10 degrees chassis
- PV combiner: Watts247 4-1 combiner
- Breaker box/breakers: Square D Homeline
- Raceway: 6" x 6" x 5' raceway from McMaster-Carr
- DC breaker: 150A double pole from Watts247
- DC fuse: 300A BlueSea class T fuse and holder
- Batteries: 4 X 48V EG4-LL batteries, 2 X 48V EG4 LifePower4
- Battery cables: Temco 2/0AWG copper, crimped with Temco hammer crimper
Attachments
-
 00-well-pump-solar-system.jpeg682.8 KB · Views: 77
 -
 02-panels-ironridge-ballast.jpeg1.5 MB · Views: 69
 -
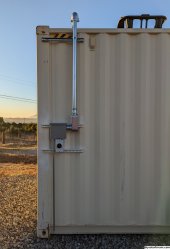 03-pv-input-ground-rod.jpeg501.8 KB · Views: 64
 -
 04-lvx6048-raceway-dc-fuse-breaker.jpeg709.7 KB · Views: 59
 -
 05-ac-panel-in-progress.jpeg390.7 KB · Views: 59
 -
 06-raceway-open.jpeg408.9 KB · Views: 64
 -
 07-well-pump-solar-diagram.png376.3 KB · Views: 61
Last edited: