diy solar

diy solar

Off-grid Solar / Battery monitoring and control freeware

Im building a freeware realtime software/hardware monitoring solution that provides intimate details and decision making information about a solar system.

I intend to be fully off grid in the near future and want to be self sufficient for power. My goal is complete control over every aspect of the power generation from any location and the ability to redirect solar energy when batteries are full to fully utilize every watt of power available.

Im making good progress using Linux/Pi micro servers, Wifi, Epever inverters, RS485 ModBus drivers and Grafana / Cloud infrastructure for access. I have a 10kw grid tied system and for testing I use 2kw off grid 24v setup with 4kw of AGM and 14kw of BYD LifePO4 cells.

If anyone is interested in helping me build/test an open source system that anyone can use with commodity hardware, let me know. A new forum for this would be beneficial.

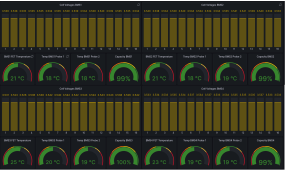
Here are some of the screen shots from my Ipad of my progress so far. I can access this info from any device and from any location. Joe.View attachment 11780View attachment 11777View attachment 11776
This look very cool. Tnx for sharing and keeping it open source. I will try it.
 
Is this using Grafana?

Yes. I finally sat down to connect everything to it, now that the batteries are in their new (final) enclosure. I can now monitor the batteries, temperature sensors in the building/outside, the inverters, charge controllers, a camera, etc. even the wood boiler controls though a VNC window in Grafana.
 
Yes. I finally sat down to connect everything to it, now that the batteries are in their new (final) enclosure. I can now monitor the batteries, temperature sensors in the building/outside, the inverters, charge controllers, a camera, etc. even the wood boiler controls though a VNC window in Grafana.
This is great to see, all my hard work getting used and getting useful results. It's all I could have hoped for when I started this project many moons ago. Thanks to everyone for their feedback and suggestions.
Joe.
 
BTW, if anyone needs a low cost unlimited data plan thro ATT (or any provider), look at using the Netgear MR1100 hotspot router. I get them on eBay used for around $99

The key feature about this device is that you can reflash the firmware, then edit the IMEI number.

Then you change the IMEI to match an iPad with cellular data, then get the ATT $20 month unlimited data plan.

This gives you unlimited hotspot data without using a hotspot. It has built in wifi so you can connect as many devices as you need.

I can post detailed info on how to do this. If you can program a Pi it's no problem.

It's only 4G, but I'm getting 200Mbs download at my remote location. Perfect for off grid users like me.
 
Last edited:
Interested, following. I'm in process of putting together a small load shaving system. This looks cool.
 
Ok, Here is what I did. It's been working fine for over a month now.

First get your hands on an MR1100 hotspot router. eBay has been good for me. I found used ones for under $100.

If your using ATT (I haven't tried other providers, but any network that gives unlimited plans should work), you will need a SIM card and an associated data plan.

If you don't charge the IMEI number you will either be unable to connect to the network or they will kick you off after a while.

The trick here is your modifying the MR1100 to look like any supported device, like an iPad or a cell phone. The cellphone companies know what your device is by looking at the IMEI number of your device, we will change that.

All provider's charge big bucks for hotspot devices like the MR1100 as they can give Internet to almost unlimited devices and could use a ton of data. If they think it's a single device like an iPad, they let you have unlimited data at a lower cost. I found ATT does an unlimited iPad plan for $20 a month. So I changed the IMEI of the MR1100 to be one for an iPad.

The MR1100 is very unique as your can change the IMEI with a little trickery. Normally this is impossible on most devices.

You will need a telnet/SSH client like putty on your PC and some technical confidence. But don't be intimidated.

You can easily access the MR1100 by plugging the USB cable into your PC. It will setup a network connection automatically.

If you boot the stock MR1100, you can view it's web page at http://192.168.1.1
Login as user:admin pass:attadmin

Get familiar with all it's settings and values, you need to be familiar with this device.

I'm assuming you know how to configure your PC to connect to network devices. You need network access to proceed.

It's like any router, you can update the firmware and change lots of settings. If you have an MR1100 that's an ATT specific version you can reflash it to be a generic Netgear version. We do that first. Get the version from the Netgear website, something like...

MR1100-100NAS_23113828_NTG9x50C_12.06.11.00_00_GenericNA_05.03.secc.spk

Place that file in a folder with the program fdt.exe (search the internet for that program)

Next configure your PC to run python scripts. Tons of info on the web on that. Check that python is working and can run a simple script.
Use the python pip3 command to load the pyserial package.

pip3 install pyserial

Then download the python script sierrakeygen.py (google that). Place that script in the same folder you made above.

Now open your telnet client on your PC, I use putty freeware. Open 192.168.1.1 at port 5510 (not the default telnet port)

You know you're connected when you can send AT commands like on old fashioned modems. Type AT and press return, if you're connected your will get the OK prompt.

Check this is working before you proceed.

First we load the new firmware.

AT!BOOTHOLD

then in a command window on your PC, where you put the firmware and fdt.exe program, run

.\fdt.exe MR1100-100NAS_23113828_NTG9x50C_12.06.11.00_00_GenericNA_05.03.secc.spk

You will the screen on the MR1100 change while it loads the new firmware.

when reboots after about 10 minutes, connect back with telnet at port 5510 and edit the IMEI

type AT!OPENLOCK? and press enter

The response you get should look something like BE96CBBEE0829BCA . Copy that number.

copy that output and go back to your command prompt window on your PC and run the python script as follows

py sierrakeygen.py -l BE96CBBEE0829BCA -d MDM9x40 (replace BE96CBBEE0829BCA with the output from the Putty window you copied above)

then go back to the Putty telnet window and type AT!OPENLOCK=[BE96CBBEE0829BCA] (again replace BE96CBBEE0829BCA with your number you copied)

type AT!NVIMEIUNLOCK

then type

AT!NVENCRYPTIMEI=01,33,08,00,85,12,75,00

(replace the numbers with the numbers from your new IMEI you want to use, add extra 0 if 1 digit short)

then type AT!RESET

The MR1100 should reboot and your IMEI should be changed. Login to it's web page to confirm.

Your now ready to call your phone provider and and your new device. They will want the new IMEI you just set and your SIM card ICCID number to activate it.

Once it done, simply configure the MR1100 as your default router, and connect via WiFi or to it's RJ45 Ethernet port via a switch.

To get the IMEI off an old iPad with cellular, i bought an old ipad 3 from eBay for $30.

You can also use the website IMEI.info to get info on IMEI numbers and confirm they are correct. That website can also produce random IMEI numbers that match any devices you want, like iPads.

Once you have done this once you will find it's really easy to repeat .

Good luck, it's worth it!
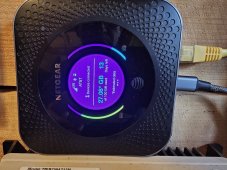
20230518_191651.jpg
 
Last edited:
Hello!
I'm building my solar setup with 2424HSE...
What is the cheapest hardware to buy for this monitoring to work?
 
If I were to do a VM on Windows for this, what is the recommended Linux distro to install? I have the windows box already for realtime monitoring, but nothing for historical data.
 
If I were to do a VM on Windows for this, what is the recommended Linux distro to install? I have the windows box already for realtime monitoring, but nothing for historical data.

I'd go with Debian. I also wrote an installation guide:

 
I'd go with Debian. I also wrote an installation guide:

Okay. I followed the guide. I have the test readouts working. I just need to connect my two Epever controllers and two Overkill solar BMS. I am very much a Linux noob, but what cmd do I need to issue to run the scripts from Github for either of these? Also, I enabled the USB devices from the system to the OSBox. Was that good or an issue I am about to have?
 
I also wanted to add that your guide was very helpful. I only had a little confusion about grafana install part. It took me a moment to realise the last two lines of code you had there were all supposed to be one line for the wget command.
 
It took me a moment to realise the last two lines of code you had there were all supposed to be one line for the wget command.

Thanks - I clarified it in the doc now.

As for the Overkill and Epever scripts, you should be able to just download them from the Github page and run them with "python name_of_script" and go from there.
 
Ah, seems those script still need Python 2. There is a pull request, but it doesn't seem to be merged to main. Use this repo instead:

Alright. That took a bit as some hidden files prevented me from removing the old directory so I could git clone the new repo. I still get the same error but there is a readme about running a script using the requirements.txt file, however that file did not download when I performed the git clone.

1685901730330.png
Can I just execute the three lines in the file with a different command?
 
Alright. That took a bit as some hidden files prevented me from removing the old directory so I could git clone the new repo. I still get the same error but there is a readme about running a script using the requirements.txt file, however that file did not download when I performed the git clone.

View attachment 151670
Can I just execute the three lines in the file with a different command?

The requirements file just downloads some libraries you need. It's the same as would be running 'pip install package_name'. You're still getting the same error - that's not possible, since that print statement is definitely fixed in this repo.
 
Back
Top