diy solar

diy solar

One cell (cell 2) discharging much faster than the rest of the pack

dodaly

New Member
Joined
Nov 16, 2022
Messages
32
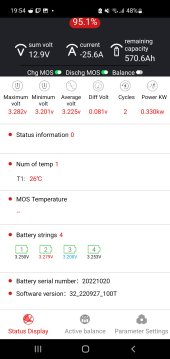
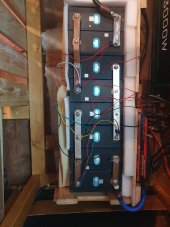
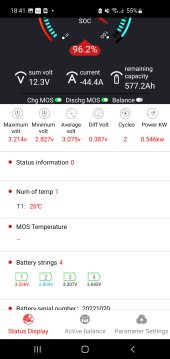
16888381356076397811724029436760.jpgWhen I discharge my 600ah pack one cell is discharging faster than others, dropping to 2.8v when I put a load on while the others sit at 3.2 or there abouts. It's not a capacity problem as I have just capacity tested each cell after top balancing them and paired the weakest with the strongest and so on. I didn't top balance the pack when I connected them together as it would take years to charge the whole pack at 3.65v but is this problem being caused because the pack hasn't been top balanced properly or is it something else? Screenshot_20230708_184103_SMART BMS.jpg
 
One of two things.
That cell is at a dramatically different SOC than the rest or
most probably
Inadequate connections.
Remove, buff to a shine with Emory cloth and then clean with isopropyl alcohol each and every metal surface.
Reassemble.
ALSO, your bus bars are ramped from one cell to the next. You must connect cell one and two then three and four THEN two to three TO KEEP THE BUS BAR FLAT.
 
To test the SOC assumption, charge the pack and see what happens to that cell. That should be done after checking connections. I have seen a loose connection behave like a weak (lower capacity) cell or group of cells in parallel.
 
Reconnected them and switched a cell from location two to 1 and seems to have done something also removed the stepping busbars to make a more level connection. However I've kept the steps on the other side of the pack to see if it causes a drop there now instead.
 
Cell 4 seems to be draining fastest now so maybe it is just the lowest cells that get discharged first
 
maybe it is just the lowest cells that get discharged firstor
Or the loose connection on the other side is manifesting itself. Try fixing the stepped connections on the other side and check all connections and give the cells a couple of charge cycles to see what settles out. If they were not well parallel top balanced it might take more cycles for them to even out at the top. The charge/discharge curves are so flat in the middle voltage of 3.2 volts. Any voltage deltas there are not much value. Also try to avoid taking the cells below 3.0 volts until you know you have a good balance at the top. A good top balance will be evident at 3.45 volts or greater per cell.
 
Last edited:
You won’t believe how incredibly important it is to have clean flat contact contact on the terminals. I use medium 3M abrasive cloth and give the post contact surface a twist to get the oxides off. Then I give the contact surfaces of the busses and lugs a quick buff. Dust off or carefully blow off (away from the vent) any residue and avoid getting abrasive into the threads. After prepping, you will want to immediately assemble because aluminum oxidation begins quickly. Use an anti oxidant or dielectric like No-Ox A-special, silicone GREASE or marine grease(synthetic) on the contact surface but not the threads because that can increase the tension on the threads in the terminal. Don’t worry, excess dielectric moves out of the way and you have great connections yet the air is kept out. Torque no more than 4Nm.
 
However I've kept the steps on the other side of the pack to see if it causes a drop there now instead.
Oy ve.
Just LOOK at them.
At the very bottom of the ramp is the only connection to the adjacent bus bar or the cell terminal that you have.
This is not good practice.
Do you want the battery to work correctly or do you want to continue chasing guesses?
 
Oy ve.
Just LOOK at them.
At the very bottom of the ramp is the only connection to the adjacent bus bar or the cell terminal that you have.
This is not good practice.
Do you want the battery to work correctly or do you want to continue chasing guesses?
Stacking busbars is not a great idea. In my opinion, its also best to use a BMS per 16s pack instead of packing cells in parallel for ah gain. This way every cell can be monitored, and one bad cell does not affect the whole pack.
 
best to use a BMS per 16s pack instead of packing cells in parallel
The OP has a 2P4S pack and it would be more practical for him to finish the diagnosis before disassembling the entire pack and purchasing anotheer BMS. Unless ther is a strong need for redundancy in packs, some parallel configurations can be successful. My own pack is 3P16S and it has worked this way for two years. If a cell loses capacity it will be propped up by the parallel cells but the problem can be detected during cell charging. I do keep spares for that eventuality. I have been using similar cells for over three years and have not yet experienced rapid cell failure with these or any of the combinations of cells I have been using in the past twelve years. The exception is an over discharge of a Headway pack ten years ago before I realized the value of a BMS. I had no low voltage protection and I drove that e bike to the point that one cell reversed and eventually blew the vent.
 
Last edited:
Fix your busbars. The picture with the busbars shows an obvious issue. Your busbars are tilted and the contact area between the cell terminals and the busbars is very small.

If you are putting 3 busbars together put the 1st, the 3rd, and the second above them. This will result in good contact with the cell terminal. Putting the 1st, then the 2nd, and the 3rd one last will result in two tilted busbars - the 2nd and the 3rd. Only the first one will be making good contact with the cell terminals.
 
You won’t believe how incredibly important it is to have clean flat contact contact on the terminals.

I use medium 3M abrasive cloth and give the post contact surface a twist to get the oxides off. Then I give the contact surfaces of the busses and lugs a quick buff. Dust off or carefully blow off (away from the vent) any residue and avoid getting abrasive into the threads.
Do you mean 3M Medium Grit Emory Cloth like this: https://www.amazon.com/3M-Pro-Pak-Medium-9-Inch-11-Inch/dp/B0002YQ2YM

Others say to avoid sandpaper or anything with grit and use ScotchBrite pads instead: https://www.amazon.com/Scotch-Brite...words=scotch+brite+pads&qid=1691282848&sr=8-3

Links or opinions appreciated.
After prepping, you will want to immediately assemble because aluminum oxidation begins quickly.

Use an anti oxidant or dielectric like No-Ox A-special, silicone GREASE or marine grease(synthetic) on the contact surface but not the threads because that can increase the tension on the threads in the terminal. Don’t worry, excess dielectric moves out of the way and you have great connections yet the air is kept out.
This: https://www.amazon.com/NO-OX-ID-Spe...ords=no+ox+id+a+special&qid=1691283005&sr=8-1

I have some Ideal NOALOX Joint Compound: https://www.homedepot.com/p/Noalox-...V6gutBh1sBA6OEAQYAiABEgLd0vD_BwE&gclsrc=aw.ds

But it sounds like that is not the right stuff. Again, links and opinions appreciated.
Torque no more than 4Nm.
I cleaned with ScotchBrite, assembled quickly and torqued to 4Nm when I built my battery 3 years ago, but skipped any kind of NOALOX.

I picked up the NOALOX Joint Compound I linked to but if using the A-Special Grease instead and/or 3M Abrasive Cloth instead of ScotchBrite is going to result in a longer-lasting lower-resistance connection, redoing all the busbar connections is enough work that I’d appreciate any advice so I do it right.
 
Back
Top