diy solar

diy solar

PV panel no longer working

douglasheld

New Member
Joined
Oct 9, 2023
Messages
43
Location
London, United Kingdom
Hello all, I have a simple setup with a single 120W monocrystalline panel, a charge controller and a 130Ah lead-acid battery. There's also an inverter which I only turn on as needed, e.g. to run a power tool.

After working adequately for 5 months or so, I found that my PV output is displayed 0.1V and 0W on the charge controller. This started yesterday and it's been two completely overcast days.

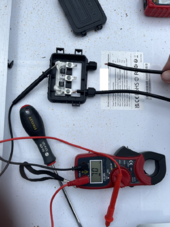
I disconnected the PV cables, re-cut and re-crimped them and measured with my voltmeter. 0V, no continuity and no current (0µA). For good measure, I went up to the roof, disconnected two MC4 connectors and tested there as well. It's 0V. Physically, the panel looks fine.

I have been fiddling with the system the past few days however. And what I assumed is that I must have fried this panel by accidentally connecting the PV outputs to 12V. But in a search of the forum, to my surprise this doesn't seem to be a frequently encountered problem by beginners.

The only other thing I can think of is that I could have given it a static shock, as I touched the frame yesterday. I didn't feel any shock.

I will tell you all the things I have been messing with, in case anybody has an idea:
  • swapped a 20A PWM charge controller for a Victron MPPT 15A charge controller. I swapped these back and forth a few times.
  • for a day had both charge controllers connected to the battery, but only one charger controller connected to PV
  • removed and reseated the battery terminal connections
  • started installing an equipment bonding system. I have bonded an inverter to the PV frame up on the roof.
  • I'm also in the process of inventorying all my cable specifications, as I need to add fuses to the system. So, I've been handling all the cables to photograph the cable markings and anything I can see on the crimped ring lugs.
I've been careful never to leave either of the charge controllers connected to PV and disconnected from the battery. I understand that would have fried a charge controller, which seems to be a common problem. But I don't see people talking about a panel not responding.

So, my question: what plausibly could be wrong with my panel? I've written to the manufacturer to ask if it's got a fuse inside. I do not know if this panel has a bypass diode - I've asked the manufacturer about that as well.
 
Last edited:
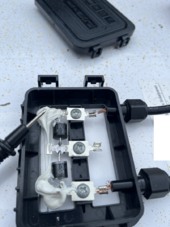
Well, anybody got their popcorn ready? Iinside the junction box is worse than I was expecting.
  • The crimps are bad. The one that pulled out clearly overheated first.
  • The cable easily pulled out with a gentle tug. The sealing nut wasn't tightened.
  • The cable itself, I counted the conductors and it totals up to just under 2mm^2 cross-sectional area.
  • As for the design, the middle terminal doesn't connect to anything. We experience the voltage drop of two diodes, which by the way measure 606 mA and 613 mA. The diodes themselves seem fine.
  • And what's with manufacturers labeling these boxes IP67? Shouldn't it be filled up with potting?

junction box.pngpull-out.png
 
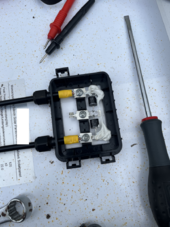
I put it back together, practicing my crimps with the many mistakes I made on the way. (and yes, I tightened that loose sealing nut)

Now the open circuit voltage is as expected, 19-20V in overcast weather. The closed circuit current however, is low, only 0.3A. So, I don't think my fix suffices. I will see if the manufacturer will take this panel back.

fixed with eyelets.png
 
Might I recommend the Wirefy crimper if you plan on crimping anything else?

 
Might I recommend the Wirefy crimper if you plan on crimping anything else?

If you don't like my crimps, that is very understandable! Do you really think, having a new tool is the lowest hanging fruit here?

Thank you because I have been curious about an all-around good crimper, rather than buying dozens of single-use tools.
 
Might I recommend the Wirefy crimper if you plan on crimping anything else?

I bought this big bertha already, for the big lugs. I am pretty happy with it: https://www.amazon.co.uk/dp/B08FJFLTHK

I am still getting to understand these insulated red/yellow/blue things.
 
If you don't like my crimps, that is very understandable! Do you really think, having a new tool is the lowest hanging fruit here?

Thank you because I have been curious about an all-around good crimper, rather than buying dozens of single-use tools.
There's plenty of things to call out in your situation, but you've done a good job of calling it out. You might want to check all of your other panels if you have more. The only thing not called out so far is the rust on the panel which may just be due to age.

I only brought up the crimper as an improper crimp might land you right back in this situation.

I bought this big bertha already, for the big lugs. I am pretty happy with it: https://www.amazon.co.uk/dp/B08FJFLTHK

I am still getting to understand these insulated red/yellow/blue things.
This looks like a decent tool. For lug crimps, I use a Temco hydraulic crimper. Nothing wrong with your tool, though. Will uses something similar from what I've seen
 
There's plenty of things to call out in your situation, but you've done a good job of calling it out. You might want to check all of your other panels if you have more. The only thing not called out so far is the rust on the panel which may just be due to age.

Thank you, I was wondering about those small specks of what look like rusted iron filings. This is mounted on a galvanized steel frame which I built quickly, including filing the edges and so I easily may have done this myself. It also could be organic splatter from work of the gardener. Plants grow above the roof line just north of where this panel is installed. (Notice, the brown marks also appear on the informational label)

The panel has only been installed four or five months. I bought it in mid-September last year.
 
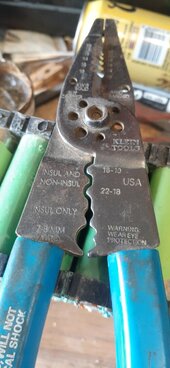
Hey @Sennen, may I ask one more question about the Wirefly crimper?
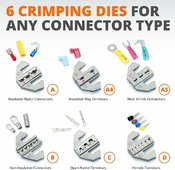
These two dies, A and A3 shown here:
With die A3, yellow appears to be the smallest. But with die A, yellow appears to be the largest. That doesn't make sense, does it? Am I not thinking of this properly? I thought yellow indicates the cross-sectional area of the conductor, so should scale with the crimp and the insulator size as well.
Save your money for more panels.
20240225_133320.jpg
 
Hey @Sennen, may I ask one more question about the Wirefly crimper?
These two dies, A and A3 shown here:
With die A3, yellow appears to be the smallest. But with die A, yellow appears to be the largest. That doesn't make sense, does it? Am I not thinking of this properly? I thought yellow indicates the cross-sectional area of the conductor, so should scale with the crimp and the insulator size as well.
A3 is for tiny crimps which you'd likely never use. I got mine with the 6 pack. as I frequently use all but A4. Everything I've crimped with this tool is solid and the wire will fail before the crimp. (Gave a crimped butt connector on 16ga wire to my 12yo and said break it. Still hasn't)
1708898691243.jpeg
 
Back
Top