diy solar

diy solar

Rail Roof Install - Level?

Kuma

New Member
Joined
Mar 12, 2023
Messages
176
Location
Newcastle Ca
Installed Ironridge tile hooks and installed the first set of rails today. I used a good 6 ft level for the top and bottom 22ft rail sections. The rails dont look quite level with each other though, not parallel. Maybe ~1 inch off in 22 ft? I would imagine if the rails are not parallel the panels would be twisted somewhat, not perfectly flat when installed. I read the Ironridge install instructions and all it says is to level rails.

Some say they run a string from each end of the rail section to try to make the rails flat, not follow roof contours and have high points. I did not do this but should probably check the rails with a string.

I am curious what others do and am open to suggestions.

btw - the house was owner built in the 70's and few things are straight, plumb, on center...
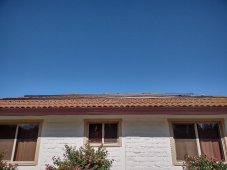

roof 2.jpgroof 1.jpg
 
This is what is used in the trades.

Use a pair of quick clamps, one on each end of the rail, pull the string taught from end to end, this puts the string @ 3-4 inches above the rail. Then check at each mount and adjust ( raise or lower at the mount ) so string is the same height at each mount.

You can also use a 4ft to 6ft level on the rail. I use the string and then the level and comes out near perfect every time.

This is a kit, string and line levels for ~10 bucks

Same for masonry, fences or anything else for long distance leveling
 
As Tim said water level the first rail on one end.
Level the rest using that as a standard, use a long water level and a long square alu board (we call them RAI in my country) ab. 3 meters in length. Make sure all rails are level horisontal and vertical, also in regards to each other.
This takes a while...the end result with panels should look like a flat floor and as good as an ice rink.
 
Last edited:
This is what is used in the trades.

Use a pair of quick clamps, one on each end of the rail, pull the string taught from end to end, this puts the string @ 3-4 inches above the rail. Then check at each mount and adjust ( raise or lower at the mount ) so string is the same height at each mount.

You can also use a 4ft to 6ft level on the rail. I use the string and then the level and comes out near perfect every time.

This is a kit, string and line levels for ~10 bucks

Same for masonry, fences or anything else for long distance leveling

Should I just raise the left side of the bottom rail ~1" then run the string to check for peaks on the rails? Seems crazy I'm eye balling the rails from the ground to check that the top and bottom rails are parallel.
 
As Tim said water level the first rail on one end.
Level the using that as a standard, use a long water level and a long square alu board (we call them RAI in my country) ab. 3 meters in length.

Apologies for not understanding something that is basic. Level one rail on one end? Dont understand how that would be the standard, any different, if the same level is used for the entire rail run. Their are 4 11ft rail pieces. Top and bottom rails are 22ft total. I used a 6ft, 2 meter, level on all 4 rail pieces. Maybe my eyes are too far out of alignment... :) I will recheck this morning.
 
seriously, it might look better if you make the lower/front rail follow the roof line, whether it is level or not. Then make the second rail follow the first rail.

Putting a dead level rail on a roof that’s out of level may stick out. Following the roof will look “right.”

In this case, if it looks right, it is right.
 
Last edited:
seriously, it might look better if you make the lower/front rail follow the roof line, whether it is level or not. Then make the second rail follow the first rail.

Putting a dead level rail on a roof that’s out of level may stick out. Following the roof will look “right.”

In this case, if it looks right, it is right.

So eye balling the top and bottom rails from the ground to verify the rails are parallel with each other?
 
So eye balling the top and bottom rails from the ground to verify the rails are parallel with each other?

Sure. End of the day, when you come home, does it look right? That’s the real test.

I suspect you will not notice the whole deal a few weeks after the install.

Just like you probably don’t notice the roof being out of level.
 
Thanks everyone. It took a combination of science (bubble level, string with clamps) and art (what looks right, visual check on rails being parallel). I can not say it is perfect but can say it is very good. Rails are almost perfectly identical/parallel the entire span, and this is with my glasses on lol, and it is better then the neighbors professional install that cost $30k.

What I realized is the bottom rail attachments being only ~6 inches from the load bearing exterior wall prevented the tile roof/rafters from sagging. Or at least sagged consistently. Most of the upper rail attachments/rafters sagged ~1/2+, more in the middle rafter attachements, less on the hip side of attachments.

I still have the other roof to do and it is longer at 33 ft but at least I am armed with some experience.
 
I still have the other roof to do
What I learned about rails and sagging is that sometimes heavier/stiffer rails can reduce rafter sag and even reduce number of penetrations. It was worth the extra cost on one of my self installs. The other engineering insight is that uplift is the greatest load your roof will experience with solar panels. They are not that heavy.
 
Last edited:
What I learned about rails and sagging is that sometimes heavier/stiffer rails can reduce rafter sag and even reduce number of penetrations. It was worth the extra cost on one of my self installs. The other engineering insight is that uplift is the greatest load your roof will experience with solar panels. They are not that heavy.

I chose the Ironridge xr100 rails because it allows for a 6ft span between attachments using tile hook mounts. The xr100 rails could span up to 8 ft but the tile hooks are the limitation. Good to know their are other benefits.
 
When we added solar panels to the simple roof mount installed well before we bought the place, we discovered the rails were far from parallel. We had to drill holes on the underside of the 2 panels to attach to the lower rail. I used scrap plywood to protect the back side of the panels when drilling.

Once the panels are installed, looks fine.
 
Installed Ironridge tile hooks and installed the first set of rails today. I used a good 6 ft level for the top and bottom 22ft rail sections. The rails dont look quite level with each other though, not parallel. Maybe ~1 inch off in 22 ft? I would imagine if the rails are not parallel the panels would be twisted somewhat, not perfectly flat when installed. I read the Ironridge install instructions and all it says is to level rails.

Some say they run a string from each end of the rail section to try to make the rails flat, not follow roof contours and have high points. I did not do this but should probably check the rails with a string.

I am curious what others do and am open to suggestions.

btw - the house was owner built in the 70's and few things are straight, plumb, on center...
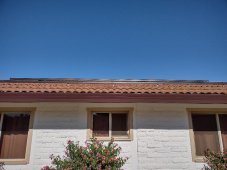

View attachment 164696View attachment 164697

Looks good enough to me
 
Back
Top