diy solar

diy solar

Removing laser welds from cells

Tatertot51804

New Member
Joined
Jun 7, 2022
Messages
11
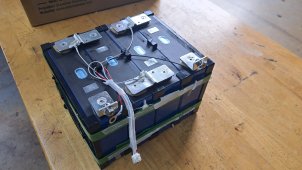
Before deciding it would be best to build my own 48v batteries I purchased 4 redodo 12v batteries. However I am having problems with the cells inside not being balanced. I paralleled and charged the batteries but I can not get any 2 batteries to have matching voltages. 1 always sky rockets to high voltage cut off even through the others never reach 14v. I dismantled one battery to see how they were built because my thought was to take them all apart and top balance the cells before adding my own 16s bms and just making a 48v battery. (the battery I took apart did not having matching cell voltages) The problem is these packs have laser welded bus bars. What is the safest way to remove the bus bars and preserve the terminals so I can bolt new bus bars to the cells to top balance? Thanks!
 
You don't need to break apart the pack.
Although you can't do a proper top-balance without taking them apart, you can bring them up pretty close in voltage.

The method is to take a PSU, set it to 3.6-3.65v, constant current (let's say 1 to 5 amps)
and connect via alligator clip cables to the cell. I would first take a voltage meter and probe the cell, just to make sure you are correctly wiring it up. If you get anywhere higher than 3.65v, you aren't probing the correct terminals. Make sure polarity is correct! Don't let the series connections confuse you. Probe first with a volt meter!

Then when the PSU reaches 3.65v and the current drops to only a few hundred milliamps, charge the next cell, in the same manner (again, checking voltage and polarity first).
This might take a while, but should balance the cells pretty closely.
That was the process I was going to use. I just figured with 16 cells to do it might be a little easier to put them all in parallel. I only have 4 of these redodo batteries but I found the same cells online. Thought I could order 16 more to make a 16s2p battery but they'd definitely have to be separated to that
 
Have a photo of the innards?
They are gangfeng cells. I have zero issue with capacity. The packs just aren't balanced. Since I already bought 4 of these batteries I figure theres no harm in just rebuilding it and adding a bms.
 

Attachments

  • 20230608_090734.jpg
    20230608_090734.jpg
    337.9 KB · Views: 71
Hm. Not sure how best to connect them together once you cut the bus bar. That's what I was primarily looking at.

Get your own laser welder lol
 
The threads are still intact under the bus bars so my thought was jsut remove them and bolt on new ones
I think you might damage the aluminum terminals, trying to take off the bus bars.
I can't think of an easy way to do that... maybe carefully dremel your way between the bus bar and terminal.
But personally I wouldn't bother.
 
Don't destroy those connections.

Just do each individual cell.

One thing I did was put a wifi plug in switch with power monitoring on the plug to my power supply.

This allows you to leave the area and periodically check over your phone to see if the cell is full or not. Once you do one cell (maybe the lowest first) this gives you a max time that you should expect for the remaining cells.
 
Should be fairly straightforward with a CNC machine, or a router with the right bit and a jig. Also, you could just connect the packs in series with a thick cable.
 
Last edited:
Why not add an active balancer and let that do its work? Might take a while but you don't have to take it apart.

I do see tapped threads already on the busbars so its just a matter of connecting.
 
@Tatertot51804 Any update on how you separated the cells?
I never did anything with it. I opted to use that battery in a 12v system in my truck to run a fridge. After months of being charged and discharged it's still out of balance. I'm actually having problems with multiple batteries at this point
 
Should be fairly straightforward with a CNC machine, or a router with the right bit and a jig. Also, you could just connect the packs in series with a thick cable.
I opted not to take it apart. I didn't want to chance messing it up as it's still a usable 12v battery even though it's not in a case
 
Why not add an active balancer and let that do its work? Might take a while but you don't have to take it apart.

I do see tapped threads already on the busbars so its just a matter of connecting.
I had thought about that. Being out of balance wasn't an issue when it was being used as a 12v battery. But I had to swap it out with one in my 48v system because this one is exposed to the elements and it's getting cold out
 
They are gangfeng cells. I have zero issue with capacity. The packs just aren't balanced. Since I already bought 4 of these batteries I figure theres no harm in just rebuilding it and adding a bms.

How about an active balancer to balance the cells?
 
I opted not to take it apart. I didn't want to chance messing it up as it's still a usable 12v battery even though it's not in a case
I have a couple 48v EG4 packs with a cell in the middle that went bad. All were welded together. I carefully dremeled out the bad cell leaving enough aluminum on the adjacent good cells. Some have a bump, cut that bump off. Then I cut 1/8" aluminum bar to bridge that gap. I bought stubby aluminum pop rivets, drilled holes thru both layers. Popped the first rivet in to hold it tight for the rest of the rivets and holes. Turned out great! 3 rivets in each area formerly welded!
 
I have a couple 48v EG4 packs with a cell in the middle that went bad. All were welded together. I carefully dremeled out the bad cell leaving enough aluminum on the adjacent good cells. Some have a bump, cut that bump off. Then I cut 1/8" aluminum bar to bridge that gap. I bought stubby aluminum pop rivets, drilled holes thru both layers. Popped the first rivet in to hold it tight for the rest of the rivets and holes. Turned out great! 3 rivets in each area formerly welded!
I wouldn't count on pop rivets to make reliable electrical connections between aluminium busbars!
Better use 2 to 4 small bolts and nuts(maybe 3 pcs M5) along with proper hardware like belleville washers.

Handy & enough confident TIG welder could also probably weld those busbars end-to-end.
 
Back
Top