You are using an out of date browser. It may not display this or other websites correctly.
You should upgrade or use an alternative browser.
You should upgrade or use an alternative browser.
Sixtysix 280ah Cells from Deligreen
- Thread starter ArthurEld
- Start date
Well, since the loctite is wicking up the screw, guess what? It's wicking on the terminals.
I can see a little but I will clean all of the terminals with acetone and scotchbrite and wipe a little noalox on
Yes that's what happened to me. Someone else here used a method of 1 drop of loctite on a stud and then "rubbed two studs together" (interlocked their threads) to divide the loctite evenly between them which prevented this kind of problem with excess.
Edit: though I kind of like the qtip idea above
ArthurEld
Solar Wizard
I used qtips for the acetone and they barely fit. So I would have to find some small cotton swabs.
Or I could try touching the tip of the loctite container to the top of the hole and only put 1/2 drop in.
Or I could try touching the tip of the loctite container to the top of the hole and only put 1/2 drop in.
ArthurEld
Solar Wizard
I wiped off the tops of the terminals with a rag damp with acetone. That took the excess off.
I'll wipe them again in a few hours to be sure there's no residue.
I'll wipe them again in a few hours to be sure there's no residue.
So you’ve abandoned the the Helicoils and going with SS grubscrews Loctited in with red loctite, right?I wiped off the tops of the terminals with a rag damp with acetone. That took the excess off.
I'll wipe them again in a few hours to be sure there's no residue.
What will be your torque goal for this solution?
From what you’ve seen of the red Loctite so far, do you think it would be effective to recover partially-stripped threads? (Top 3 out of 5 threads barely grab)?
ArthurEld
Solar Wizard
I didn't abandon the helicoils. I just want to limit the number of helicoils I have to put in.So you’ve abandoned the the Helicoils and going with SS grubscrews Loctited in with red loctite, right?
What will be your torque goal for this solution?
From what you’ve seen of the red Loctite so far, do you think it would be effective to recover partially-stripped threads? (Top 3 out of 5 threads barely grab)?
I have come to the conclusion that 30 - 35 inch pounds is good enough for the torque. But the threads shouldn't rip out if I accidently go to 40 inch pounds.
I'm glad this problem with stripped threads came to my attention now because they could cause big problems if left unnoticed.
I bet there are a lot of EVE battery packs that have threads already stripped or are ready to let go and people don't even know it.
I am not the only person that has stressed the crap out of the terminal threads by the cells moving.
There was plenty of warning about cell movement stressing terminal threads but I still messed it up.
Last edited:
Do you think it was cell movement that messed up your threads or use/galling?I didn't abandon the helicoils. I just want to limit the number of helicoils I have to put in.
I have come to the conclusion that 30 - 35 inch pounds is good enough for the torque. But the threads shouldn't rip out if I accidently go to 40 inch pounds.
I'm glad this problem with stripped threads came to my attention now because they could cause big problems if left unnoticed.
I bet there are a lot of EVE battery packs that have threads already stripped or are ready to let go and people don't even know it.
I am not the only person that has stressed the crap out of the terminal threads by the cells moving.
There was plenty of warning about cell movement stressing terminal threads but I still messed it up.
I really didn’t have any movement at all and only used the threads 4 times (three of those to light torque well under 35 inch-lbs), so I’m pretty certain that in my case the worn aluminum threads developed just through using them with stainless bolts (likely from a bit of galling each time).
ArthurEld
Solar Wizard
I think movement messed up my threads.
I didn't turn the stud so galling didn't mess up my threads.
A few of my nuts got stuck on studs but I noticed it when I tried to take the nut off.
It was right after the short. When I noticed one was seized, I checked them all by loosening them.
I just mentioned it because I realized seized nuts could be a bigger problem if someone didn't notice.
Seized nuts are the reason it is recommended that we put an allen wrench in the stud when we adjust the nut.
So you got thread damage before you’d ever removed a bolt or a stud from the aluminum threads? Yeah, must have just been movement/mechanical stress through the busbars then...I think movement messed up my threads.
I didn't turn the stud so galling didn't mess up my threads.
A few of my nuts got stuck on studs but I noticed it when I tried to take the nut off.
It was right after the short. When I noticed one was seized, I checked them all by loosening them.
I just mentioned it because I realized it could be a bigger problem if someone didn't notice.
Glad I’ve settled on 2/0 cables to replace my solid busbars...
ArthurEld
Solar Wizard
That is an excellent solution.Glad I’ve settled on 2/0 cables to replace my solid busbars...
I was worried they’d cost a fortune but really not too bad (if you crimp your own).That is an excellent solution.
I’m going to hold off installing my grubscrews until I hear what you think of the final results you get with the red Loctite.
Sounds like the Loctite is easier to apply and easier to clean up than JB Weld or another epoxy-based thread stopper would be, so I’m leaning that way unless you discover that it’s not up to the challange.
You had the one damaged thread into which you installed a Helicoil that then sheeted out (at 80Nm). Do you have any other weakened / partially-stripped threads you are trying to recover with Loctite?
How are you going to attempt to recover that sheered thread, with a larger-diameter Helicoil?
ArthurEld
Solar Wizard
I have a good cell that needs a helicoil. The helicoil I tore out was on a bad cell I will never use.You had the one damaged thread into which you installed a Helicoil that then sheeted out (at 80Nm). Do you have any other weakened / partially-stripped threads you are trying to recover with Loctite?
If I wanted to fix that hole I would have to use a keensert or timesert now that it is too big for a M6 helicoil.How are you going to attempt to recover that sheered thread, with a larger-diameter Helicoil?
Or I could put in M8 threads
Cool. Have you seen enough to know an M6 Helicoil will be able to recover any future stripped threads your forced to deal with?I have a good cell that needs a helicoil. The helicoil I tore out was on a bad cell I will never use.
Great, so sounds like you’re convinced there is a 2-stage recovery plan for these weak aluminum threads we are getting:If I wanted to fix that hole I would have to use a keensert or timesert now that it is too big for a M6 helicoil.
Or I could put in M8 threads
Primary plan is Stainless Grubscrews w/ Red Loctite
First recovery if those sheer out at 4nm (or whatever torque) is M6 Helicoil
Second recovery if an M6 Helicoil sheers out is Keensert or timesert or tapping M8 threads.
Believe I’ll be following in your (thoughtful) footsteps...
ArthurEld
Solar Wizard
yesCool. Have you seen enough to know an M6 Helicoil will be able to recover any future stripped threads your forced to deal with?
These crappy terminal holes really aren't a big deal. Just part of DIYGreat, so sounds like you’re convinced there is a 2-stage recovery plan for these weak aluminum threads we are getting:
Primary plan is Stainless Grubscrews w/ Red Loctite
First recovery if those sheer out at 4nm (or whatever torque) is M6 Helicoil
Second recovery if an M6 Helicoil sheers out is Keensert or timesert or tapping M8 threads.
Believe I’ll be following in your (thoughtful) footsteps...
Your confidence is comforting. And thanks for all the good work.yes
These crappy terminal holes really aren't a big deal. Just part of DIY
ArthurEld
Solar Wizard
Thanks,Your confidence is comforting. And thanks for all the good work.
I just went and did the other one
Hole drilled. Ground off drill. Doesn't need to cut in the center. Good thing
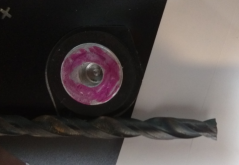
Flat bottom hole
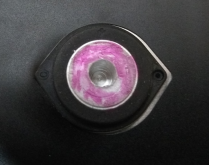
Rotate by hand in drill press to start tap exactly perpendicular
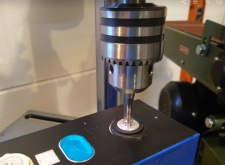
Removed from drill press to finish by hand
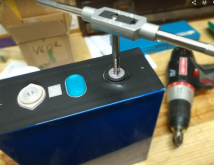
Cut off 2 threads
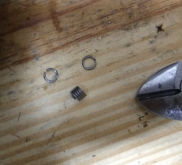
Finished with ugly countersink.
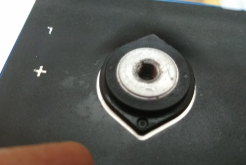
Finished product and tang
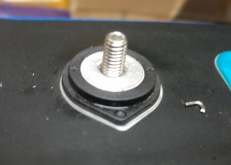
I don't need to test how much torque will tear it out but I'm pretty sure it's more than 60 inch pounds
Last edited:
ArthurEld
Solar Wizard
I let the loctite cure for 36 hours before using scotchbrite to scuff up the terminals and adding a thin film of noalox to all of the terminals.
Then I wired it up serial so I can do a capacity test. This is the first capacity test for the battery.
I only torqued my busbars to 25 inch pounds. I think it is better to let the threadlocker cure longer before using more torque. And I don't think it will hurt anything. This will force the studs to be normal to the terminals before the threadlocker is completely cured.
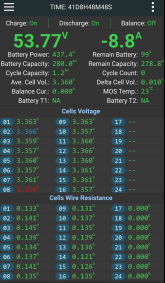
Here's my cells barely out of the knee. I have some of my house loads connected but they don't amount to a whole lot. I am usually at less then 10A. Occasionally I get up to 40A or so. It will be days before I hit the low voltage limit and know what the capacity is.
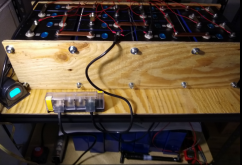
There is a new 225A Class T fuse in the lower left corner next to the cells. The holder can use up to a 400A fuse and I might switch to that one day. The 225A fuse should be good for using two 48V batteries at once.
Then I wired it up serial so I can do a capacity test. This is the first capacity test for the battery.
I only torqued my busbars to 25 inch pounds. I think it is better to let the threadlocker cure longer before using more torque. And I don't think it will hurt anything. This will force the studs to be normal to the terminals before the threadlocker is completely cured.
Here's my cells barely out of the knee. I have some of my house loads connected but they don't amount to a whole lot. I am usually at less then 10A. Occasionally I get up to 40A or so. It will be days before I hit the low voltage limit and know what the capacity is.

There is a new 225A Class T fuse in the lower left corner next to the cells. The holder can use up to a 400A fuse and I might switch to that one day. The 225A fuse should be good for using two 48V batteries at once.

Last edited:
Nice!I let the loctite cure for 36 hours before using scotchbrite to scuff up the terminals and adding a thin film of noalox to all of the terminals.
Then I wired it up serial so I can do a capacity test. This is the first capacity test for the battery.
I only torqued my busbars to 25 inch pounds. I think it is better to let the threadlocker cure longer before using more torque. And I don't think it will hurt anything. This will force the studs to be normal to the terminals before the threadlocker is completely cured.
Here's my cells barely out of the knee. I have some of my house loads connected but they don't amount to a whole lot. I am usually at less then 10A. Occasionally I get up to 40A or so. It will be days before I hit the low voltage limit and know what the capacity is.
View attachment 35225
There is a new 225A Class T fuse in the lower left corner next to the cells. The holder can use up to a 400A fuse and I might switch to that one day. The 225A fuse should be good for using two 48V batteries at once.
View attachment 35226
My stainless 20mm studs just arrived tonight, so I’m just waiting for you to give Red Loctite your final blessing before getting some and following in your footsteps.
After only 36 hours of cure, you’re able to get to 25 inch-lbs without issue - how long will you wait for ‘full cure’ and at that point, if you plan to push torque further (and if so to where)?
Do you have any way to measure the quality / resistance of your connections to assess whether they improve at higher torque?
I suppose measuring voltage across cell terminals at two different current levels allows you to get some measure of the pair on connection/contact resistances added to the internal resistance (of ~0.25 mOhms).
If you see different deltas in voltage drops (between the two current levels) amongst cells at 25 inch-lbs and any cells you bumped up to 35 inch-lbs of higher, you’ll know the extra torque improved the connection).
Is that ‘cells wire resistance’ a measure you have any confidence in? It’s showing a low of 121 mOhms and a high of 145m Ohms.
That’s values are very high compared to internal resistance of well under 1 mOhm (which is why I asked if you trust them), but that ~20% variation could be partly explained by differences in contact resistance at 25 inch-lbs...
ArthurEld
Solar Wizard
I only waited 18 hours. The instructions say to assemble right away. But studs allow the option to wait before torqueing.Nice!
My stainless 20mm studs just arrived tonight, so I’m just waiting for you to give Red Loctite your final blessing before getting some and following in your footsteps.
After only 36 hours of cure, you’re able to get to 25 inch-lbs without issue - how long will you wait for ‘full cure’ and at that point, if you plan to push torque further (and if so to where)?
I thought it was better to torque to 25 inch pounds after 18 hours. It takes 24 - 72 hours to fully cure.
The only thing I check for is heat with a Seek infrared camera. It will show hot spots.Do you have any way to measure the quality / resistance of your connections to assess whether they improve at higher torque?
I do have confidence in those #s but I don't have much experience.I suppose measuring voltage across cell terminals at two different current levels allows you to get some measure of the pair on connection/contact resistances added to the internal resistance (of ~0.25 mOhms).
If you see different deltas in voltage drops (between the two current levels) amongst cells at 25 inch-lbs and any cells you bumped up to 35 inch-lbs of higher, you’ll know the extra torque improved the connection).
Is that ‘cells wire resistance’ a measure you have any confidence in? It’s showing a low of 121 mOhms and a high of 145m Ohms.
I have tried checking connections and increasing torque in the past but the BMS wire resistance #s didn't change. I think those values are acceptable but I have never seen what happens when there is a problem. I have 3 more batteries and BMSs. I will be paying attention to variations as time goes on.
I think wire resistance values are very different from IR values.That’s values are very high compared to internal resistance of well under 1 mOhm (which is why I asked if you trust them), but that ~20% variation could be partly explained by differences in contact resistance at 25 inch-lbs...
Last edited:
ArthurEld
Solar Wizard
Another reason I only used 25 in lbs of torque is to allow the busbar to slide if the cells move.
Since I am using solid busbars I need to find the sweet spot for how much and when to torque my terminal nuts.
To me it makes more sense to torque the terminal nuts when the cells are closer to full charge.
Cell movement and the stress it causes to terminal studs is an important subject that isn't talked about much.
I have seen it mentioned in the past but I don't think most people deal with it properly.
Braided busbars or wire connections solve the problem and I assume the spring loaded fixture guys have come to that conclusion.
But most people use solid busbars.
Similar threads
- Replies
- 6
- Views
- 402
- Replies
- 4
- Views
- 196


