diy solar

diy solar

Source for Relays for BMS8T

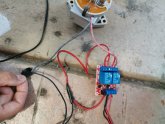
Yeah, I picked up a used TE Contactor for $30 off of eBay. The coil appears to draw about 2 watts when energized at nominal 24V and does not get warm at all when it is energized for hours at a time. Unfortunately, I'm still waiting on my batteries (8-280ah LiFePo4), so I have only been able to run about 3 amps through the main contactor from a bench power supply. I can't speak to how warm they will get under actual load conditions, but they are rated for 500A and I'll probably max it out at about 125A at 24V. I can say that they are much better than the relays that you can get from Chargery. Those suckers got too hot to touch just energizing the coil and drew about 11 watts. I started out with two 12V Chargery relays directly fed from the Chargery BMS 12V outputs, then figured out that if I use the output of two small SSRs in series with the TE Contactor coil, I only have to use one main contactor instead of two and not worry about overloading the Chargery BMS outputs. This cuts down the potential wasted energy from about 528 watt-hours per day to 48 watt-hours per day. An added benefit of the TE Contactor is that the coil can be driven with 24V, so it makes wiring the coil circuit pretty simple. I paid $13 each for the two SSRs at the following link: https://www.amazon.com/gp/product/B079BGGVYX/ref=ppx_yo_dt_b_asin_title_o08_s00?ie=UTF8&psc=1

Do those SSRs require a separate 12V supply of power, or are they activated directly through the leads from the BMS?
 
So far the best combination I've found for a Chargery relay setup is these two gismos. Everything you need to run one contactor for common port (by wiring the relay controller NO contacts in series to one relay) or two contactors. Plus you get an extra controller for cooling fans or whatever. Lowest operating current and the coolest running of everything I have tested. Probably my final setup.

The parts:


I bought two of the contactors and they looked new. I run the relay module because in some cases current energizing two contactors causes the Chargery to reboot.

The hold current for the entire setup is 157 mA. Runs cool (barely warm) tested to 100 amps.

Since the module does the switching logic for both Chargery relay outputs common charge/discharge setups can use just one contactor for both charge/discharge and temperature protection cases.

I wired the Chargery relay wires to the high triggers and common and brought 12 v in from my stepdown to power the controller and the contactor coil.


Diagram for common port single relay

chargerycontactorsetup.png

For two contactors run 12v+ through NO1/COM1 and NO2/COM2 separately to each coil+.
 
Do those SSRs require a separate 12V supply of power, or are they activated directly through the leads from the BMS?
The SSRs I used are activated directly from the Chargery Charge and Discharge cutoff leads at 12V. I wired their outputs up in series with the TE Contactor coil across my 24 V bus. I didn't use the optocouplers for my setup because I didn't know if they could handle 24V.
 
I bought a couple of the TE Connectivity / Kilovac EV200P4ANA contactors
This is a latching version. I am wondering how I should use them with my BMS8T, do I need to use a relay board, or octocoupler?
The relay I'm using is the EV200AAANA, which is a normally open (NO) relay and only closes the main contactor when the coils are energized. If, for whatever reason, the BMS drops the voltage to the coil the relay main contactor opens. The Chargery BMS can directly feed the coil of a NO relay at 12V if it does not draw more than 2.5A total. However, if you are planning to use latching relays you will need a logic board that takes the 12V output from the Chargery and converts it to a latching pulse signal that your relay can use.
 
I bought a couple of the TE Connectivity / Kilovac EV200P4ANA contactors
This is a latching version. I am wondering how I should use them with my BMS8T, do I need to use a relay board, or octocoupler?

If this does what I think it does (not entirely sure) you could remove the relays on this board and run yours instead. What I think it does is convert high trigger to the pulses needed for the latching relays that are on the module.

 
The SSRs I used are activated directly from the Chargery Charge and Discharge cutoff leads at 12V. I wired their outputs up in series with the TE Contactor coil across my 24 V bus. I didn't use the optocouplers for my setup because I didn't know if they could handle 24V.
I am tempted to try the SSR's you are using. Do you think they would work with the latching version of the TE contactor?
 
I am tempted to try the SSR's you are using. Do you think they would work with the latching version of the TE contactor?
No, the SSRs that I used would not work with your latching relay without some kind of driver circuit to convert the continuous 12/24v signal to a pulse signal. The SSRs I'm using work with my EV200AAANA relay because it is a normally open relay that only closes when the coil is continuously energized at 12/24V. I think onemorebattery posted a link above for a self latching relay module that looks like it would work using the Chargery inputs to create a pulse to trigger your latching relay. See his post at 6:21 PM earlier today.
 
No, the SSRs that I used would not work with your latching relay without some kind of driver circuit to convert the continuous 12/24v signal to a pulse signal. The SSRs I'm using work with my EV200AAANA relay because it is a normally open relay that only closes when the coil is continuously energized at 12/24V. I think onemorebattery posted a link above for a self latching relay module that looks like it would work using the Chargery inputs to create a pulse to trigger your latching relay. See his post at 6:21 PM earlier today.
Thanks, looks like the onemorebattery it is.
 
So far the best combination I've found for a Chargery relay setup is these two gismos. Everything you need to run one contactor for common port (by wiring the relay controller NO contacts in series to one relay) or two contactors. Plus you get an extra controller for cooling fans or whatever. Lowest operating current and the coolest running of everything I have tested. Probably my final setup.

The parts:


I bought two of the contactors and they looked new. I run the relay module because in some cases current energizing two contactors causes the Chargery to reboot.

The hold current for the entire setup is 157 mA. Runs cool (barely warm) tested to 100 amps.

Since the module does the switching logic for both Chargery relay outputs common charge/discharge setups can use just one contactor for both charge/discharge and temperature protection cases.

I wired the Chargery relay wires to the high triggers and common and brought 12 v in from my stepdown to power the controller and the contactor coil.


Diagram for common port single relay

View attachment 13830

For two contactors run 12v+ through NO1/COM1 and NO2/COM2 separately to each coil+.
i just bought the pcb board. will that work if i hook them up?
 
So far the best combination I've found for a Chargery relay setup is these two gismos. Everything you need to run one contactor for common port (by wiring the relay controller NO contacts in series to one relay) or two contactors. Plus you get an extra controller for cooling fans or whatever. Lowest operating current and the coolest running of everything I have tested. Probably my final setup.

The parts:


I bought two of the contactors and they looked new. I run the relay module because in some cases current energizing two contactors causes the Chargery to reboot.

The hold current for the entire setup is 157 mA. Runs cool (barely warm) tested to 100 amps.

Since the module does the switching logic for both Chargery relay outputs common charge/discharge setups can use just one contactor for both charge/discharge and temperature protection cases.

I wired the Chargery relay wires to the high triggers and common and brought 12 v in from my stepdown to power the controller and the contactor coil.


Diagram for common port single relay

View attachment 13830

For two contactors run 12v+ through NO1/COM1 and NO2/COM2 separately to each coil+.
i tried.. didn't work..nothing happen..i double check too.
 
I don't see any wiring errors but your power sources are not shown. There are two red leds and one green led (near IN2) on the module. If the green led is not lit then the module does not have power. Check your grounding. You should have zero volts between DC- and COIL-. If you have the Chargery connected to one supply (a battery) and the module connected to another (a different battery or power supply) without a common ground the module will have no power.
 
I don't see any wiring errors but your power sources are not shown. There are two red leds and one green led (near IN2) on the module. If the green led is not lit then the module does not have power. Check your grounding. You should have zero volts between DC- and COIL-. If you have the Chargery connected to one supply (a battery) and the module connected to another (a different battery or power supply) without a common ground the module will have no power.
two black wire connected to 12v battery. also connected to the bms.
 
POSTING UPDATE from ( page-3#post-67469 ) reference to Dongya Relays.

That post mentions the DH200 series which is the incorrect one for this type of application. I ordered & received two, to only realize that I made a mistake and that these were Uni-directional and not energy savers, although lower power consumption that the Electro-Mechanical Contactors as used with the Chargery BMS'. I have since ordered two DHV200AAANH relays to test within my production setup. They are expected to arrive June 2nd and will likely be in operation by June 8th.

The correct Relay information is as follows, with attached info sheet & image.
The DHV200AAANH is non-polarized, bi-directional, energy saver type:
V
stands for non-polarized
200 stands for rated current 200A
The first A: main contact normally open (stud type)
The second A: coil voltage 9V-36V
The third A stands for coil wire length is 390mm
N stands for not with coil terminal connector
H stands for install method is Horizontal

Website & Ordering information here: https://en.cndongya.com/ or Https://www.dc-contactors.com
IMPORTANT NOTE READ THIS ! :
These are not shown on the website and this company does not typically sell small orders. Sample orders can be done.
Because these are not normally stocked, there is lead time for assembly but they can also be made in 200, to 500 + Amp models as well. Priced accordingly of course.
You will have to use their Contact Page and request a quote for the specific relay. See the attached Specifications document which breaks down the details. Be VERY CLEAR to State " non-polarized, bi-directional, energy saver type "

DHV200AAANH.jpg
 

Attachments

  • DHV200 Engery saving datasheet.pdf
    307.8 KB · Views: 12
Back
Top