Would you mind linking to the other thread? There are so many threads that mention "group buy" in the title I'm not sure where to look.I wrote a long post and attached a screen shot of the typical test sheet that I see. Then I remembered which thread this was and decided I should post that in the group buy thread instead. As someone pointed out, this thread really is supposed to be more Xuba centric.


You are using an out of date browser. It may not display this or other websites correctly.
You should upgrade or use an alternative browser.
You should upgrade or use an alternative browser.
Xuba Electronics: DEAL - 280AH LiFePo4 cells. Purchase & Review
- Thread starter Steve_S
- Start date
Michael B Caro
Solar Wizard
- Joined
- May 21, 2020
- Messages
- 1,194
Would you mind linking to the other thread? There are so many threads that mention "group buy" in the title I'm not sure where to look.

280ah cells
I purchased from Gloria Luo at Shenzhen Basen a month ago, before I discovered this forum. Retired and with time on my hands, I spent days reviewing the different options, finally deciding on Basen due to their being both an established company and having the best price I could find. My first...
 diysolarforum.com
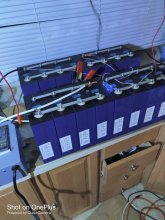
Received these cells and ready to put them together in simple 16s config. I'm starting to doubt the bus bars that Amy sent me. Should I just make copper ones? This is for electric motor that will pull max 200a. What would you recommend as far as bars? Picture below on bars that I received with cells.
Received these cells and ready to put them together in simple 16s config. I'm starting to doubt the bus bars that Amy sent me. Should I just make copper ones? This is for electric motor that will pull max 200a. What would you recommend as far as bars? Picture below on bars that I received with cells.View attachment 25871
Did you recieve enough busbars to double them up ?
With double busbars you are going to need either longer screws, or to use grub screws in the terminals.
Amy can supply rectangular wider busbars for a small additional cost (still 2mm thickness, so I will use double of them too)
Steve_S
Offgrid Cabineer, N.E. Ontario, Canada
Remember that Covidus Interuptus had an effect on all shipments like everything else and as things have improved in certain areas things are moving along better.I guess I'm just lucky. My third shipment of cells was ordered Sept 29 and got fedex notice that I will have them this Wed. The second batch was 35 days and the first 55 days. All shipped via sea freight.
Greg
Solarfun4jim
Solar seduced :-)
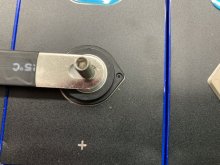
Anyone know for sure what the Xuba supplied busbars are made of?
(nickel plated copper???)
(nickel plated copper???)
Steve_S
Offgrid Cabineer, N.E. Ontario, Canada
Mine were solid copper, then they switched to tin plated copper for corrosion proofing. If you file down the slight ridge created when the holes are stamped out, you'll see the copper.
Solarfun4jim
Solar seduced :-)
Cheers SteveMine were solid copper, then they switched to tin plated copper for corrosion proofing. If you file down the slight ridge created when the holes are stamped out, you'll see the copper.
")
nope, why not just use the surplus sulfuric acid from inside one of the wet cell batteries you are replacing. That should do a nice job on surface removal...err, surface prep...Gas sounds stinky and dangerous. I'd go for the nail polish remover in a pinch.
It would be good to put on something for anti corrosion. Gas might leave enough residue to help.
And this may seem obvious but it wouldn't be smart to remove much aluminum when sanding the terminals. They need to be flat and parallel to the other terminals. Sandpaper will start rounding off the surface and the contact area will get smaller.
Fresh green scotch bright will clean the tarnish off the terminals just as fast as fine Emory cloth.
So there! 301 pages now.
Egg, do t have enough to double them. Anybody knows where maybe I can get heavy duty busbars copper tin plated on American side? Dont want to wait again for boat shipment. Or should I just make my own out of copper pipe? Any recommendations on how , what size, for 200a max current on 48v system?
I checked mine and sure enough they have that slight ridge. Its good you are pointing that out. The ridge is more slight than I had envisioned and files off very easily. I think many suppliers use these same ones although mine came with heat shrink tubing in the middle. I have no idea how many amps they are capable of and I am not thrilled to have elongated holes. By looking at them I think they will be ok for my use (less than 100 amps) and I will be doubling them up.Mine were solid copper, then they switched to tin plated copper for corrosion proofing. If you file down the slight ridge created when the holes are stamped out, you'll see the copper.
Steve_S
Offgrid Cabineer, N.E. Ontario, Canada
Yes, any bar / metal that is stamped will have a slight ridge on the exit side of the stamping.I checked mine and sure enough they have that slight ridge. Its good you are pointing that out. The ridge is more slight than I had envisioned and files off very easily. I think many suppliers use these same ones although mine came with heat shrink tubing in the middle. I have no idea how many amps they are capable of and I am not thrilled to have elongated holes. By looking at them I think they will be ok for my use (less than 100 amps) and I will be doubling them up.
The reason for the slot is a good reason.... remember the cells expand & contract. but when setting up your cells, you do need a little "wiggle space" and the slotted hole allows for that. I made my own BusBars with 110 Copper Bar Stock, drilled the holes with a drill press and still had to elongate one hole in each bar for that little juggle space. You cannot have the screws cross thread or go in on an angle.
Keep in mind, you will never be discharging these cells at 280A per cell ! If you are, there is other issues to deal with that would be a higher priority.
Doubling up the bars will give you plenty for normal usage.
While mine aren't XUBA (they're Shenzhen), they look the same as post 1841. The slotting is excessive and rather uncentered. I have 4.5mm of excess on both ends. We really only need .5mm on each side of the hole based on the expected swelling from the specs of the EVE cells. That said, I don't know that the bars would shift to accommodate expansion while under 7Nm of torque anyway?
Attachments
Minor but worthwhile clarification:While mine aren't XUBA (they're Shenzhen)
I suspect you are referring to Shenzhen Basen (from context), Shenzhen is a huge city in China, roughly the size of New York. It is not the name of any one company. Virtually every reseller of the EVE cells either has Shenzhen or Dongguan (a sister city that is also a huge export and manufacturing hub) in its name. For example:
Chefjjdecker
New Member
- Joined
- Aug 23, 2020
- Messages
- 9
D
Deleted member 9967
Guest
Find out what gauge of wire you need. From there you can figure out the cross sectional amount of wire you need.Egg, do t have enough to double them. Anybody knows where maybe I can get heavy duty busbars copper tin plated on American side? Dont want to wait again for boat shipment. Or should I just make my own out of copper pipe? Any recommendations on how , what size, for 200a max current on 48v system?
Which in your case is a LOT less than a pipe made of copper.
Many make their own out of copper pipe and to be honest, I have never heard of one being less than they need if they hammer the sheeeet out of the pipe to flatten it out.
I hope this helps.
Solarfun4jim
Solar seduced :-)
I ordered my xuba cells with double busbars.
My question is this, if you double up the busbars and add a BMS/balance lead, do you need to replace the supplied screws with slightly longer ones or will they still have enough threads in contact? I'm assuming you do not need to use a locking washer as well?
My question is this, if you double up the busbars and add a BMS/balance lead, do you need to replace the supplied screws with slightly longer ones or will they still have enough threads in contact? I'm assuming you do not need to use a locking washer as well?
Last edited:
D
Deleted member 9967
Guest
I am using 280 Ah cells and I have doubled up the bus bars and using it on my mobility scooter. In spite of the jostling they are still holding up just fine.I ordered my xuba cells with double busbars.
My question is this, if you double up the busbars and add a balance lead, do you need to replace the supplied screws with slightly longer ones or with they still have enough threads in contact? I'm assuming you do not need to use a locking washer as well?
Solarfun4jim
Solar seduced :-)
It is a pity the supplied busbars are not slightly longer, that way you could connect the cells in either direction. The inside of the slots to connect the cells side by side and the outside of the slots to connect length ways!
(Maybe a suggestion for AMY)
(Maybe a suggestion for AMY)
Amy can supply longer busbars for an 8s square pack, as well as wider busbarsIt is a pity the supplied busbars are not slightly longer, that way you could connect the cells in either direction. The inside of the slots to connect the cells side by side and the outside of the slots to connect length ways!
(Maybe a suggestion for AMY)
I highly recommend using stud and locknut no matter what, you ensure you have full thread engagement. You want as much as you can get with these small aluminum threads. Still need to be careful to not tighten too much.I ordered my xuba cells with double busbars.
My question is this, if you double up the busbars and add a BMS/balance lead, do you need to replace the supplied screws with slightly longer ones or will they still have enough threads in contact? I'm assuming you do not need to use a locking washer as well?
These are long enough for double bar and balance lead:

McMaster-Carr
McMaster-Carr is the complete source for your plant with over 595,000 products. 98% of products ordered ship from stock and deliver same or next day.
McMaster-Carr
McMaster-Carr is the complete source for your plant with over 595,000 products. 98% of products ordered ship from stock and deliver same or next day.
Yeah, I agree. I also decided to use some red thread locker on the studs. Was going to use blue but I don't want to worry about the nut turning the stud when I tighten it. Also I got my hardware from Amazon.I highly recommend using stud and locknut no matter what, you ensure you have full thread engagement. You want as much as you can get with these small aluminum threads. Still need to be careful to not tighten too much.
These are long enough for double bar and balance lead:
McMaster-Carr
McMaster-Carr is the complete source for your plant with over 595,000 products. 98% of products ordered ship from stock and deliver same or next day.www.mcmaster.com
McMaster-Carr
McMaster-Carr is the complete source for your plant with over 595,000 products. 98% of products ordered ship from stock and deliver same or next day.
I bought 20mm grub screws. Plenty long enough for me.
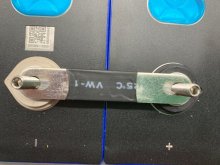
Yes, the bus bars you can blame on EVE rather than Xuba. That's what the manufacturer sends with them. They are supposed to be plated copper.Cells all tested within .006 of one another at:
1 3.293 2 3.299 3 3.296 4 3.299 5 3.298 6 3.296 7 3.296 8 3.298
All cells in good repair, all packaging excellent. Bus bars not what I'd hoped for, but otherwise nicely done Xuba.
Similar threads
- Replies
- 4
- Views
- 242
- Replies
- 58
- Views
- 2K
- Replies
- 2
- Views
- 366